
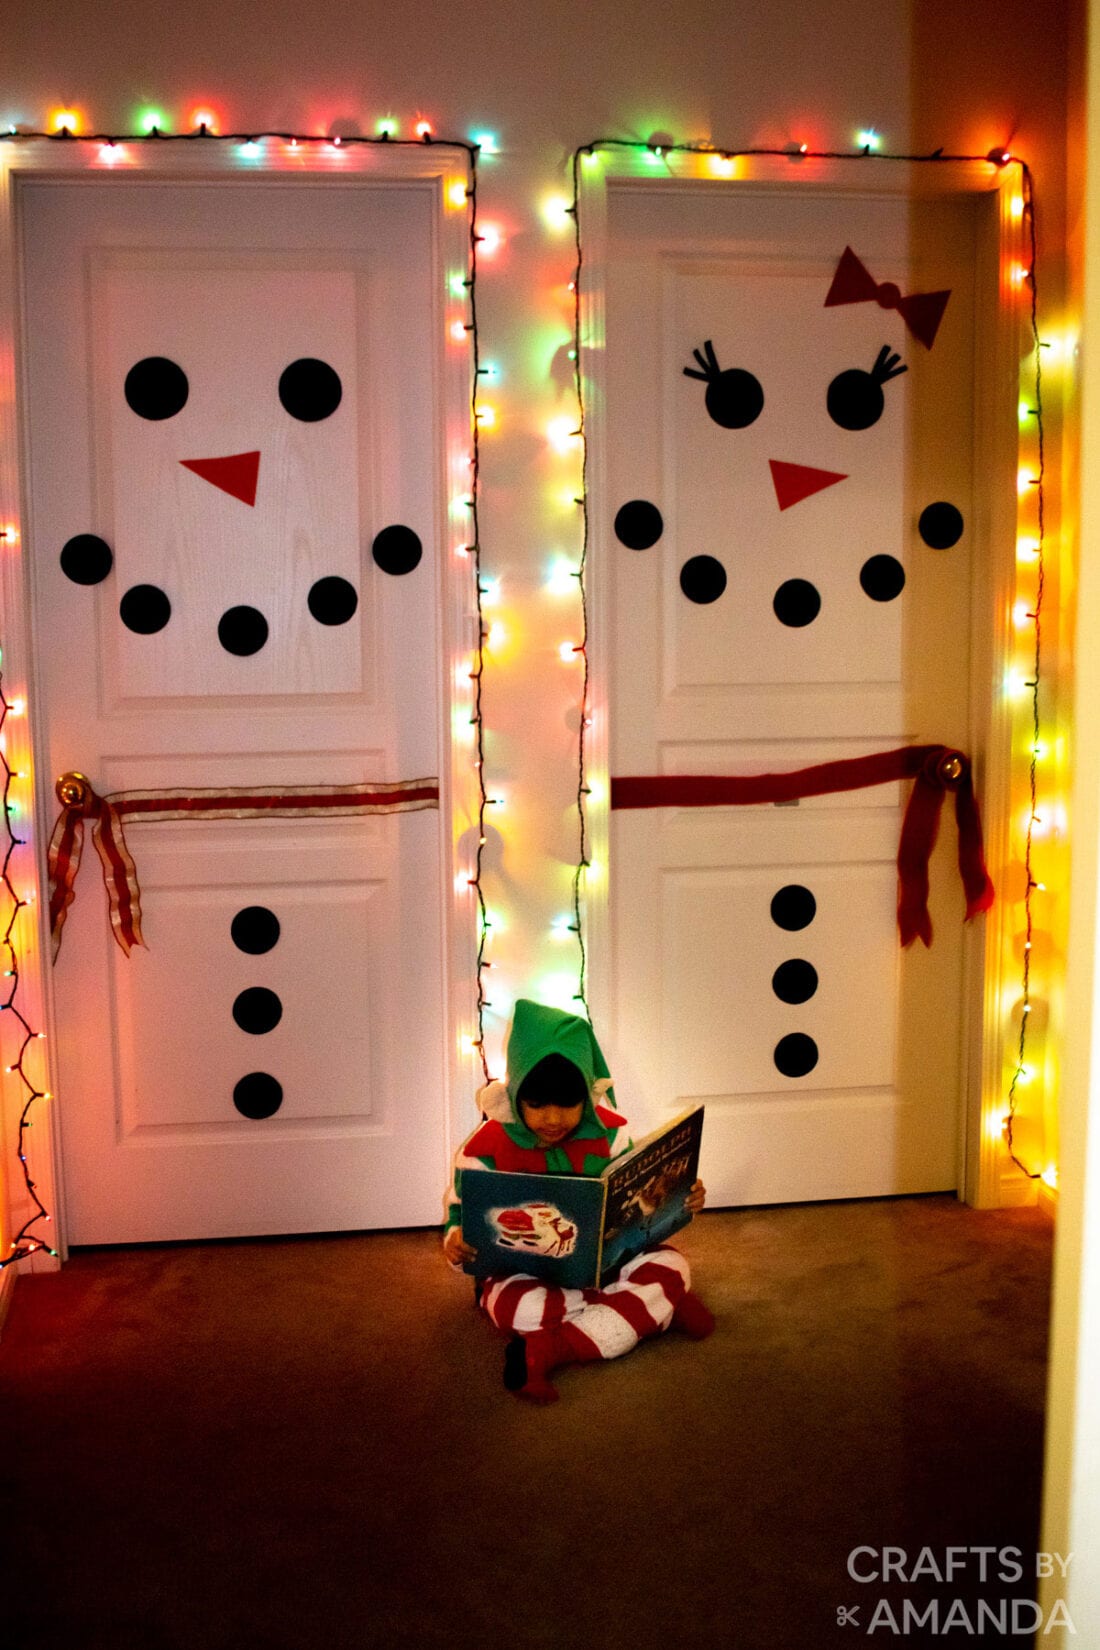
Need an inexpensive and fast way to decorate for the holidays? Make a snowman door (or snow woman!) from just a couple simple supplies. So cute and the kids can do most of this project themselves!
Why we love this project
I mean, how could you not love this project!? These snowman doors are super easy to put together and take just minutes. The kids will love them, as will the kid inside you!
The supplies are simple and inexpensive, and when the season is over you can carefully remove them and save them for next year!
If you love snowmen, this DIY snowman gum is the perfect last minute stocking stuffer.
Helpful Project Information:
- Age Level: 6 and up
- Mess Factor: Low
- Level of Difficulty: Easy
- Time to Complete: Less than 30 minutes
- Cost Estimate: Less than $5.00
Craft supplies you will need
How to a Make a Snowman Door
These step by step photos and instructions are here to help you visualize how to make this project. Please scroll down to simply print out the instructions!
Preparing the Pieces
These instructions are for TWO doors.
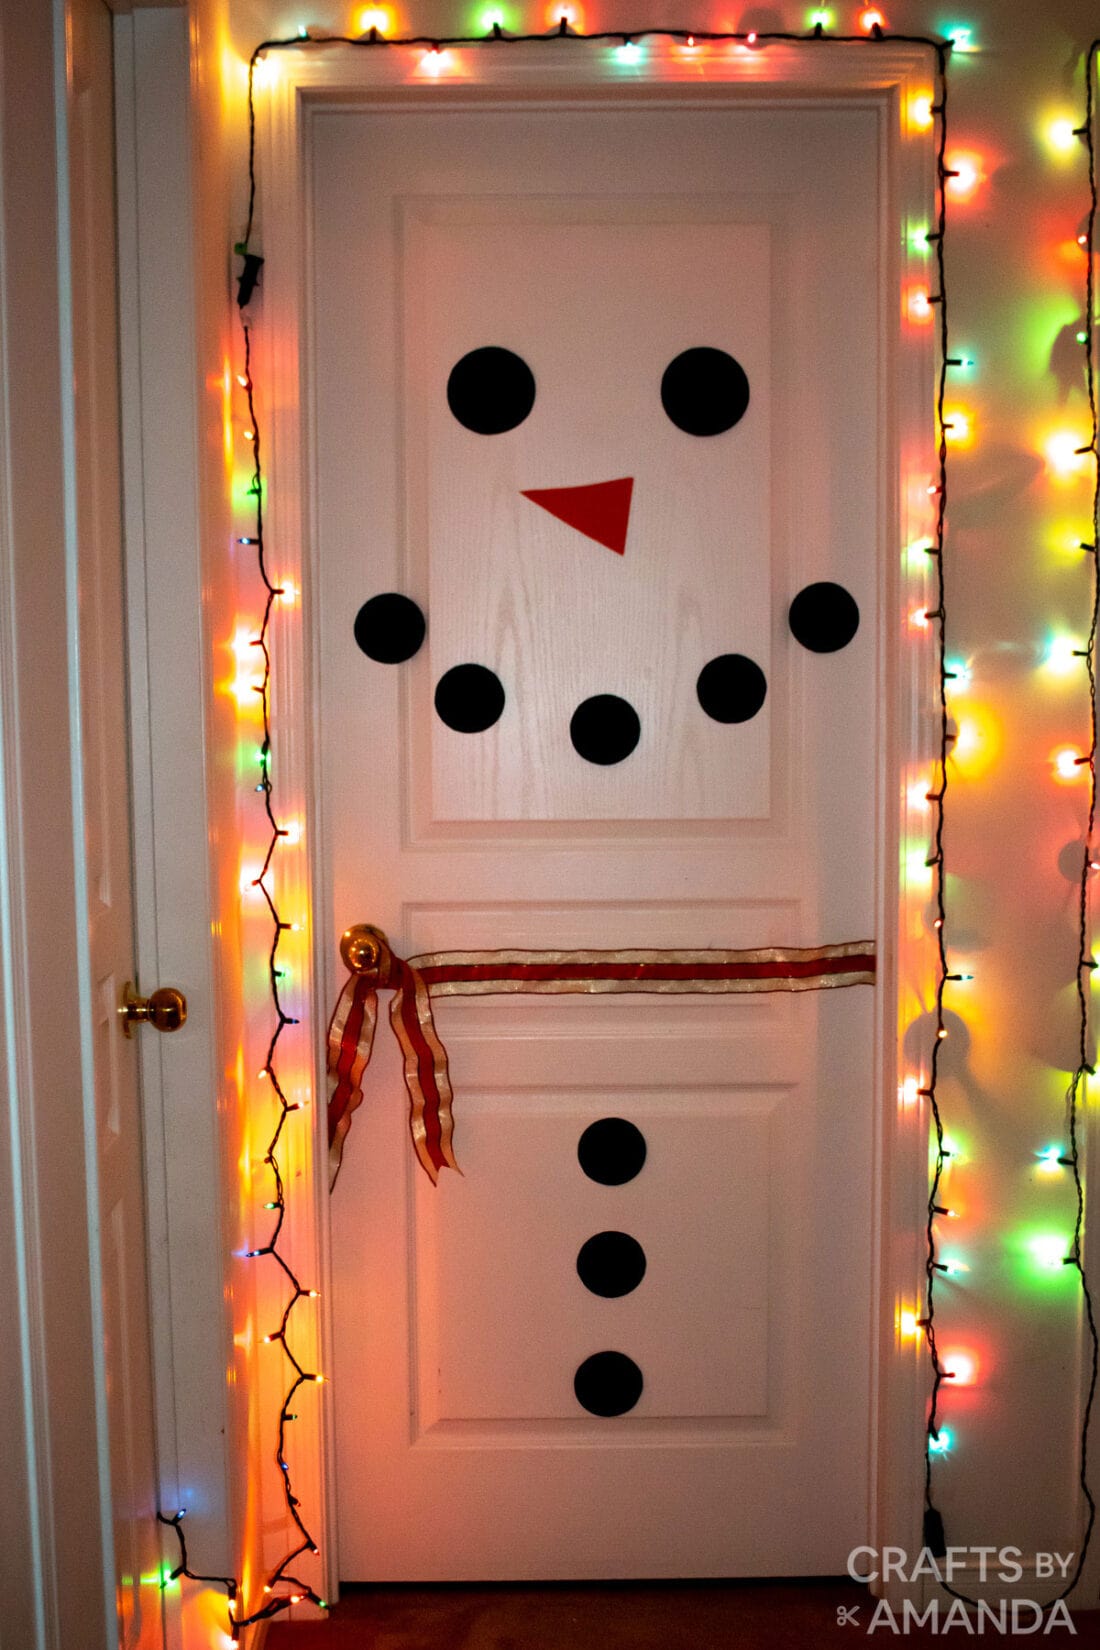
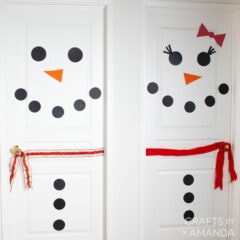
- Cut (8) 3.5-inch circles from black card stock for the buttons and smiles. We used a small bowl to trace the circles.
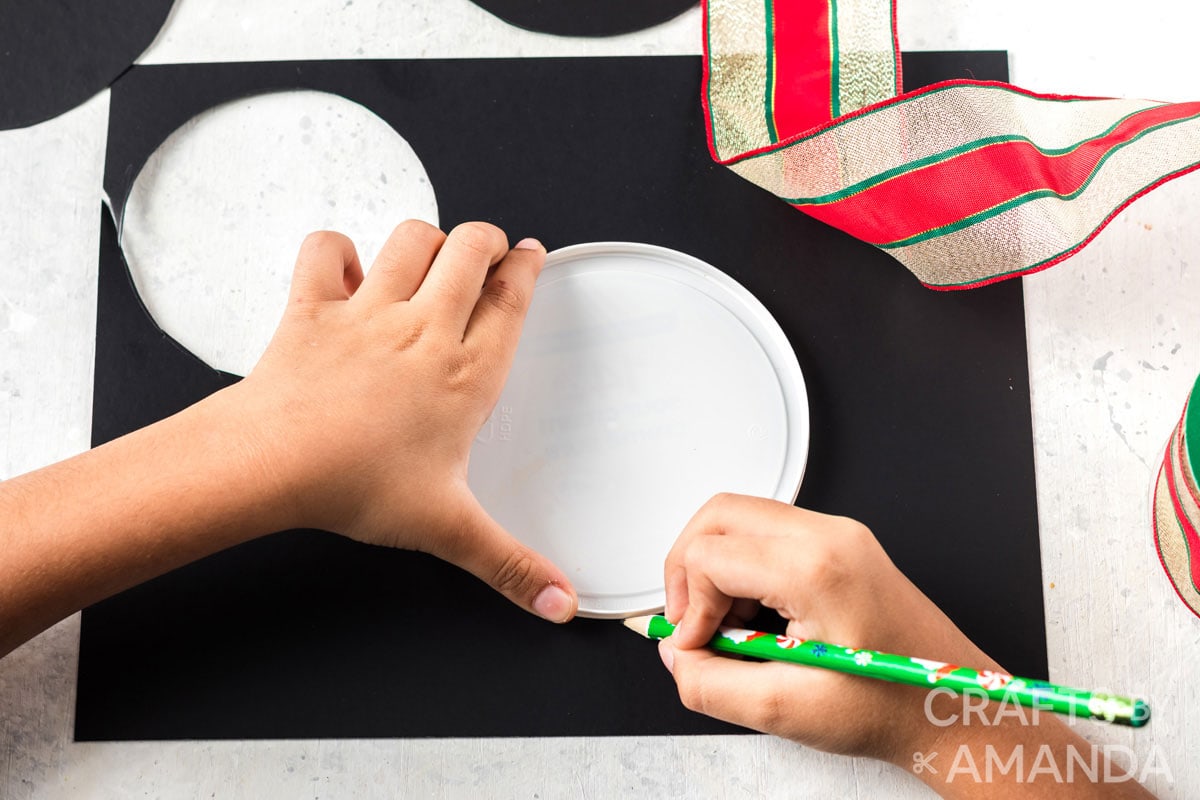
- Cut (4) 4.5-inch circles from black card stock for the eyes. We used the lid from a sour cream container to trace the circles.

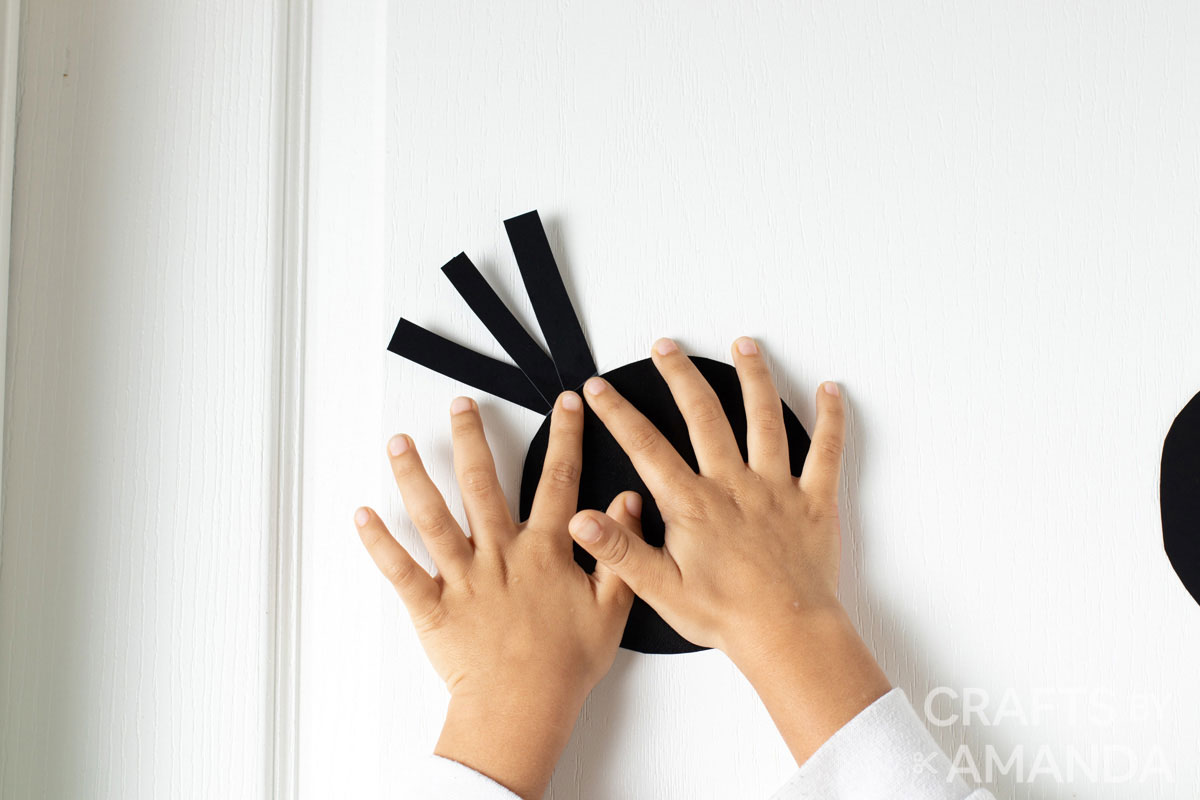
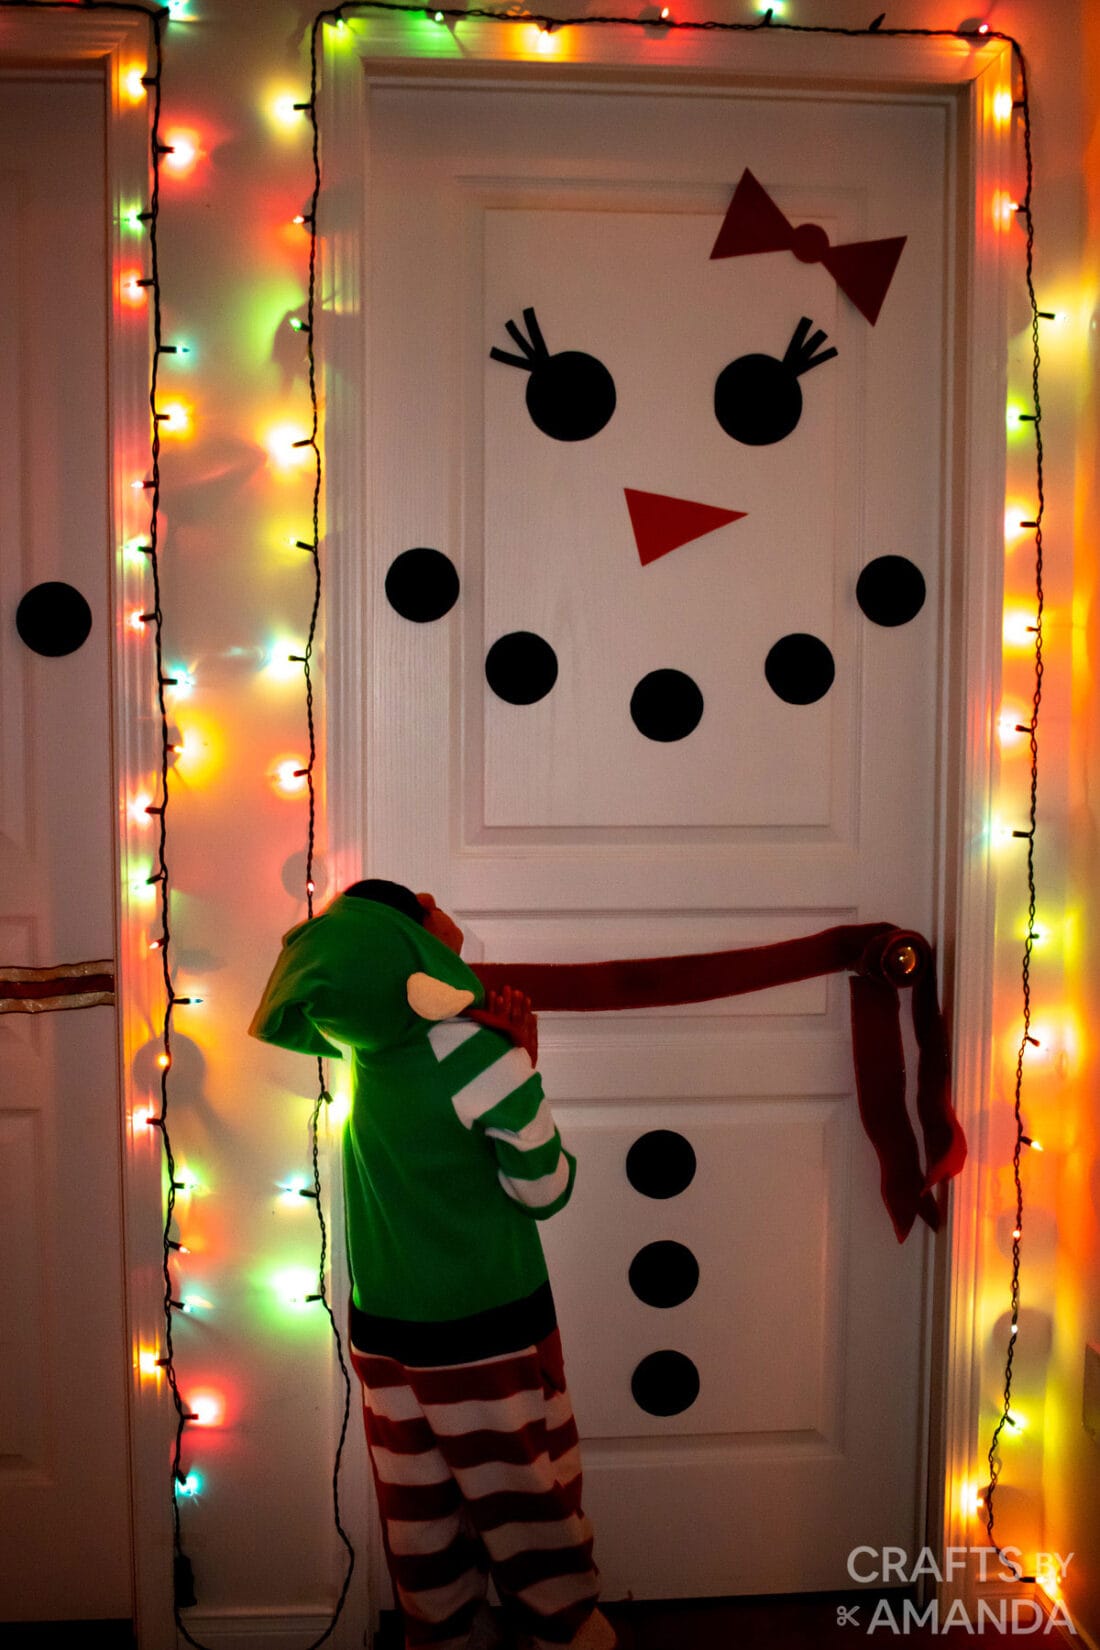
- Cut out (6) half-inch x 3-inch rectangle strips from black card stock for the eyelashes for the snow woman.
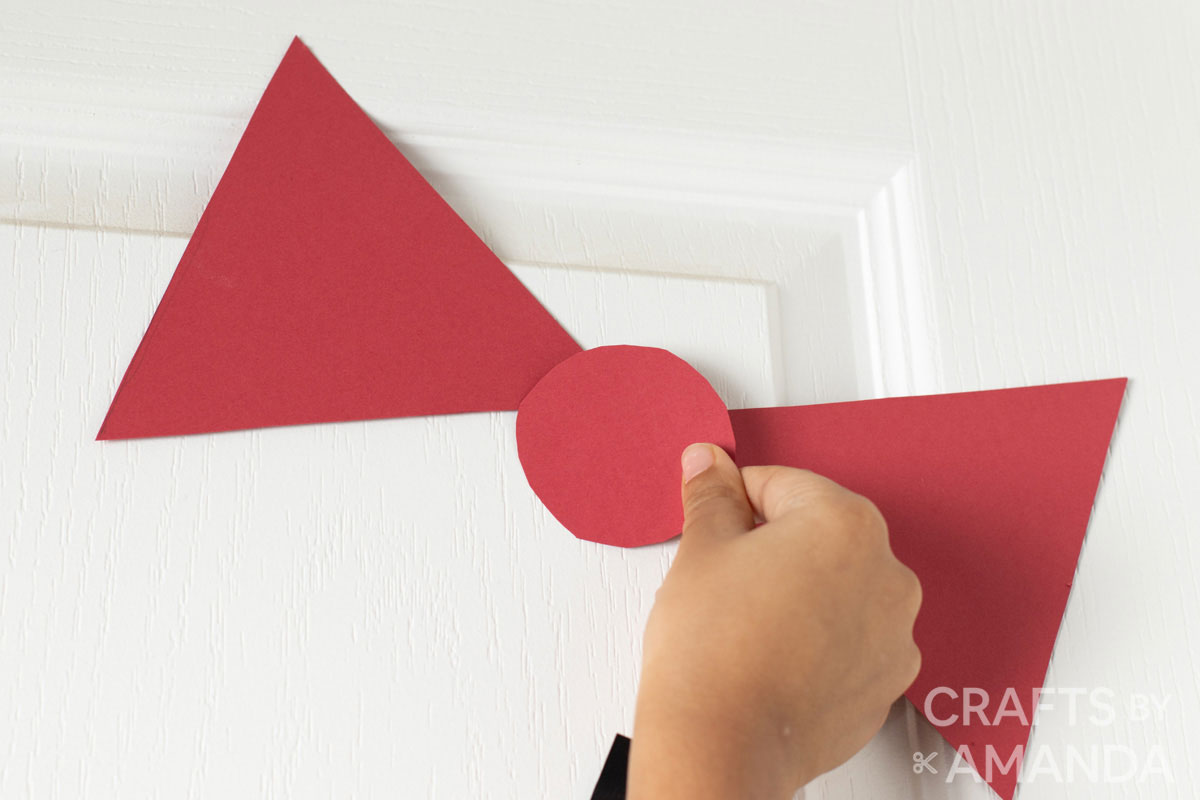
- Cut out (2) triangles from red card stock with a 5-inch base and 5 inches long for the snow women’s bow.
- Cut out (1) 2-inch circle from red card stock for the center of the bow.
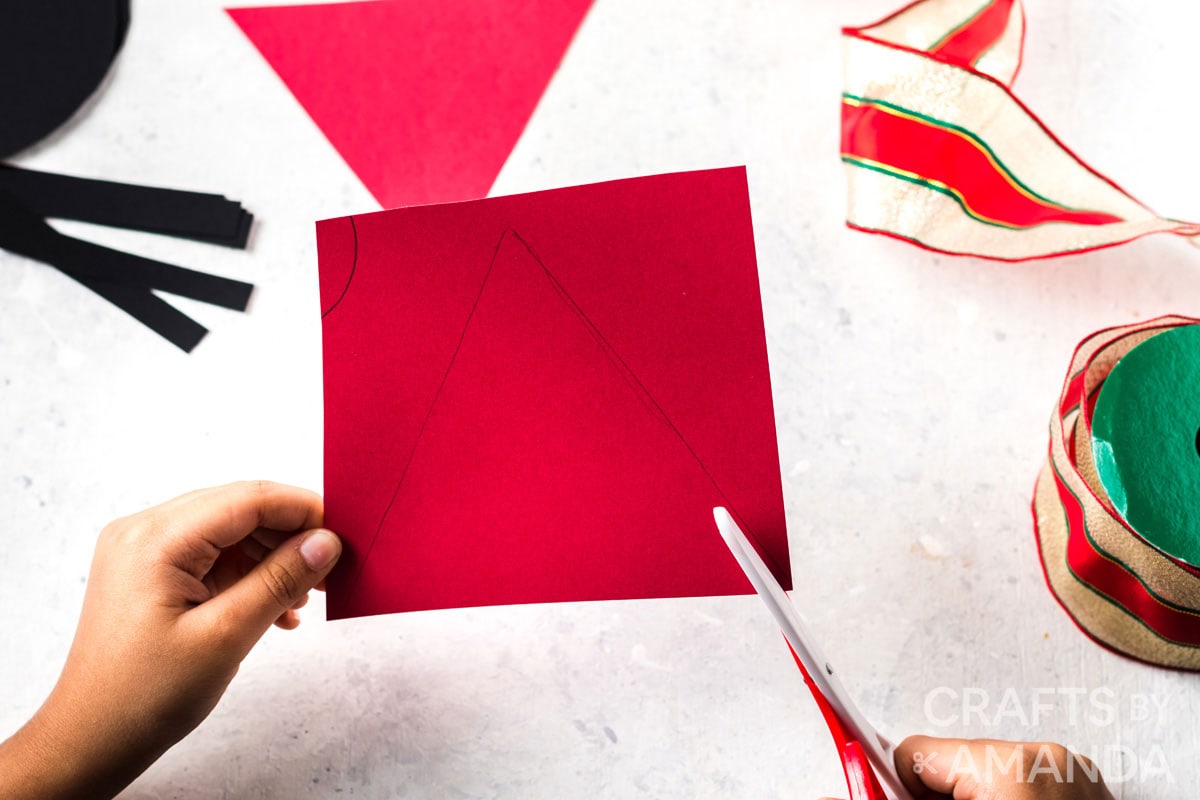
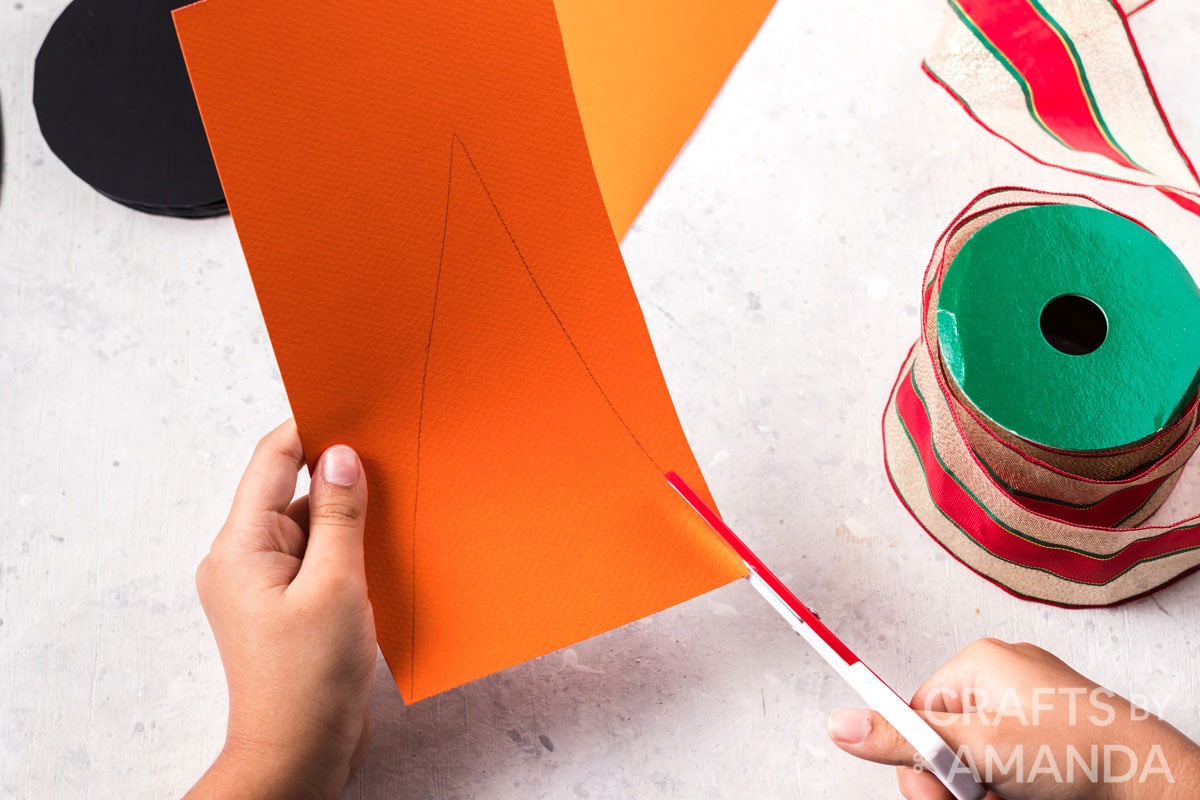
- Cut out 2 triangles with a 4-inch base that extends 6 inches long from orange card stock for the carrot noses.
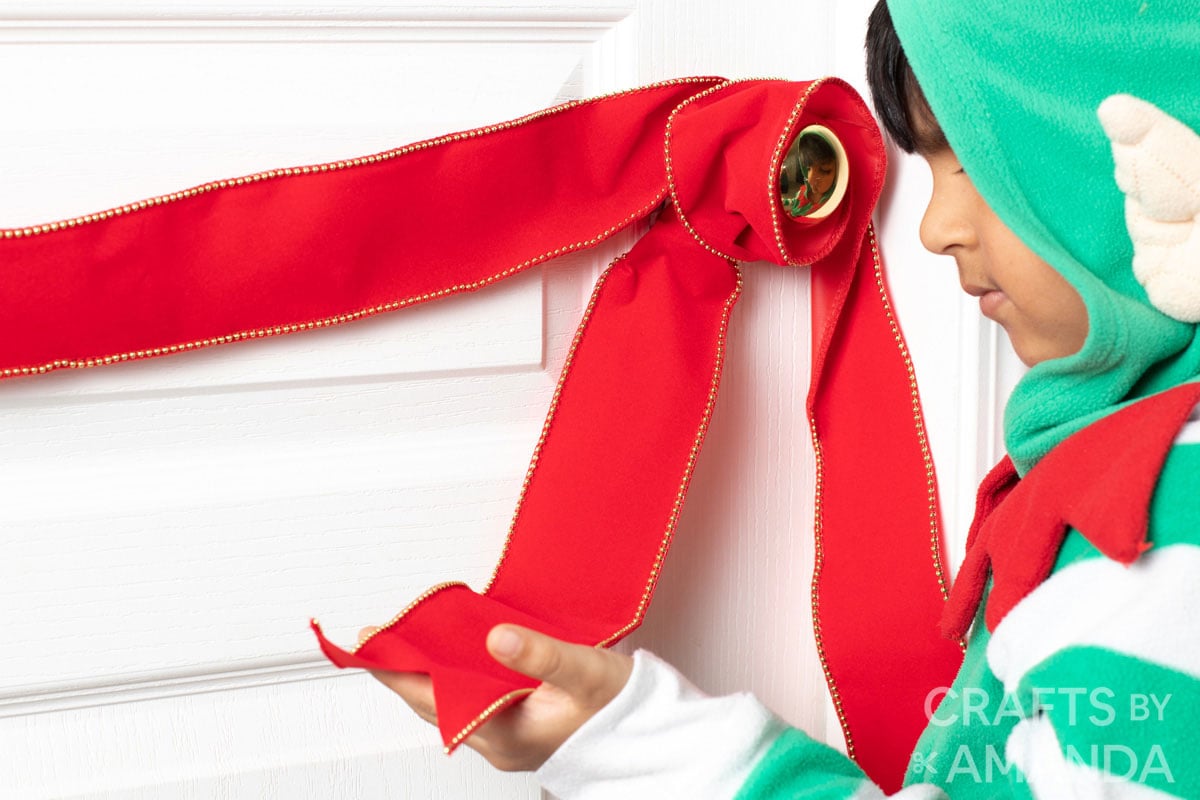
- When assembling the door you will cut out the ribbon pieces for the scarf.
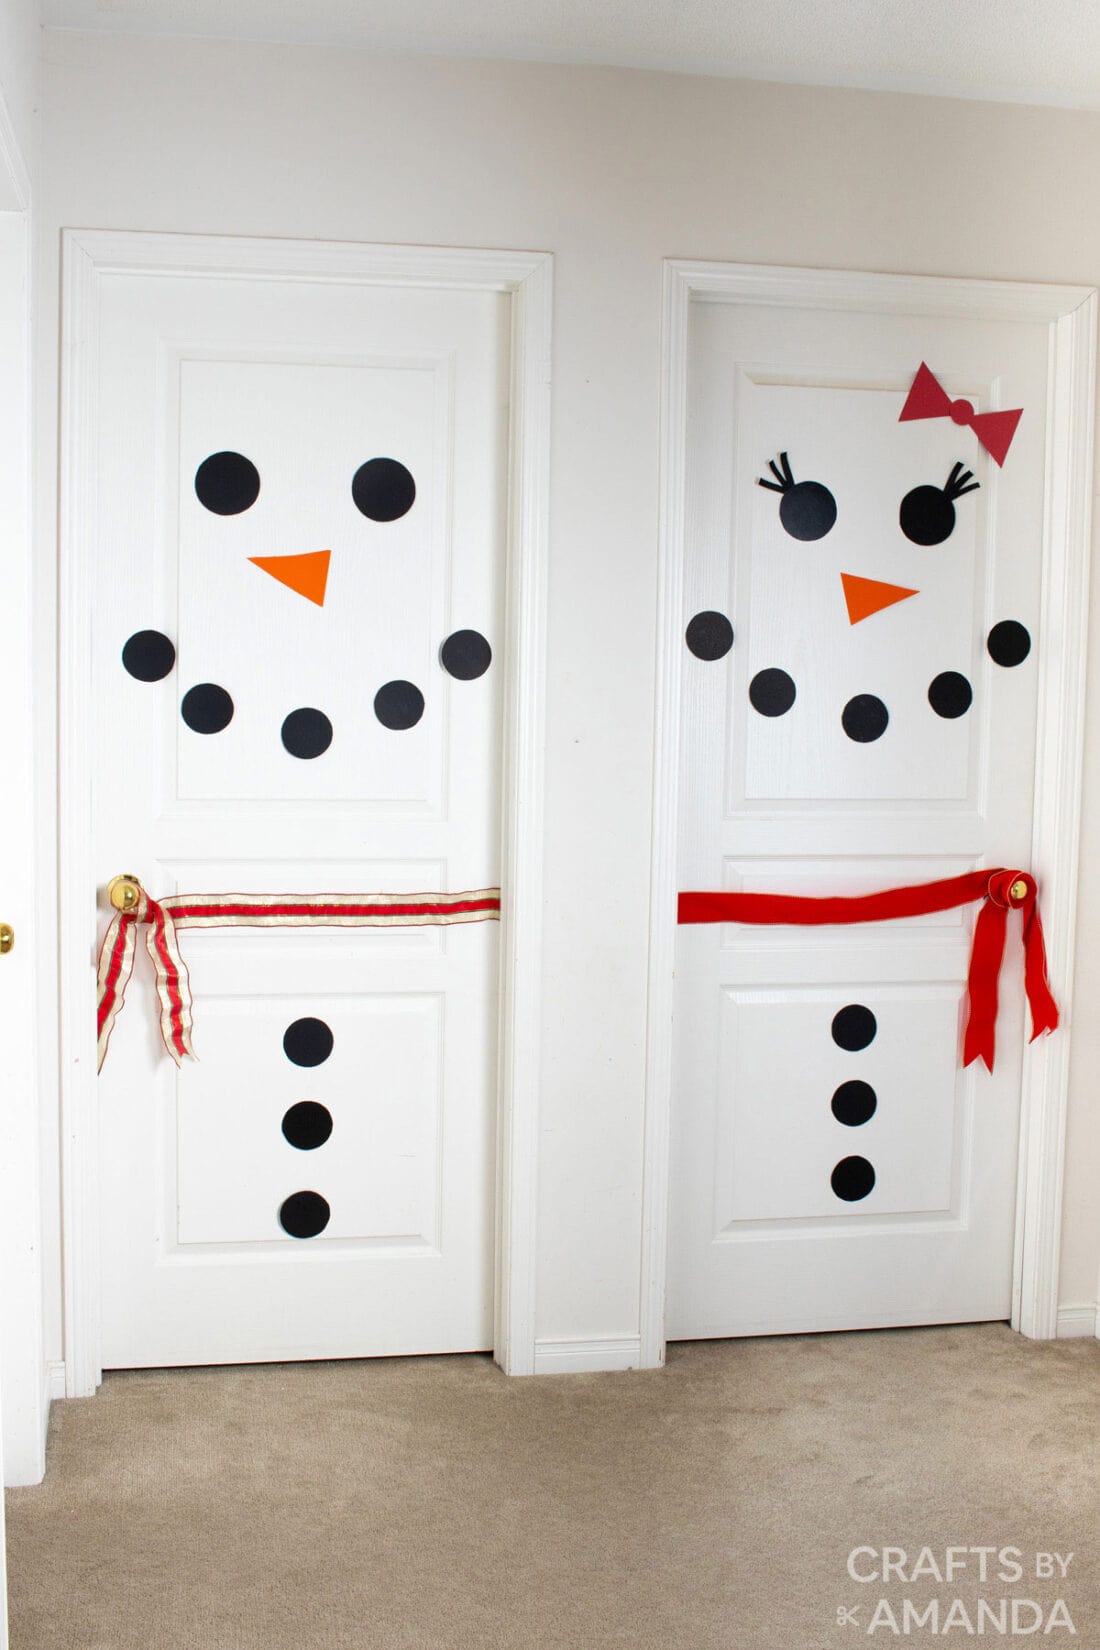
Assembling the Snowman Door
- Using a low tack tape, create a loop and stick to the back of the large black circles for the eyes and place them at the top of the door. Repeat for the second door. For the snow women door add 3 eyelashes to the corner of each eye and slightly curl the ends if desired.
- Next, add tape to the bake of the carrot nose pieces and attach just below the eyes. Repeat for the other door.
- For the snow woman door, attach the 2 red triangles above one of the eyes at the corner and add the small red circle to form the bow.
- Next, attach one of the smaller circles centered underneath the carrot nose and space out the rest of the circles to form a smile. Repeat for the other door.
- On the lower third of the door attach the 3 remaining circles to form the buttons, use the nose and middle smile circle as a guide to line them up.
- Line up the ribbon with the doorknob at the center of the door. Tape ribbon to the corner of the door. Wrap the end around the doorknob and determine the desired length for the scarf tails. Cut the ribbon and attach another piece of ribbon the same length and tape under the doorknob to form a second tail for the scarf.
- If desired attach Christmas lights with tape around door frame.
Expert Crafting Tips
- Use whatever ribbon color makes you happy, however I do suggest using the wired ribbon. It makes it easier to position your ribbon the way you want it.
- Instead of black for the buttons, try a different color like light blue or green, and draw two dots in the center to resemble real buttons!
These adorable snowman doors are super easy to put together and a fun family project for a snowy afternoon.
More Holiday Decor Ideas
I love to create and share my projects with you! I know it’s hard to remember to come back and search, so I’ve made it easy for you with my weekly newsletter! You can subscribe for free and I’ll send you fun crafts and delicious recipes every week right to your email.
Snowman Door
Supplies
- Black card stock
- Orange card stock
- Red card stock
- Wide wired ribbon
- String lights optional
Craft tools
- Small bowl, cup or round lid
- Low tack tape
Instructions
Prepping the Pieces
- Cut (8) 3.5-inch circles from black card stock for the buttons and smiles. We used a small bowl to trace the circles.
- Cut (4) 4.5-inch circles from black card stock for the eyes. We used the lid from a sour cream container to trace the circles.
- Cut out (6) half-inch x 3-inch rectangle strips from black card stock for the eyelashes for the snow woman.
- Cut out (2) triangles from red card stock with a 5-inch base and 5 inches long for the snow women’s bow.
- Cut out (1) 2-inch circle from red card stock for the center of the bow.
- Cut out 2 triangles with a 4-inch base that extends 6 inches long from orange card stock for the carrot noses.
- When assembling the door you will cut out the ribbon pieces for the scarf.
Assembling the Snowman
- Using a low tack tape create a loop and stick to the back of the large black circles for the eyes and place them at the top of the door. Repeat for the second door. For the snow women door add 3 eyelashes to the corner of each eye and slightly curl the ends if desired.
- Next, add tape to the bake of the carrot nose pieces and attach just below the eyes. Repeat for the other door.
- For the snow woman door attach the 2 red triangles above one of the eyes at the corner and add the small red circle to form the bow.
- Next, attach one of the smaller circles centered underneath the carrot nose and space out the rest of the circles to form a smile. Repeat for the other door.
- On the lower third of the door attach the 3 remaining circles to form the buttons, use the nose and middle smile circle as a guide to line them up.
- Line up the ribbon with the doorknob at the center of the door. Tape ribbon to the corner of the door. Wrap the end around the doorknob and determine the desired length for the scarf tails. Cut the ribbon and attach another piece of ribbon the same length and tape under the doorknob to form a second tail for the scarf.
- If desired attach Christmas lights with tape around door frame.
Expert Tips & FAQs
- Use whatever ribbon color makes you happy, however I do suggest using the wired ribbon. It makes it easier to position your ribbon the way you want it.
- Instead of block for the buttons, try a different color like light blue or green, and draw two dots in the center to resemble real buttons!
- Bottle Cap Flower - April 2, 2024
- 7 Cool Ways to Decorate Easter Eggs - March 19, 2024
- Cardboard Tube Lambs - March 12, 2024


Trina says
Can’t wait to try this with my grandchildren. Instead of card stock we may use felt or foam.
Vanessa says
These look really cool and are easy to make. You made a small error on the number of circles needed for the smiles and buttons for “These instructions are for TWO doors”. All of your instructions are correct for 2 doors, beside “Prepping the Pieces” in #1 directions . The directions say( 8 )circles when it requires 16 circles for 2 doors , if going by your pictures. My doors came out so cute.
Beverly says
Used this idea for my mom’s apartment door in Assisted Living community. It turned out great and everyone is loving it! Thank you for sharing!!
Rosie says
I’ve the snowman doors great ideaL
judy krebsbach says
I think you inadvertently made an error on the number of circles needed for the smiles and buttons for 2 doors. The directions say 8 circles when it looks like you would need 16 circles for 2 doors. i can’t wait for the holiday season to put mine up.
Amanda Formaro says
Sorry for the confusion. The instructions are for one door :)