Snowman Felt Board
An easy snowman felt board leaves tons of room for imagination by swapping out its accessories! Simply cut out shapes from felt and watch the creativity flow.
Supplies
- 8x10 cardboard the back of a writing pad works great
- Felt in light blue, white, green, and various other colors
- Black and pink Sharpies
- White craft glue
Instructions
- Cover the cardboard with white craft glue and spread it into an even layer using your finger. Be sure that all of the cardboard is covered.
- Cover a little more than half of the cardboard with light blue felt for the sky. Cover the bottom section with white felt, overlapping the blue by about ½". Do not glue down the overlap.
- Cut out two sections of triangle trees from green felt. These can be inserted into the white felt "pocket" that overlaps the blue felt. This way the trees can be moved and your snowman can be repositioned. Cut out clouds from white felt.
- Cut out snowman shape from white felt, cut another and glue them together. This will make your snowman a bit sturdier.
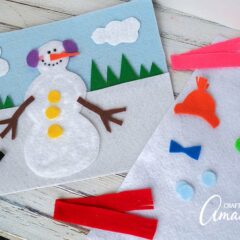
- Cut noses from orange felt, stick arms from brown felt, and accessories from various other colors. You can make a top hat, stocking cap, ear muffs, scarves, mittens (not shown), a bow tie and buttons.
- Draw facial features on with black and pink Sharpies (hint: place a hat and scarf in place before drawing to be sure you have enough room).
- Kids will be able to make various different snowmen by dressing them in different accessories!