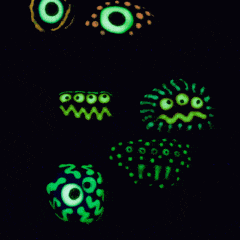
Glow in the Dark Monster Rocks
Cute by day and spooky by night - these glow in the dark monster rocks are a fun and creative way to paint rocks for Halloween!
Supplies
- Rocks
- Tulip Glow in the Dark dimensional fabric paint
- Acrylic craft paint in your choice of colors
- Paint brush
- Black marker
- Black fine point pen or marker
Instructions
- First off, if you are using rocks you found outside, be sure they have been washed and dried and are completely free of dirt.
- This first step is actually optional. My rocks were very dark, almost black. So I chose to give them a couple coats of white paint first. You don't have to do this, but if you don't you may end up adding more color coats to cover the dark rocks.
- Paint each rock in desired color. Let them dry then add a second coat. Let them dry completely.
- Use the "natural" glow in the dark paint to add eyes and teeth.
- You will need to prop up your rocks on something that will keep the glow in the dark paint from dripping before it dries. Just make sure the surface is level with the horizon.
- At this point you can begin adding designs with the different colors of glow in the dark paint. Try polka dots, stripes and squiggly lines. If you make a mistake you can carefully wipe it off with a Q-tip and start again.
- Here's the hard part, you will need to let these dry overnight. It may even take longer depending on the thickness of your application. Once the glow in the dark paint is dry enough that it has a solid surface, use a black marker to add the eyeballs. You can also use a fine point marker (I use these micron pens for my craft projects) to draw carefully along the edges of the glow paint mouths so that the rocks look good in the daytime as well.
- Finally, charge your glow in the dark paint using a UV light or black light. Then turn out the lights to see your cool glow in the dark monster rocks!