Vintage Crackled Flower Pot
Supplies
- Clay pot
- Scrapbook papers
- Decoupage medium
- One-Step Crackle
- Antiquing gel
- Dark brown paint
- Soft cloth
- UV Protectant sealer spray
Instructions
- Cut paper into strips 4-inches wide. Use a large paintbrush to brush the decoupage medium onto the pot, just in a section big enough for one of your paper strips. Paint the back of the paper with decoupage as well and apply to the pot, carefully smoothing it out to remove any air bubbles. Repeat until the pot is covered.
- Choose a different patterned paper for the pot's rim. This particular paper was heavier so I cut it into 5-inch lengths and made slits ever inch or so along the edges to make it easier to apply around the top and bottom of the rim. Use decoupage medium as above to apply to pot. Add a generous (but not dripping) coat of decoupage medium over the entire pot and let it dry for at least two hours.
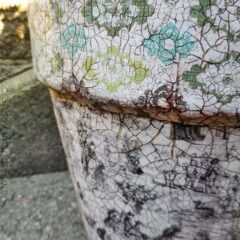
- Apply One-Step Crackle. The trick to this product is NOT overworking it. In fact, you'll want to try to apply in one stroke if you can, but definitely no more than two or it may not work. The thicker the amount you apply, the larger the cracks will be. I wanted larger cracks so I chose to use a generous amount. You want to allow this to dry for 3-4 hours, but overnight is best. You should begin to see cracking after a couple of hours.
- Mix staining/antiquing medium with brown acrylic craft paint according to bottle directions. Use a simple household sponge dampened with all excess water squeezed out. Apply the mixture in sections over the crackling with the sponge. Use a soft cloth to wipe back. This will remove the stain from the surface and leave it in the cracks, making them more visible. If it's not dark enough for your liking, apply it again until it is.
- After you're finished and everything has been allowed to dry thoroughly, apply a UV-Resistant clear coat, I used matte finish. This will make it safe to remain outside in the elements without damaging all of your hard work.