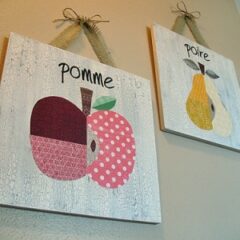
French Fruit Wall Art
Supplies
- 2 pieces of 12″ x 12″ x 3/4″ plywood available at Michael’s
- Crackle medium I used DecoArt Weathered Wood
- Acrylic paint: dark brown and antique white
- Various scrapbook papers in shades of red yellow, green and brown
- Scissors
- Mod Podge matte finish
- Brown cardstock
- Burlap
- Twine
- Hot glue
- 2 thumbtacks
- Scrap cardboard
- Apple pattern
- Pear pattern
- Silhouette pattern or use the font “harrison” in Word
Instructions
- Print the fruit patterns. Use the patterns to cut pieces out of scrapbook paper.
- Paint the plywood brown, paint the sides as well. Allow to dry. When the brown paint is dry, brush on a coat of crackle medium. This will need to dry for a good 30-40 minutes. You don’t want it to dry completely, but almost. ;)
- Load up your brush with antique white paint. You want a good amount of paint on your brush, but it shouldn’t be dripping. Brush on top of crackle medium using single strokes, try not to paint over areas you have already painted. You can quickly touch something up right away, but don’t wait too long.
- If you have a cutting machine, use that and the “harrison” font to cut the words “pomme” and “poire” from brown cardstock. If you don’t have a cutting machine, you could use a sharp craft knife or maybe paint the words on to the board.
- Position the fruit pieces and the words on the board to make sure you have them where you want them. I found the center of the board with a rule and started there, placing the middle of the word in the center and positioning the rest of the word afterward.
- Add the letter first using a little Mod Podge. After the letters are in place, start adding the fruit pieces with Mod Podge.
- Once all the pieces are in place, add a good coat of Mod Podge over the entire project.
- Let them dry completely.
- To add hangers, cut a piece of burlap into a 12-14″ strip, fray the edges by pulling off a couple side strands. Position the fruit art on your work surface facing up, then position your hanger under it, just to figure out how you want it. When you have it the way you want it, tie a piece of twine at the top of the hanger into a bow, trim ends. Use your glue gun to tack the burlap to some pieces of cardboard, and tack the cardboard to the wooden board. Now you can lift the art and turn it over without losing the hanger’s position. Add more hot glue where needed and push thumbtacks into the burlap and cardboard for a little added strength.