Vintage Wall Hanging Redo
Supplies
- old picture to decoupage
- fabric larger than your old picture by 3" all the way around
- plank or other surface to decoupage onto
- sandpaper
- antique white acrylic paint
- antiquing gel
- an old rag
- paintbrush
- sponge applicator
- 18 " x 2" strip of burlap
- 1 " diameter button
- white craft glue I used Elmer's Glue All, it rocks
- scissors
- vinyl letters rub ons, OR black acrylic paint, a font pattern and graphite transfer paper (this is what I did and I will show you how below)
- clear spray sealer
Instructions
- Remove any unwanted surface from your plank. I used sandpaper and lots of elbow grease to remove the ugly boat design on my plaque. If you have a power sander, that rocks, I don't, so my arm does the work.
- Prepare your old picture carefully. For mine, I actually ironed it underneath a piece of cotton fabric to try and remove some of the wrinkles. It worked somewhat, but those wrinkles have been there a long time, so they were pretty stubborn. I was actually worried I wouldn't be able to get rid of them on the final project.
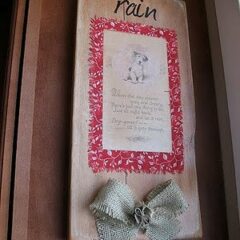
- Paint the plank with a coat of antique white. While that is drying, cut a piece of fabric to border your old picture, I gave mine an approximate 1" border.
- Use the sponge applicator to paint antiquing gel over the white painted surface, working in section. Wipe off excess with an old rag. Continue until you have the look that you want. I did the entire surface once, then I went around to different areas of the wood and added more, making it darker in some spots.
- Before applying the fabric to your plank you'll want to fray the edges. Gently pull the loose threads around the edges of the fabric until you have about 1/4" fray.
- Mix some white glue with water to make your decoupage, or you can use Modge Podge if you like. Decoupage the fabric to the prepared plank by first painting a thin layer of decoupage onto the board (use a clean sponge applicator), then lay the fabric onto the plank and decoupage over it. Use a clean rag to squeeze out the excess (using a squeegee type motion), then use the rag to rub back and forth over the frayed edges to give it a more three dimensional affect. Decoupage your old picture over the top of the fabric. I was able to get all the wrinkles out by starting at the top and working my way downward, smoothing with a rag as I went.
- To add your lettering, you can use rub ons, which I was going to do originally. You can even see them sitting in one of the photos above. However, I just didn't like the font or the size of the lettering, it really just didn't match. So instead, I typed the word "rain" into my Word program several time, changing the font of each one. I printed out the paper, cut each one out and placed them onto the board to see which one I liked best. Once I had decided on one, I used a piece of graphite transfer paper to transfer the font pattern onto the plank.
- Next I used a fine point paintbrush and black acrylic paint to paint the letters. After the letters dry, use a piece of sandpaper to rough up all the edges of the plank. Dust off the surface, then spray with sealer and let dry.
- Make a bow out of the burlap strip. I also frayed the edges of the burlap, then I used one of the burlap strings, threaded it through the button, and tied a small bow in the front of the button. Sew the button onto the front of the bow, then glue the bow to the bottom of the plank. Let dry and hang!