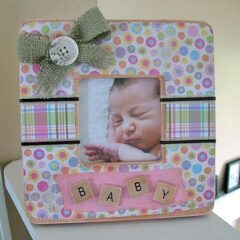
Baby Frame and Love Blocks
Supplies
- square wooden frame
- decorative paper two different patterns, I used circles and checks
- pink paper
- 3/4 " wide baby green ribbon
- 1/4 " wide brown ribbon
- 12 " x 1" strip of burlap
- 1 " wide button
- white thread and needle
- alphabet tiles to spell out "BABY"
- white craft glue
- paintbrush
- water
- scissors
- brown paint antiquing gel is better if you have it!
- sandpaper
Instructions
- Make a photocopy of the frame, cut out the copy of the frame to use as a pattern. Trace the pattern onto the patterned paper you want to be the main background (I chose the circles).
- Cut out the patterned paper frame, then cut off about 1/4" all the way around the outside and the inside of the frame shape.
- Next, position the paper frame on top of the wooden frame. Eyeball it, then trim where needed. Mix some white craft glue and water, equal parts of each, in a bowl to make your decoupage mixture. Using a paintbrush. decoupage the paper frame onto the wood frame, smooth out any bubbles or air pockets as you go. Cut two pieces of checkered paper, about 2" in height and the same width as the side of the frame. Position in the center on each side and decoupage on.
- Tear a strip of pink paper to fit at the bottom of the frame and decoupage in place. If you have stain, or better yet, antiquing gel, use that (I only had brown paint, so I watered it down and worked with what I had) to give the paper an aged look. If using watered down paint, be sure to have a rag handy to wipe excess off as you work. Rough up all the edges with sandpaper.
- Paint the alphabet tiles with thinned brown paint and wipe off excess. Sand all the edges with sandpaper. Glue the alphabet tiles to the pink paper.
- Glue the green ribbon at the top and bottom of the checkered paper, wrapping around to the back and to the inside of the frame. Glue the brown ribbon to the center of the green ribbon.
- Tie the strip of burlap into a bow. Sew button to the center of the bow, trim ends of bow if needed and make the edges ragged by pulling off a few threads. Glue the bow to the top left corner of the frame.