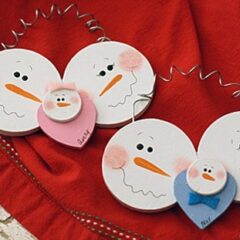
Baby’s First Christmas Snowman Ornament
Supplies
- 2 2-3/8 x 1/4 inch wooden discs
- 1 1- inch wooden disc
- 1 1-1/2- inch wooden heart
- Felt white and blue or pink
- Black micron fine point pen
- Craft wire
- Wire cutters
- White craft glue
- Hot glue gun
- Paintbrushes
- Scissors
Americana paint:
- White
- Black
- Bright Orange
- Spice Pink
- Baby Pink or Baby Blue
- StarLite Varnish
Instructions
- Paint the two large discs and the small disc white. Paint the heart Baby Blue or Baby Pink.
- Glue the small white disc to the top of the heart. About 1/3 of the disc should be above the top of the heart.
- Cut a bow from either light blue or pink felt. For a girl, glue it to the top of the small white disc (hair bow). For a boy, glue it underneath the small white disc (bow tie).
- Glue the two large discs together, side by side. Place the "baby" over the two white discs but do not glue in place. Use a pencil to very lightly dot where the eyes should be on the large discs and the beginning and ending points of the carrot nose. Remove the baby.
- Dip the handle end of a paintbrush into black paint and dot on the eyes (on the two large discs). Use a long liner brusher dipped in Bright Orange to add the carrot noses. Use a scruffy brush dipped in Pink Spice (dab off excess on paper towel) to pounce on the cheeks. You can soften the pink cheeks by pouncing on a little white over the top as well. Use a fine point black pen to add eyebrows and a smile.
- For the baby's eyes, use a toothpick that has had the point snipped off. Dip it in black paint and add the eyes. Follow the same procedure as the larger discs to add remaining facial features.
- If desired, use fine tip pen to add baby's name to the bottom of the heart. Glue the baby to the parents and let dry.
- When everything is completely dry, turn the ornament over. Trim a piece of wire about 10-inches long. Wrap it around the handle of a paintbrush to create the coil and stretch out the ends.
- Use hot glue to attach the hanger to the back of the ornament. Cut circles, slightly smaller than your large discs, from white felt. Use whet craft glue to cover the back of the ornament with the felt circles.
- To finish, apply a coat of StarLite Varnish and allow to dry completely.
Expert Tips & FAQs
Use white craft glue for the best hold. The hot glue in this project is only used in one step, and that's to add the hanger to the back of the ornament.