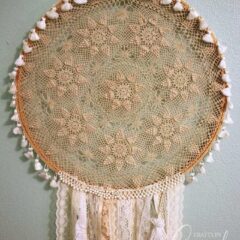
Boho Chic Doily Dreamcatcher
Supplies
- Embroidery hoop mine is 18-inches in diameter
- Doily should be an inch or two smaller than the hoop
- Lace ribbon
- Beads or pearls
- Yarn
- Twine
- Scissors
- Hot glue gun
Optional tools:
- Thumbtack
- Foam core board or cork board
- Glue gun finger caps
Instructions
- I suggest using a piece of foam core or cork, something that a thumb tack can be pushed into. This is handy for holding your doily in place while you work.
- Place doily in the center of the core board and push thumb tack into the center (mine is a button thumb tack, not just a button). Place the embroidery hoop over the top of the doily so it’s in the center.
- Gently stretch the doily to the left and the right and glue over the edges of the embroidery hoop.
- Now stretch the top and bottom in the same fashion so that you have glued the top, bottom and both sides.
- Continue stretching the rest of the doily over the embroidery hoop edges until it is completely covered. Remove the thumb tack.
- Place the outer ring of the embroidery hoop over the inner hoop/doily and tighten.
- Choose lace, or in my case some tassel fringe, and glue it around the outer edge of the embroidery hoop.
- Cut lace ribbon into different lengths. Glue strips of lace ribbon from the bottom of the dreamcatcher.
- Using finger caps will protect your fingers from hot glue burns. Use them to glue the ribbon in place and hold it in place until it dries.
- To make tassels, wrap yarn around four fingers several times.
- Slide it off your hand and tie a piece of yarn around the bunch.
- Cut through one side of the loop to crate the fringed tassel.
- Tie the tassel to a piece of twine and glue in in place with the lace ribbon.
- Glue beads or pearls over the ribbon edges along the bottom of the hoop.
- Hang with command strips or by hanging on a nail.