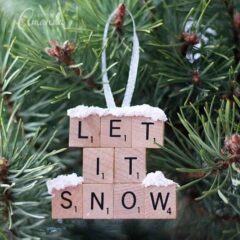
Let it Snow – Scrabble Tile Ornament
Make a "Let It Snow" scrabble tile ornament from scrabble tiles and snow texture paint! A fun Christmas ornament project for kids and adults.
Supplies
- Scrabble tiles that spell "let it snow"
- Snow texture paint
- Ribbon or twine
- Paper plate
- Felt
- White craft glue
Craft tools
Instructions
- On top of a paper plate, line the scrabble tiles up so that they spell "let it snow". Use a pen to trace around the shape of the tiles onto the paper plate (this does not have to be perfect).
- As you can see, you just need a rough outline of the shape of your letters.
- Place paper plate design over the top of your felt and cut the shape out, cutting it smaller than the actual outline by cutting inside the lines by about 1/4-inch. You will be cutting through both the paper plate and the felt. Hint, you can add a drop of glue between the plate and the felt to help keep it together temporarily while you cut.
- Set the felt shape aside to use at the end of the tutorial.
- Your paper plate shape should be large enough to glue the letters to, but small enough that they don't overlap or show from the front of the ornament.
- Apply glue all over the paper plate template then press the letters in place.
- Place something heavy on top of the letters, like a bottle of craft paint, and let them dry for 2-3 hours.
- Cut a piece of ribbon and fold into a loop. Glue the ribbon hanger to the back of the ornament.
- Glue the felt to the back, covering the hanger.
- Apply snow texture paint to the top edges of the letters to make it look like they have freshly fallen snow on them. You can use a palette knife, paintbrush or even your finger. Be sure to wash your hands when you're done! Let the snow texture dry for at least an hour (or as bottle directs).
- Let everything dry before hanging on your tree.