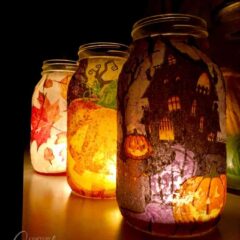
Fall Napkin Luminaries
These fall napkin luminaries are easy to make and look so beautiful in your window, on your mantle, or atop your Thanksgiving table!
Supplies
- Paper napkins
- Mod Podge
- Glass jar
Craft tools
- Large paintbrush
Instructions
- Wash and dry your glass jar.
- Prepare your paper napkins by separating ply (if needed) and cutting out designs.
- Apply a thin coat of Mod Podge to the front of your jar.
- Lay jar on its side with the wet side facing up.
- Place napkin onto the jar, pressing gently from the center outward.
- Apply Mod Podge to the bottom, side edges and rim.
- Using a gentle hand, apply a coat of Mod Podge over the top of the entire napkin.
- Repeat steps on the back side of the jar.
- Allow everything to dry completely (overnight is best) before displaying and adding a candle.
- You can decorate the rim with burlap, ribbon or twine, but this step is completely optional.
Video
Expert Tips & FAQs
- Don't use white glue and water - while this solution does work, it can yellow over time. Mod Podge (and other decoupage mediums) is formulated to prevent yellowing. See our post on How To Choose The Best Glue for Your Craft Projects for more tips!
- Do "prime" your jar first by applying a thin layer of Mod Podge. This will make the glass tacky and will make it easier to apply the napkin.
- Separate double ply napkins if you have them. The ones I used in this tutorial were sturdy one-ply napkins.
- Apply Mod Podge gently and with a light touch over the napkin to avoid ripping it. Remember, decoupage medium is a liquid and napkins are delicate. Using a heavy hand can cause damage to your pretty design!
- When applying the Mod Podge, use a generous amount but not so much that dripping occurs.
- Be sure to allow your finished project to dry completely (overnight is best) before adding a candle and displaying.
- Always store your Mod Podge with a tight-fitting lid and in a cool place out of reach of children.
- Placing your wet decoupage projects onto a wire cooling rack keeps them from sticking to your table!