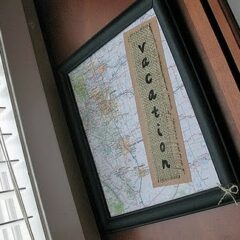
Decorative Framed Map
Supplies
- an old cheap 8x10 frame missing the glass
- page out of a road atlas
- a strip of burlap
- a brown paper grocery bag
- thick piece of cardboard
- scissors
- craft knife
- black paint
- ruler
- pen
- glue stick
- white craft glue
- font file or type your own letters in Word, I used the "Angelina" font
Instructions
- Measure the inside of the frame, then cut your cardboard just slightly smaller than that (by about a centimeter). Decide where you want your map positioned, then use a glue stick to attach the cardboard to the back of it. Turn it over and smooth out any wrinkles or bubbles, making sure your map surface is nice and flat. Turn it back over and glue the excess map to the back of the cardboard.
- Paint the frame with a coat or two of black acrylic craft paint and let it dry. When dry, spray it with an acrylic sealer, gloss or matte, whatever you prefer. You can even use a little bit of white glue mixed with water to add a coat of sealant.
- In order to make the letters, paint a section of the brown grocery bag with black paint. Print out the font file and use a black sharpie marker to trace around the letters, making them bigger. Next, position it over the top of the black section of the bag and trace around the letters using a pen. The indentations will carry through to the bag. Carefully cut the letters out, use a craft knife to get the center of the letters "a" and "o".
- Cut a 7"x2" strip of brown paper bag and a 6" x 2" strip of burlap. Trim the burlap to fit onto the bag strip, pull a bit of the threads out to tatter it a bit. Set at least one long burlap thread aside. Line the bag strip with white craft glue and smooth it with your finger. Attach the burlap to the bag strip. Spread white craft glue onto the back of the letter "v" and press onto the burlap. Repeat for all the letters. Attach the completed strip to the map with white craft glue.
- Insert the completed map into the frame. Tie one of the spare burlap threads into a small bow. Trim the ends and glue to the bottom right corner of the frame.