Paint Chip Clock
Supplies
- an old clock
- paint chips
- sand paper
- crackle medium
- Vintage white acrylic paint
- paintbrushes
- Mod Podge
- antiquing gel
- scrapbook paper
Instructions
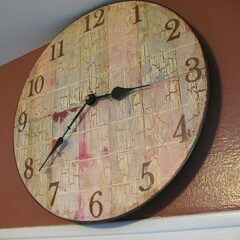
- So I pulled out the clock, removed the mechanism and sanded down the face.
- I laid out the paint chips across the front of the clock to make sure I had enough and that there would be enough to cover. I made sure to alternate the colors as well. I even changed them around a bit after taking this picture, positioning most of the dark colors toward the center. I was careful to keep them in the order that I wanted them as I laid them down on the work surface.
- I pulled out the crackling medium and gave each paint chip a thin coat.
- When the crackle medium dried I added a coat of Vintage White.
- When the paint chips are dry, add a coat of acrylic matte finish spray sealer.
- After the paint chip strips had dried for a while, I started in the middle of the clock and using some Mod Podge and a paintbrush attached them to the clock. I did not Mod Podge the top yet, just the side that attached to the clock.
- After attaching all the paint chips to the clock I let it dry a bit, then turned it over and used a box cutter to trim away the excess. I turned it face up again and trimmed away about an 1/8″ or so from the edge.
- I thinned some antiquing gel with water and applied it with an old rag. I rubbed it on gently then wiped it off. I repeated this step in a few areas until I was happy with the result.
- I just used a piece of scrapbook paper and printed reversed numbers on the back. They have to be reversed so that when you cut them out the colored side of the paper will have the numbers in the right direction.
- I began by adding the numbers 3, 6, 9, and 12 with Mod Podge. I did add Mod Podge over the top of the numbers at this point.
- Once all the numbers were in place, I gave the entire surface a good coat of Mod Podge.
- When it was completely dry, I put the mechanism back on the clock and hung it on the wall!