
This clock is one of my favorite decoupage projects. It’s a paint chip craft taken to a different level. There are some really awesome paint chip projects out there, but I was determined to come up with something a little different. That’s when crackle medium entered the picture and this paint chip clock was born!
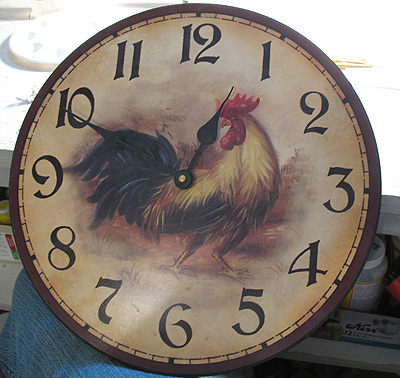
I’ve had this rooster clock for quite a few years. It was one of those clocks you buy on a gift website or in a gift shop. Nothing special, but it was cute. However, it really didn’t fit in my decor anymore so I took it down from the wall and tucked it away in a cabinet in my craft room. Last week I had picked up a bunch of red toned paint chips from WalMart. I knew I wanted to make something with them, I just hadn’t decided what yet. Then one day it just hit me. The clock!
If you want to make one of these or something similar, you will need:
an old clock
paint chips
sand paper![]()
crackle medium
Vintage white acrylic paint![]()
paintbrushes![]()
Mod Podge![]()
antiquing gel![]()
scrapbook paper![]()
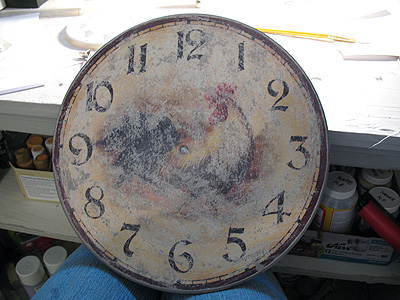
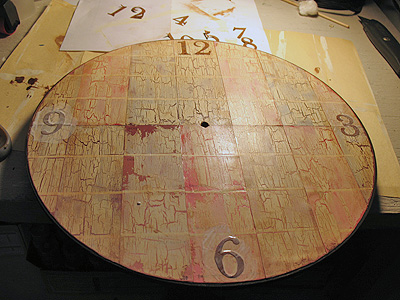
So I pulled out the clock, removed the mechanism and sanded down the face.
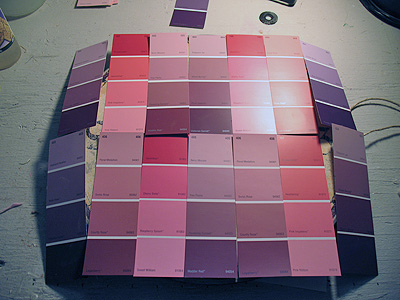
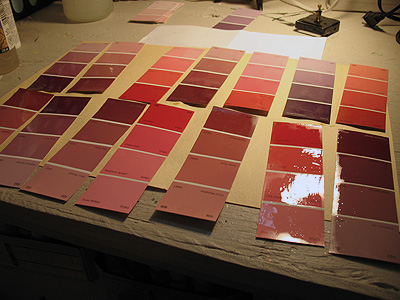
I laid out the paint chips across the front of the clock to make sure I had enough and that there would be enough to cover. I made sure to alternate the colors as well. I even changed them around a bit after taking this picture, positioning most of the dark colors toward the center. I was careful to keep them in the order that I wanted them as I laid them down on the work surface.
I really wanted to do something different. There’s a lot of awesome paint chip art out there, and they are all awesome, but I wanted mine to be a bit more unique. So I pulled out the crackling medium and gave each paint chip a thin coat.
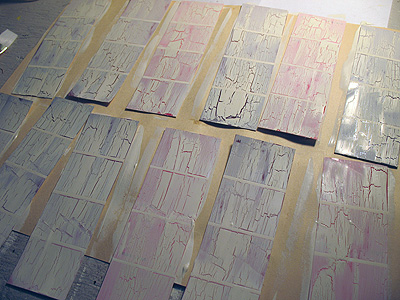
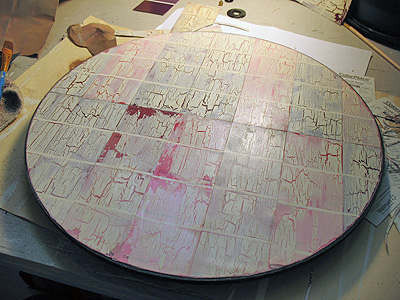
When the crackle medium dried I added a coat of Vintage White. The beauty of this is that you don’t have to paint a base coat because the paint chips serve as the base coat! The crackle medium went to work and started “aging” the finish right away.
When the paint chips are dry, add a coat of acrylic matte finish spray sealer.
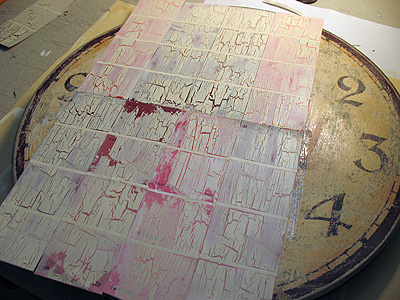
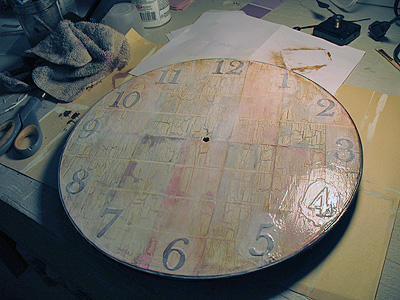
After the paint chip strips had dried for a while, I started in the middle of the clock and using some Mod Podge and a paintbrush attached them to the clock. I did not Mod Podge the top yet, just the side that attached to the clock.
NOTE: You can see where I accidentally removed some of the Vintage White. That was from me trying to smooth the paint chips down on to the Mod Podge. That’s when I realized that I needed to add the spray sealer to the paint chips, to keep the crackled finish from peeling off. It worked out ok, made it look chippy where I made my oops :)
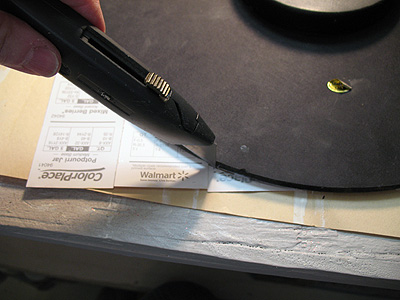
After attaching all the paint chips to the clock I let it dry a bit, then turned it over and used a box cutter to trim away the excess. I turned it face up again and trimmed away about an 1/8″ or so from the edge.
It was looking pretty cool so far, but I thought it needed something else…
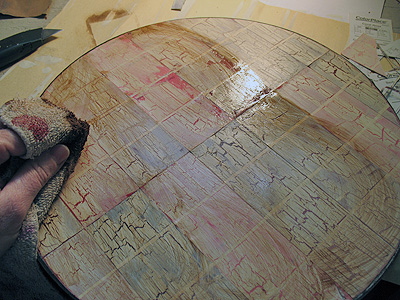
So I thinned some antiquing gel with water and applied it with an old rag. I rubbed it on gently then wiped it off. I repeated this step in a few areas until I was happy with the result. I wasn’t completely sure how this would work since I had to add a coat of sealer to the chips earlier, but it worked like a charm.
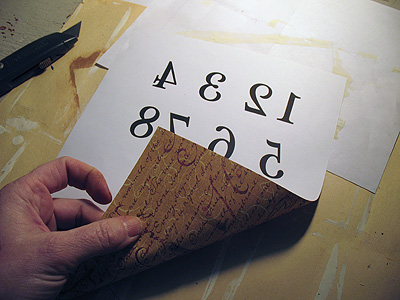
I set the clock aside to dry for a while and went to work on the numbers. Unfortunately there’s something wrong with my Silhouette machine or I would have just cut the numbers with that. But since I couldn’t I just used a piece of scrapbook paper and printed reversed numbers on the back. They have to be reversed so that when you cut them out the colored side of the paper will have the numbers in the right direction.
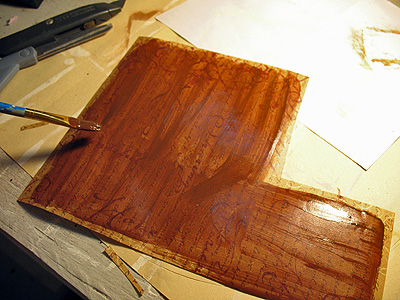
After cutting out one of the numbers I realized that the numbers were blending with the clock colors rather than standing out. Easy fix! I pulled out the antiquing gel and used it to make the scrapbook paper darker. Paint on, wipe off.
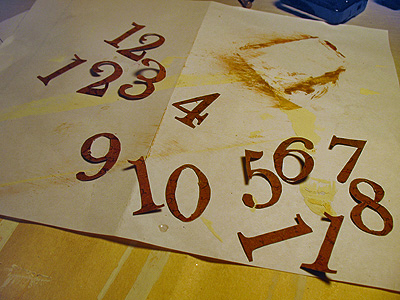
It took a while to get all the numbers cut out!
I began by adding the numbers 3, 6, 9, and 12 with Mod Podge. I did add Mod Podge over the top of the numbers at this point.
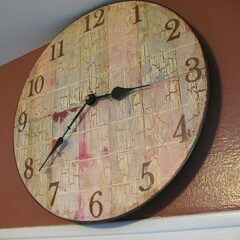
Once all the numbers were in place, I gave the entire surface a good coat of Mod Podge.
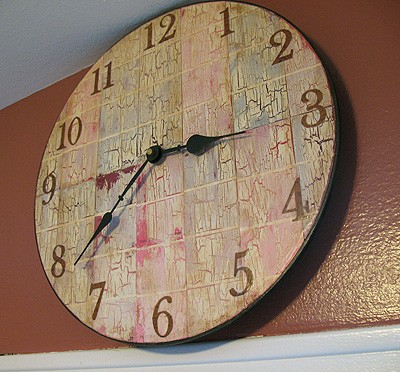
When it was completely dry, I put the mechanism back on the clock and hung it on the wall! I’m happy with how it turned out. hope you like it too!

Paint Chip Clock
Supplies
- an old clock
- paint chips
- sand paper
- crackle medium
- Vintage white acrylic paint
- paintbrushes
- Mod Podge
- antiquing gel
- scrapbook paper
Instructions
- So I pulled out the clock, removed the mechanism and sanded down the face.
- I laid out the paint chips across the front of the clock to make sure I had enough and that there would be enough to cover. I made sure to alternate the colors as well. I even changed them around a bit after taking this picture, positioning most of the dark colors toward the center. I was careful to keep them in the order that I wanted them as I laid them down on the work surface.
- I pulled out the crackling medium and gave each paint chip a thin coat.
- When the crackle medium dried I added a coat of Vintage White.
- When the paint chips are dry, add a coat of acrylic matte finish spray sealer.
- After the paint chip strips had dried for a while, I started in the middle of the clock and using some Mod Podge and a paintbrush attached them to the clock. I did not Mod Podge the top yet, just the side that attached to the clock.
- After attaching all the paint chips to the clock I let it dry a bit, then turned it over and used a box cutter to trim away the excess. I turned it face up again and trimmed away about an 1/8″ or so from the edge.
- I thinned some antiquing gel with water and applied it with an old rag. I rubbed it on gently then wiped it off. I repeated this step in a few areas until I was happy with the result.
- I just used a piece of scrapbook paper and printed reversed numbers on the back. They have to be reversed so that when you cut them out the colored side of the paper will have the numbers in the right direction.
- I began by adding the numbers 3, 6, 9, and 12 with Mod Podge. I did add Mod Podge over the top of the numbers at this point.
- Once all the numbers were in place, I gave the entire surface a good coat of Mod Podge.
- When it was completely dry, I put the mechanism back on the clock and hung it on the wall!

Did you enjoy this post? Why not subscribe to my feed, or better yet, to my free newsletter – Foodie in the Craftroom, which provides not only crafts but recipes from my other blog, Amanda’s Cookin’ as well!
- Patriotic Pinwheels - June 23, 2026
- Fingerprint Daddy & Me Coffee Mug - June 12, 2026
- Patriotic Bandana Wreath - June 9, 2026


Mel the Crafty Scientist says
Love your blog and this project – so creative and fun and I’m a big fan of paint chip projects! Just wanted to let you know I featured it in my roundup of clock re-dos and makeovers here. Feel free to check it out if you want and hope you like it! : )
-Mel
Amanda Formaro says
That’s a huge collection of clocks Mel! Thanks so much for including mine :)
artsnark says
excellent – I have a similar clock which I was going to give away but now I am excited to try this instead.
Amanda says
So glad it was helpful!
Nik Commatose says
Great job! I love it.
Olivia. says
Hey. I was trying this last night and today im not making a clock just more like some kinda little artwork. and wanted to try this affect with the paint chips. but I cant get my crackle to work. I followed your instructions. I added the crackle straight to the paint chips let it dry completly then added the white paint…and it did not crackle at all. Any ideas on what i did wrong?
Amanda says
Hi Olivia :) Be sure to follow the directions on the back of the bottle of your crackle medium. If you let it dry too long crackling will not occur. You want it to be a little tacky still when you add a coat of paint. Good luck!
Olivia. says
Thank you I will try that.
Olivia. says
So I tried this Again. The first Problem was the kind of crackle i was using. wasn’t the kind i wanted. So i went to hobby lobby and bought the Delta Crackle Cermacoat.. And Well I followed the Directions and it still isnt crackling I have no idea what i am doing wrong.
Amy says
Just wondering if it would work to attach the paint chips to the clock first, then “crackle” and paint them all at once? It’s a lovely clock, and I want to try it myself!
Amanda says
Hi Amy. I am sure you could do that, HOWEVER I would recommend making sure you don’t get any of the Mod Podge on the front of the paint chips while attaching them to the clock. That might cause issues with the crackling affect. So as long as you glue the chips down first being careful not to get anything on the front of them, then do your crackle and paint it should work. :)
Decoratingkate says
Love This! I have a table top this size what a perfect project!
Amanda says
Thanks Kate!
Jeanette Porter says
Fantatic clock – would I be ale to print out theinstructions for a mental health craft group that I run?
admin says
Certainly! :)
Jeanne says
I’m so glad I found this! I’ve been wanting a clock for our master bathroom, but haven’t found anything that I liked or would “go” in there. So I thought I would make one, probable paint one. But this idea is great. I can’t wait to make it! Thank you for the tutorial.
Andrea @ HandMakeMyDay says
This is adorable Amanda! Love your Paint Chip Post on Craft Gossip too! Keep on craft’n girl!
bettdev says
Love this clock project! I'm a PaintchipAholic, an always knew there were kewl things to do with them!
Lana Bisson says
I am definitely gonna try this. maybe not on a clock but the technique for sure. I love all your ideas. Im using your idea this month with the lightbulb snowman to teach a class at the senior citizen center where I volunteer at.
Laura at Ms. Smartie Pants says
This is the coolest idea! I have an old clock that I was going to redo, I think you just gave me the idea of what I am going to do with it!
Natalie says
That's awesome! What a fantastic idea!
Amy (naptimecrafters) says
Looks AMAZING! Thanks for auditioning for American Crafter- good luck:)
MoneySavingEnthusiast says
Wow! That's amazing! I can't wait to try this.
I bet you can just make art work like this and frame it too.
dm designs says
Lovely blog! I just wanted to let you know I featured this lovely clock of yours (photo & link) on my Wednesday "What To Do…. CLOCKS" blog post :) I hope you'll take a peak!
http://danimariedesigns.blogspot.com/2011/03/what-to-do-clocks.html
Seth says
Awesome idea and it sounds like it was fun to make. I've got so many paint chips and now I've got something to do with them.
Kathy in FW TX says
Love it, thank you so much for sharing… can't wait to see more of your ideas
Mrs Ergül says
What a great job done with this! You sure know a lot about crafts! I know who to go to next time I stumble!
Leslie @ goodbye, house! HELLO, HOME! says
G
E
N
I
U
S
!
!
Lauren @ YoungNester says
This is absolutely amazing! Thank you for the tutorial! I would love for you to link up any of your projects to my Ten Buck Tuesday link parties.
And I'm a new follower :)
http://www.youngnester.blogspot.com
Stephanie Holtgrefe says
I can't tell you how much I LOVE this!! I'm dying to try it but I've never used crackle paint OR worked with clocks. Someday I'll get the courage…thanks for the inspiration!
Stephanie
http://holtgrsl.blogspot.com/
Allison @ House of Hepworths says
You've been featured at this weeks Hookin Up with HoH #36!
Feel free to stop by and grab a button!
~Allison @ House of Hepworths
PartyMom says
This is such a great take on paint chip art…love it!
Judy says
Now this is truly a unique way of using paint chips. You did an absolutely awesome job. I am hosting a blog party. The link opens up tonight at 8pm EST. I hope you will stop by and join in the fun.
Kim @ Cheap Chic Home says
This turned out great, Amanda. I think this is the best paint chip project I've seen!
Cami says
This is AMAZING. Seriously. I usually glance over most of the projects on linky parties, but this one caught my eye. I love how you used paint samples…and the crackling? Genius! I love the stain and the numbers. This is GREAT! I will be featuring it on my site sometime this week.
Cami @ youseriouslymadethat.blogspot.com
MMB Creations says
Really cute Idea. Do the paint stores know we are having so much fun with their free chips?
Peggy says
Oh my gosh! That is so cute! I really like it I love the age it has. Beautiful colors.
creativejewishmom/Sara says
Very nice and original! Paint chips are too hard to come by around here to craft with them, but maybe I could make copies of them and craft with those! Thanks so much for sharing on Craft schooling Sunday!
Heather@The Black's Best says
I love this clock! I'm a bit of a clockaholic and like new ideas. What a creative use of paint chips! I can't believe you came up with all of these steps and the end result looks geat. Very creative!
Terry says
Very interesting Amanda and such a good job. Don't forget to stop at my blog and sign on for the giveaway!
Gośka says
Thank you for the idea for the clock which I wanted to do for your own kitchen:)
Amanda says
Thank you all so much for the compliments!! :) :)
InMyOwnStyle says
Hi Amanda-
You are always coming up with the most creative ideas. I am a clock lover – this one is fabulous. I enjoy using paint chips as a paper source and this technique is so cool.
My best- Diane
Katie @ On the Banks of Squaw Creek says
That is VERY cute! I love the crackly look, and the different shades underneath are perfect!
meettheswans.com says
Looks great! So creative!! I love the idea of re-doing a clock!!
Michelle@Somedaycrafts says
I love love love this when I first saw it at sew dang cute! Very creative!
Lucy Designs says
How creative! I love it
-Sam says
Saw this on craftster and had to visit, love it!
Wani says
Such a creative use for something that would easily be overlooked! I love it!
Aaron says
So completly cleaver and "out of the box". I love it! It turned out amazing. Good job!
-Aaron
mudpiesandmarigolds.blogspot.com
FrouFrouBritches says
Oh my gracious! That is the coolest thing EVER! Totally different than anything I've seen. Love it!
Angie @ The Country Chic Cottage says
Amanda,
This is truely amazing!! I love it!!!
Angie
Sherry @ No Minimalist Here says
What a unique and creative idea. I love how the clock turned out.
Hugs,
Sherry
Mirka says
I love your posts and look forward to more …
Liz says
This is amazing. What a great idea. Thanks for sharing! We will be featuring you on our blog ziggycrafts.blogspot.com
Megan says
I LOVE this clock, you did a fantastic job!
[email protected] says
Well done! I've never used the crackle paint. What a great idea using the paint chips to get the variety of colors. Thanks for linking!
Katie says
Wow, I love finding items that I don't like anymore and adding a "face lift" for a new look. Great job!!
Lindsay says
I love this! I love clocks myself, and this one is so pretty…and anyone could make one to match any color scheme in their house – which is awesome!
Thanks for the great tutorial!
Lindsay @ Diary of a Crafty Lady
Kimberly says
That's the super coolest clock! You know, we have NO clocks in our house because I can't find any that I like? I may have to try something like this!
kayla says
Wow, I really like this!! Awesome job!
Dayna says
I love this. You're so creative!
Kat says
That is gorgeous, and really unique! Nice job!
Kristyn @ Good Gravy Crafts says
Love this, I just did something similar and used the SAME paper on my clock as you did for your numbers!! What a great way to re-use!
xx-Kristyn
suzi.wollman says
Well, I have an old clock, and some paint chips, and I'm always trying to think of something to make for my husband (just a regular "I love you" gift, and then it dawned on me that VDay was coming!)
Hi, I'm Suz!! says
Wow, Amanda!! That is so cool!! I guess I haven't been paying attention to the 'paint chip craze'. Your project was a wonderful slap upside the head!!! I want one!!!!
Thanks for sharing! It turned out great!!
Hugs ~~ Suz
inspiringcreativeness.blogspot
Morgan says
Wow! How very creative! I love how your clock came out! I even loved how it looked after you'd just sanded over the original, with the rooster/background all faded out! LOL Thanks so much for sharing your masterpiece…another example of "oh! just think of the possibilities!" :) ~M