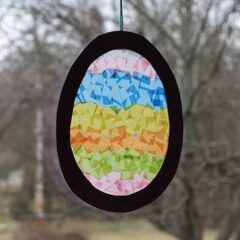
Easter Egg Suncatcher
Celebrate the colors of Easter and spring with a pretty tissue paper Easter Egg Suncatcher! This Easter craft is fun for all ages.
Supplies
- Clear contact paper
- 2 sheets purple construction paper
- Tissue paper in various colors
- 1 sheet white paper
- 12- inch piece of yarn
Tools
- black marker
- glue stick
- scissors
- 4 pushpins
- foam board or corkboard
Instructions
- You will need a sheet of contact paper that is twice the size of a piece of construction paper. Lay the contact paper, clear side down (do not remove the backing yet!) onto the foam board and tack it in place with pushpins, one in each corner.
- Draw an egg shape on white paper with a black marker. Slide the egg drawing underneath the contact paper on the left side. Carefully peel the backing off the left side of the contact paper (the sticky side should be facing upward) and fold it over to the right, tacking it under the pushpins on the right to hold it in place.
- Have children decorate the sticky side of the contact paper with tissue paper, using the egg drawing underneath as a guide.
- When children are done decorating, peel the backing off the right side of the contact paper and fold it over to the left, sticky side to sticky side. This will sandwich the tissue paper design between the contact paper.
- Take the egg drawing and cut it out. Use that as a guide to cut egg shapes from the purple construction paper. Stack both sheets of construction paper together and cut around the egg, leaving about a 1-inch border all the way around.
- Use the egg cut-out to cut the decorated contact paper in the same fashion, only leaving about 1/2-inch border all the way around.
- Tie your yarn into a loop. Use glue stick to adhere the egg inside the two construction paper eggs, creating a frame for your suncatcher. Be sure to glue the yarn inside with the contact paper egg.