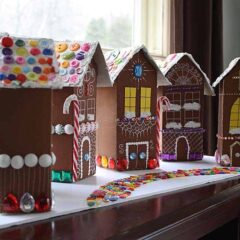
Recycled Village of Gingerbread Houses
Supplies
- Empty milk and/or juice cartons rinsed well and dried
- Paper napkins or tissue paper
- Cereal box cardboard roofs
- Buttons in a variety of colors and sizes
- Decoupage medium
- Light brown and white acrylic craft paint
- Dimensional Effects
- Snow Texture
- White paint pen
- Craft jewels
- Faux candy canes
- Beads
- Yellow card stock
- Tools: scissors paintbrush, hot glue gun, sandpaper, palette knife, Black marker
Instructions
- Make sure you rinse your cartons out really well and let them dry.
- Open the tops of the cartons. At the “pour” side, cut the upper corner triangles out, leaving a little border around the “pouring” triangle. Repeat on the other side.
- Hot glue the pouring triangle to the sides as shown to create the eves.
- Repeat this for all of your cartons. They won’t be pretty, and that’s okay. And if the glue isn’t holding well at the top, go ahead and tape or staple them to keep them shut. You are going to cover that anyway.
- Paint a thin layer of decoupage medium onto one side of the milk carton and place paper napkin over the top, gently smoothing it out. Continue this process until the entire carton is covered.
- I actually used some brown napkins from Taco Bell. :) They have kind of a cool texture to them, but you can use any paper napkin or tissue paper. The idea is to give you a textured surface to paint on, as the actual milk carton surface is too slick.
- After the cartons have dried, decoupage one more layer of napkin onto each one.
- Paint each of the houses light brown. Mine only needed one coat.
- While the houses are drying I made the roofs. Mine are made from cereal box cardboard.
- FIRST I folded the card board and made sure they fit properly. Then I sanded the printed side of the cardboard to knock off the shine and remove much of the color. I actually used Gesso to paint the cardboard white, but white paint will be fine too. I painted them so I wouldn’t have to use too much of the Dimensional Effects, I didn’t want to take the chance of running out! Glue them to the top of the houses.
- Use a palette knife to spread on the Dimensional Effects. It’s creamy, so it spreads like cake frosting.
- You will want to do one roof at a time so that the Dimensional Effects doesn’t start to dry before you have a chance to add the buttons. Simply press the buttons gently into the Dimensional Effects, no glue needed.
- I made my own peppermint candies from a bunch of white shank buttons I had. I simply used a red Sharpie and a green Sharpie to add lines around the outside of each one! I also cut the shanks off.
- All that’s left to do is decorate. This will be different for each person and each house. Some windows I used card stock and a black marker, other windows I drew on with a white paint pen (I used Elmer’s by the way, I don’t like the Sharpie paint pens).
- Something to note, I decorated the bottom of all of my houses with craft jewels. That gave each house enough weight to keep them standing. If you decide to decorate yours differently and don’t weigh them down that way, you can always add a bag of rice to the carton. If you’ve already decorated it, simply cut a hole in the bottom, add the bag of rice and tape it back up. No one will see the bottom anyway!
- It always helps me to draw out some ideas first. Search Pinterest or the web for gingerbread houses and you’ll find plenty of inspiration for designs!
- The final step for my village was to hot glue all the houses to a piece of foam core board and create a pathway using different colored buttons. Now you can simply lift the entire village in one motion.