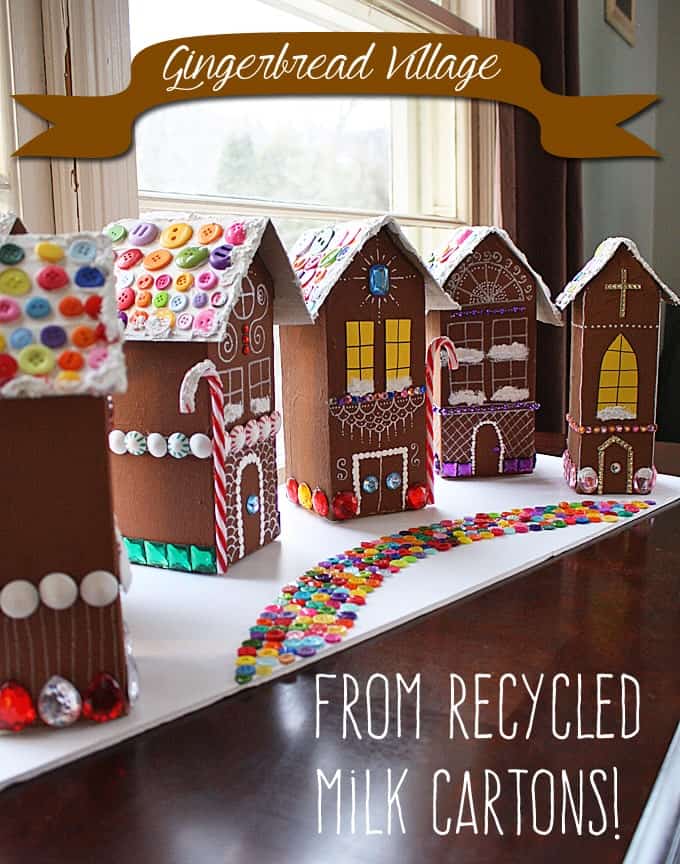
I’ve always loved the look of a gingerbread house, and I adore a Christmas village scene, but I haven’t had a village for several years. Gingerbread houses are fun, but all too often are temporary because they are made from actual gingerbread, icing and candies. I wanted a Christmas village made up of gingerbread houses, but one I could bring out each year. And, of course, you know I’m all about recycling, so using milk and juice cartons was exactly what I wanted to do.

Gingerbread Village from Recycled Milk Cartons
It’s not uncommon to make a gingerbread house from an empty milk carton. Kids do it all the time. But as much as I loved all the gingerbread houses my children made over the years, I was looking for something the adults could do. Anyone who reads this blog regularly knows I love to make something from nothing. So if you want to use wooden houses like my (Birdhouse Gingerbread House), go for it, but this village is made from garbage. ;-)
I’ve been saving these milk and juice cartons for a while now. I originally planned on making a regular Christmas village scene, but then I came across The World’s Largest Gingerbread Village by Chef Jon Lovitch on #YahooDIY and that inspired me to make gingerbread houses instead! Of course, Jon’s houses are made the traditional way, from edible items… all 152 of them! They are actually trying to break the Guinness World Record. They actually set the record last year with their first village and are looking to beat themselves this year. Incredibly impressive, I wish I could have seen that in person!

For my gingerbread house village, I didn’t want to have to go spend a fortune on faux candy from the craft store, so I decided I had to make due with what I had on hand. Everything was either recycled or already in my craft stash.
Project Cost: $0.00
Note: some links below are affiliate links. That means if you happen to buy something, a small percentage of that sale goes back into this site, which enables me to continue to bring you free tutorials such as this one. So, thanks!

To make these gingerbread houses you will need:
- Empty milk and/or juice cartons, rinsed well and dried
- Paper napkins or tissue paper
- Cereal box cardboard (roofs)
- Buttons in a variety of colors and sizes
- Decoupage medium
- Light brown and white acrylic craft paint
- Dimensional Effects
- SnowTex or White Texture Effect
- White paint pen
- Craft jewels
- Faux candy canes
- Beads
- Yellow card stock
- Tools: scissors, paintbrush, hot glue gun, sandpaper, palette knife, Black marker
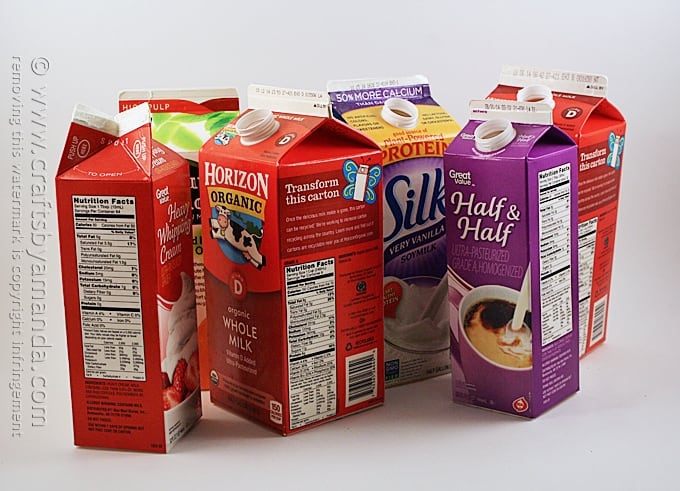
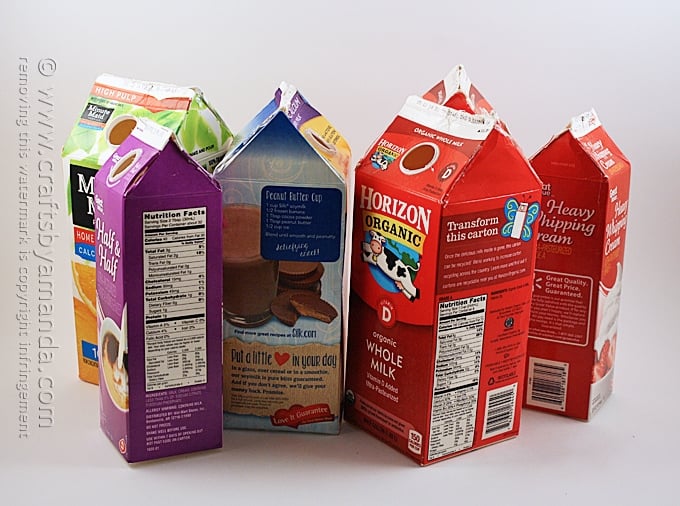
I used milk and juice cartons and even empty cream cartons. Make sure you rinse them out really well and let them dry.
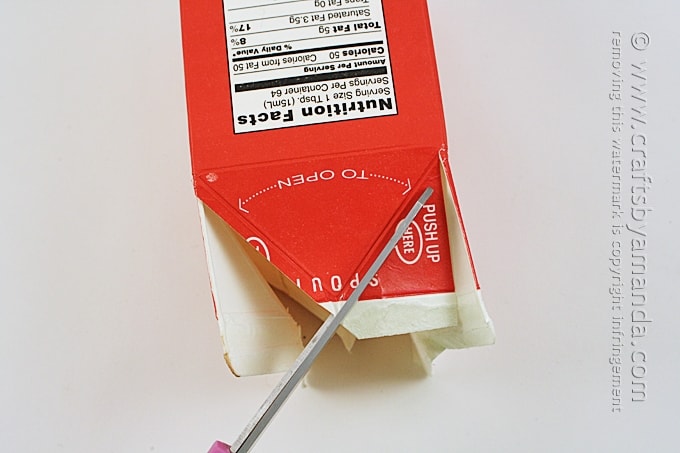
Open the tops of the cartons. At the “pour” side, cut the upper corner triangles out, leaving a little border around the “pouring” triangle. Repeat on the other side.
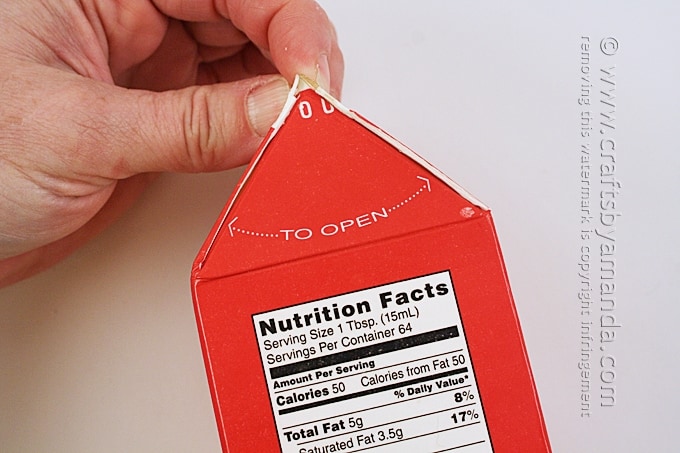
Hot glue the pouring triangle to the sides as shown to create the eves.
Repeat this for all of your cartons. They won’t be pretty, and that’s okay. And if the glue isn’t holding well at the top, go ahead and tape or staple them to keep them shut. You are going to cover that anyway.

Paint a thin layer of decoupage medium onto one side of the milk carton and place paper napkin over the top, gently smoothing it out. Continue this process until the entire carton is covered.
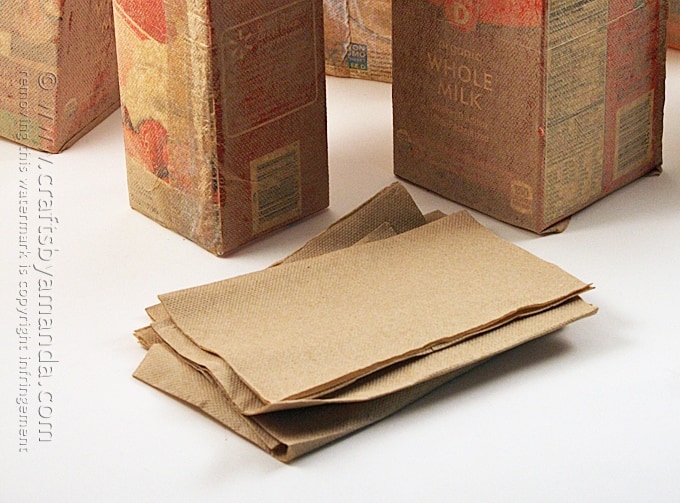
I actually used some brown napkins from Taco Bell. :) They have kind of a cool texture to them, but you can use any paper napkin or tissue paper. The idea is to give you a porous surface to paint on, as the actual milk carton surface is too slick.
After the cartons have dried, decoupage one more layer of napkin onto each one.
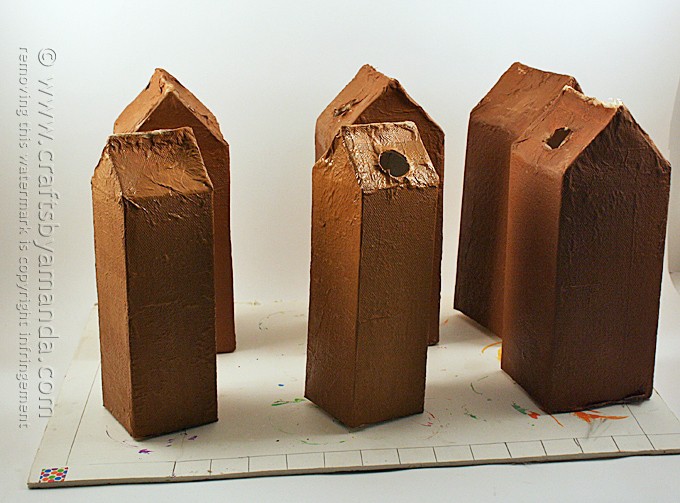
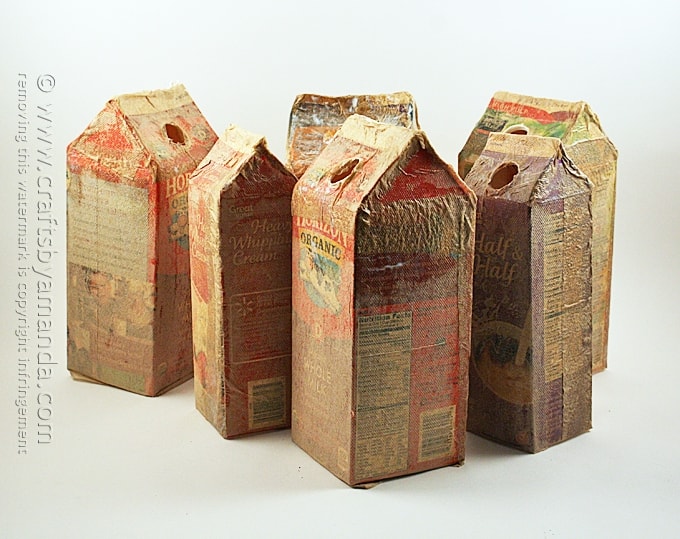
Paint each of the houses light brown. Mine only needed one coat.
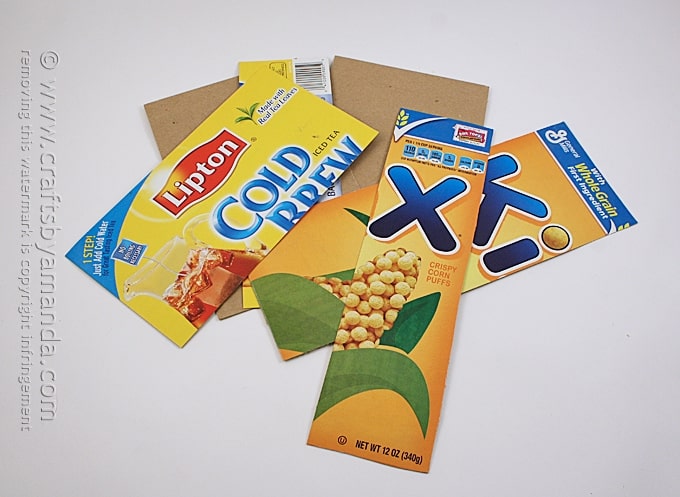
While the houses are drying I made the roofs. Mine are made from cereal box cardboard.
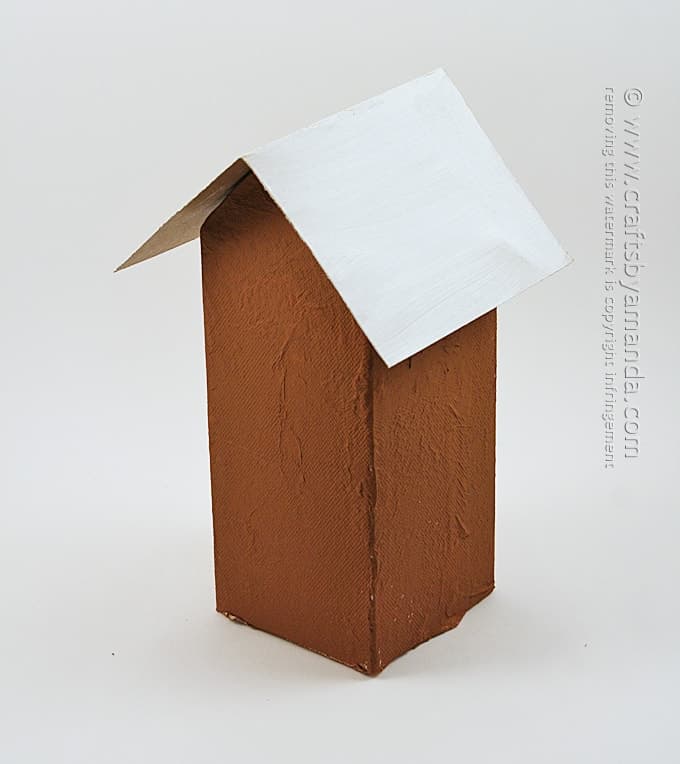
FIRST I folded the card board and made sure they fit properly. Then I sanded the printed side of the cardboard to knock off the shine and remove much of the color. I actually used Gesso to paint the cardboard white, but white paint will be fine too. I painted them so I wouldn’t have to use too much of the Dimensional Effects as the printed cardboard can show through, I didn’t want to take the chance of running out! Glue them to the top of the houses.
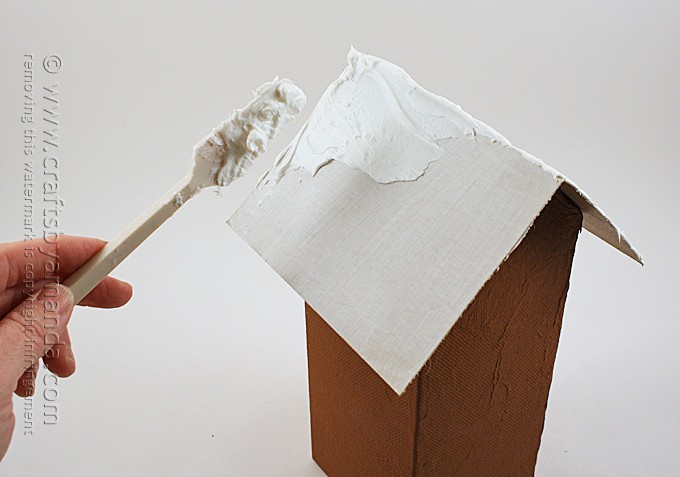
Use a palette knife to spread on the Dimensional Effects. It’s creamy, so it spreads like cake frosting.
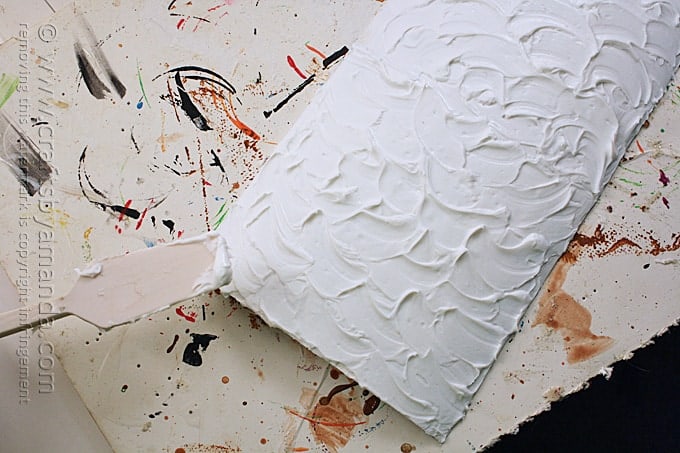
Here’s an example of what you can do with it! See how it looks like cake?
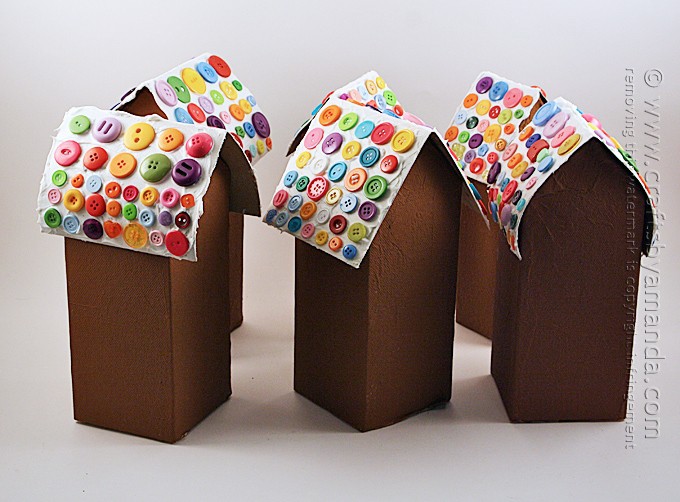
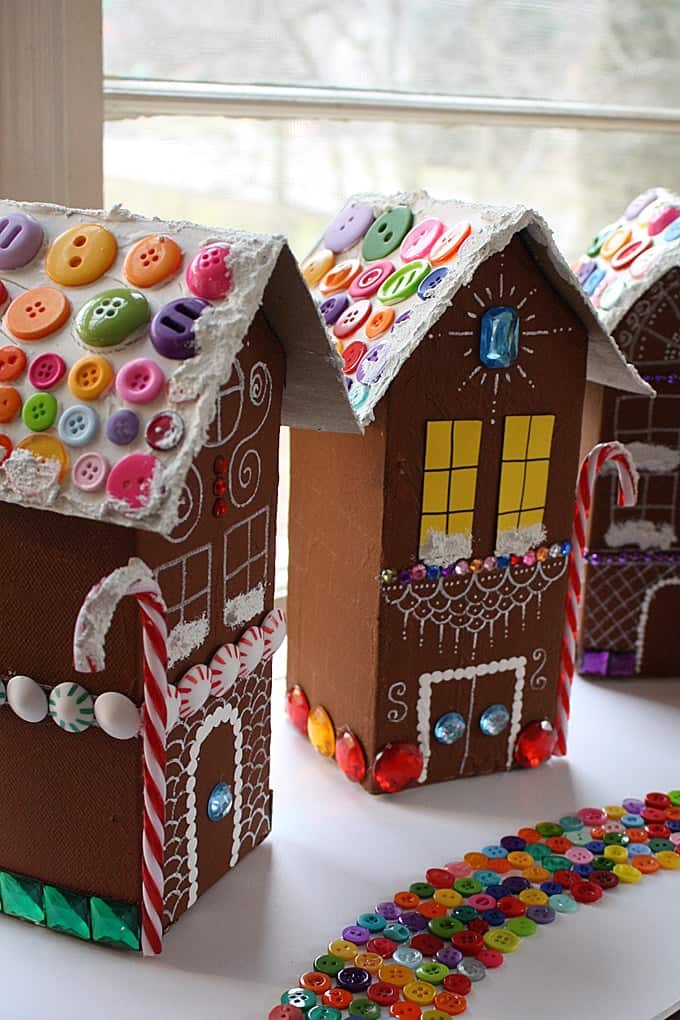
You will want to do one roof at a time so that the Dimensional Effects doesn’t start to dry before you have a chance to add the buttons. Simply press the buttons gently into the Dimensional Effects, no glue needed.
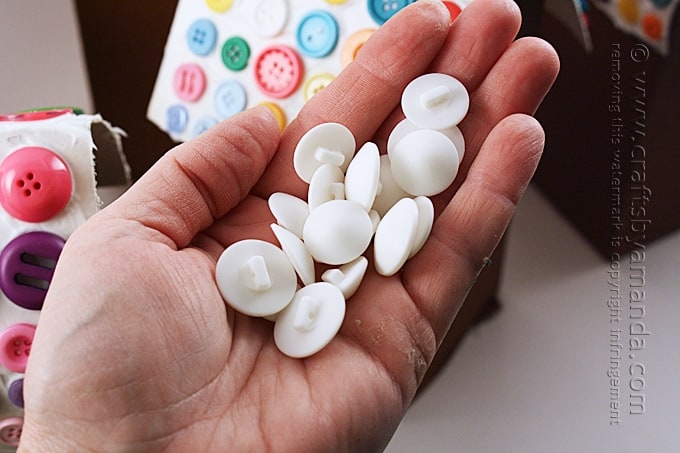
I made my own peppermint candies from a bunch of white shank buttons I had. I simply used a red Sharpie and a green Sharpie to add lines around the outside of each one! I also cut the shanks off.
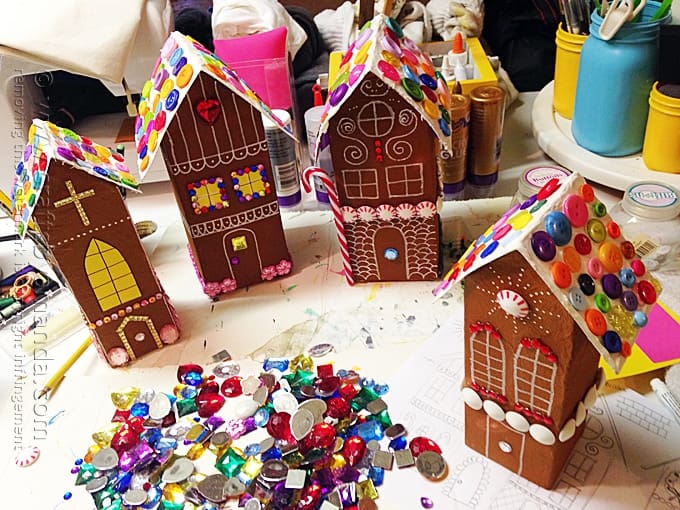
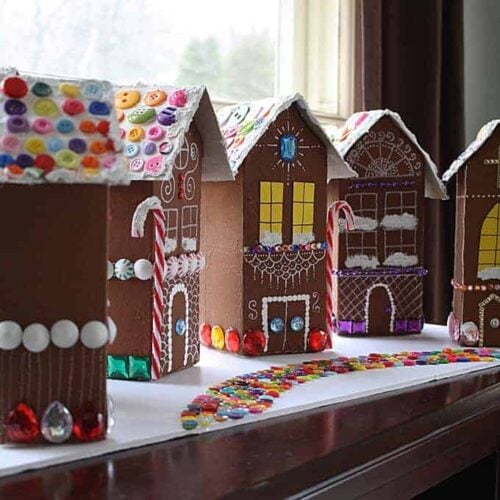
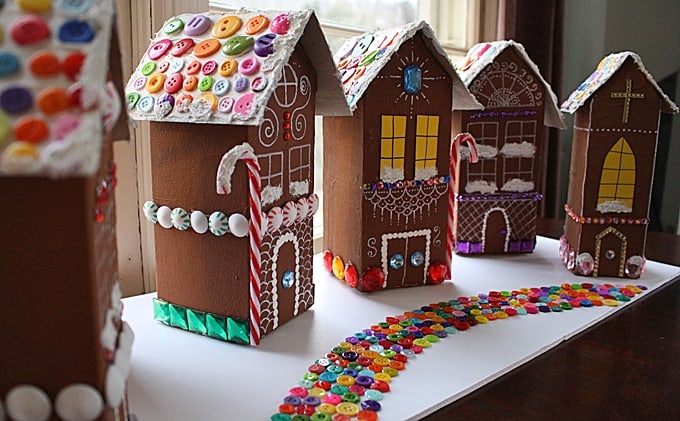
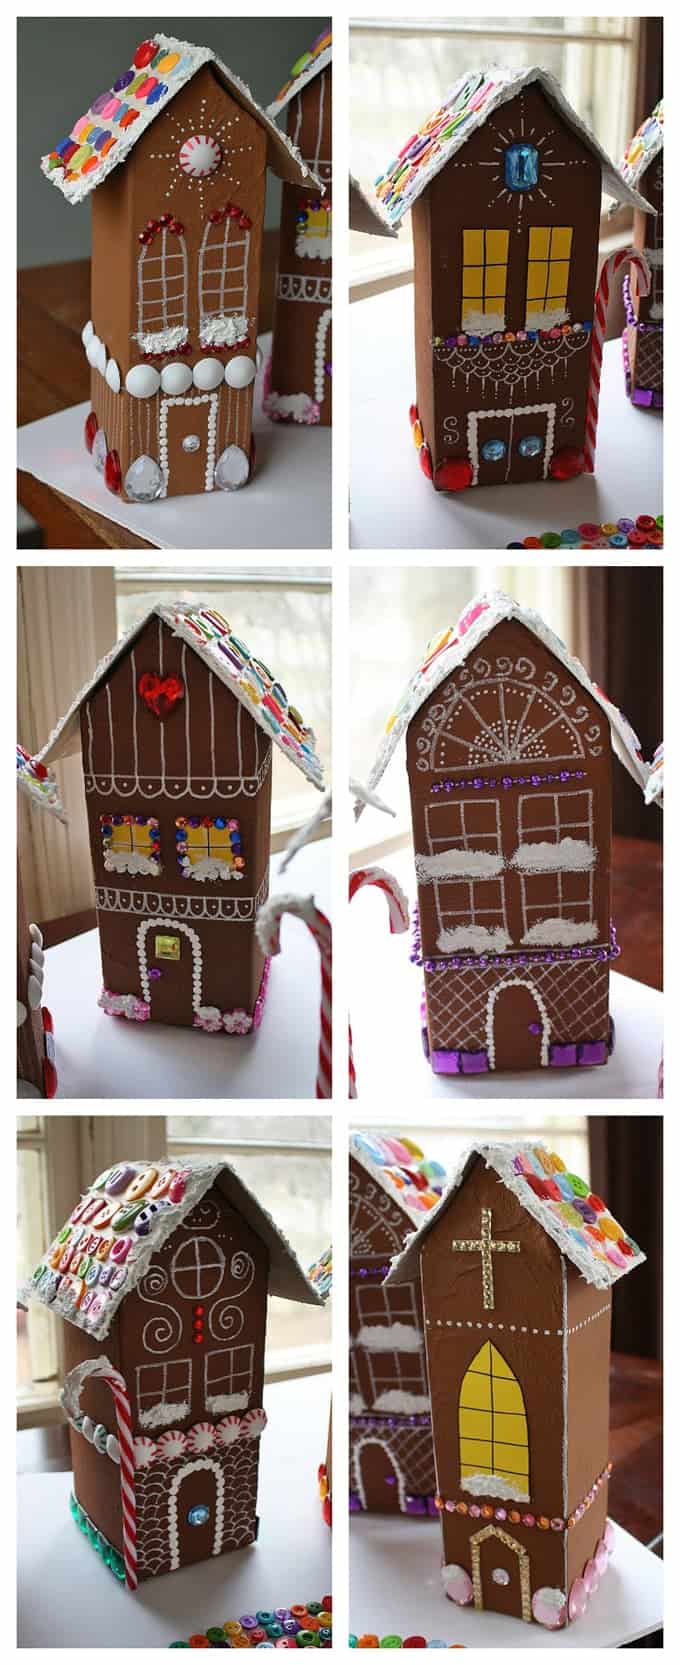
All that’s left to do is decorate. I don’t have a bunch of step photos of the process because it will be different for each person and each house. Some windows I used card stock and a black marker, other windows I drew on with a white paint pen (I used Elmer’s by the way, I don’t like the Sharpie paint pens).
Something to note, I decorated the bottom of all of my houses with craft jewels. That gave each house enough weight to keep them standing. If you decide to decorate yours differently and don’t weigh them down that way, you can always add a bag of rice to the carton. If you’ve already decorated it, simply cut a hole in the bottom, add the bag of rice and tape it back up. No one will see the bottom anyway!
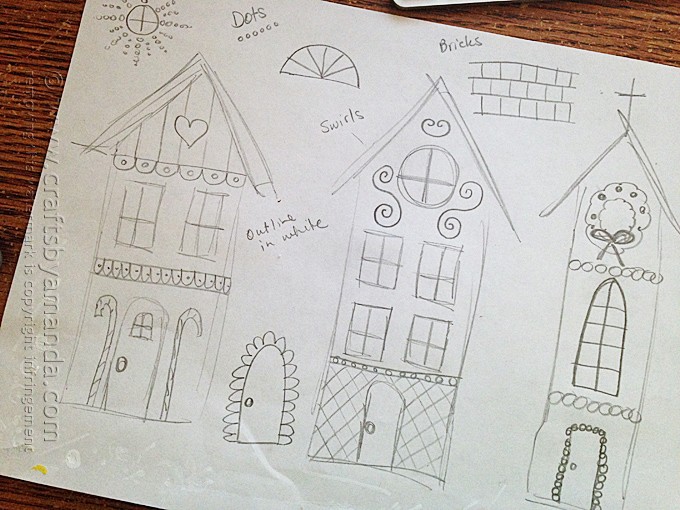
It always helps me to draw out some ideas first. Search Pinterest or the web for gingerbread houses and you’ll find plenty of inspiration for designs!
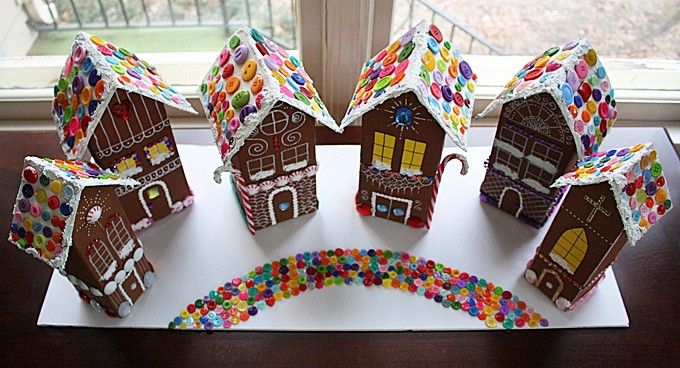
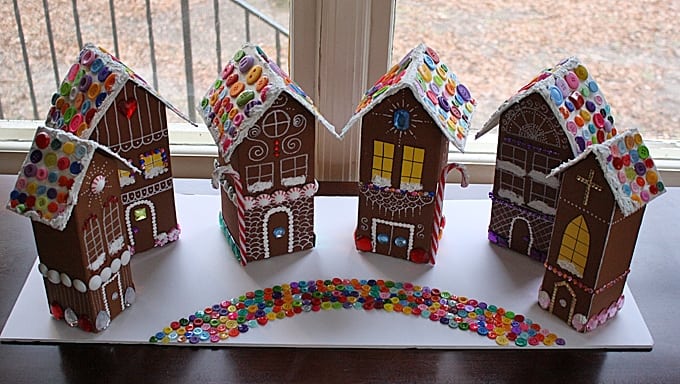
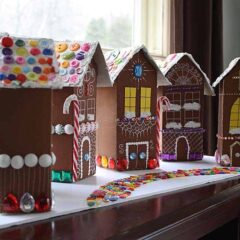
The final step for my village was to hot glue all the houses to a piece of foam core board and create a pathway using different colored buttons. Now I can simply lift the entire village in one motion.
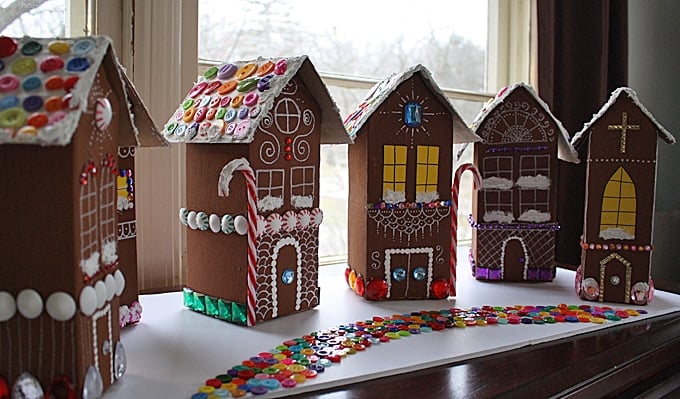
 Here are the individual houses if you need some inspiration for house designs.
I hope you enjoyed this project! I’m super excited that I have a gingerbread village that I can pull out of the attic year after year and don’t have to worry about candy rot!
Have fun!
More Holiday Crafts
- Ugly Sweater Ornaments
- Homemade Button Christmas Cards
- 10 Fun Holiday Crafts for Your Kids – on #YahooDIY
- All of my Christmas craft ideas
- Christmas Village Shadowbox
More gingerbread fun:
- Rice Krispie Treat Gingerbread Men
- Soft Gingerbread Cookies with Chocolate Drizzle
- Soft Gingerbread Football Cookies
- Bread Tag Gingerbread Men
Recycled Village of Gingerbread Houses
Supplies
- Empty milk and/or juice cartons rinsed well and dried
- Paper napkins or tissue paper
- Cereal box cardboard roofs
- Buttons in a variety of colors and sizes
- Decoupage medium
- Light brown and white acrylic craft paint
- Dimensional Effects
- Snow Texture
- White paint pen
- Craft jewels
- Faux candy canes
- Beads
- Yellow card stock
- Tools: scissors paintbrush, hot glue gun, sandpaper, palette knife, Black marker
Instructions
- Make sure you rinse your cartons out really well and let them dry.
- Open the tops of the cartons. At the “pour” side, cut the upper corner triangles out, leaving a little border around the “pouring” triangle. Repeat on the other side.
- Hot glue the pouring triangle to the sides as shown to create the eves.
- Repeat this for all of your cartons. They won’t be pretty, and that’s okay. And if the glue isn’t holding well at the top, go ahead and tape or staple them to keep them shut. You are going to cover that anyway.
- Paint a thin layer of decoupage medium onto one side of the milk carton and place paper napkin over the top, gently smoothing it out. Continue this process until the entire carton is covered.
- I actually used some brown napkins from Taco Bell. :) They have kind of a cool texture to them, but you can use any paper napkin or tissue paper. The idea is to give you a textured surface to paint on, as the actual milk carton surface is too slick.
- After the cartons have dried, decoupage one more layer of napkin onto each one.
- Paint each of the houses light brown. Mine only needed one coat.
- While the houses are drying I made the roofs. Mine are made from cereal box cardboard.
- FIRST I folded the card board and made sure they fit properly. Then I sanded the printed side of the cardboard to knock off the shine and remove much of the color. I actually used Gesso to paint the cardboard white, but white paint will be fine too. I painted them so I wouldn’t have to use too much of the Dimensional Effects, I didn’t want to take the chance of running out! Glue them to the top of the houses.
- Use a palette knife to spread on the Dimensional Effects. It’s creamy, so it spreads like cake frosting.
- You will want to do one roof at a time so that the Dimensional Effects doesn’t start to dry before you have a chance to add the buttons. Simply press the buttons gently into the Dimensional Effects, no glue needed.
- I made my own peppermint candies from a bunch of white shank buttons I had. I simply used a red Sharpie and a green Sharpie to add lines around the outside of each one! I also cut the shanks off.
- All that’s left to do is decorate. This will be different for each person and each house. Some windows I used card stock and a black marker, other windows I drew on with a white paint pen (I used Elmer’s by the way, I don’t like the Sharpie paint pens).
- Something to note, I decorated the bottom of all of my houses with craft jewels. That gave each house enough weight to keep them standing. If you decide to decorate yours differently and don’t weigh them down that way, you can always add a bag of rice to the carton. If you’ve already decorated it, simply cut a hole in the bottom, add the bag of rice and tape it back up. No one will see the bottom anyway!
- It always helps me to draw out some ideas first. Search Pinterest or the web for gingerbread houses and you’ll find plenty of inspiration for designs!
- The final step for my village was to hot glue all the houses to a piece of foam core board and create a pathway using different colored buttons. Now you can simply lift the entire village in one motion.
Thank you Yahoo! for sponsoring this post. While this was a sponsored opportunity from Yahoo!, all content and opinions expressed here are my own.
- Patriotic Pinwheels - June 23, 2026
- Fingerprint Daddy & Me Coffee Mug - June 12, 2026
- Patriotic Bandana Wreath - June 9, 2026


Mary says
It would be neat to make these smaller to hang on the Christmas tree…so lightweight! Thanks for the fun idea!
LEGLANTIER DOMINIQUE says
Tout simplement SUPER. J’adore .Magnifique projet et simple à réaliser
Patty says
Hi Amanda,
Your gingerbread Houses look so so good!. I need to make a few. I’m collecting milk and small whipping cream cartons but, im saving them to make a fairy Village..im also saving cardboard egg cartons. Well, egg carton lids. I glue the egg carton lids. To the sides of the cartons, they look like stucco or mortar.. Then I coat it with clear drying glue and roll the carton in small aquarium rock/pebbles. It looks really good. I There arw so many things you can make with cardboard boxes!. I Made a fun cardboard box Holiday Fireplace.. I wish I could post a picture here. Thank You for posting Your Very Cute Village pf gingerbread homes..
joyce luckey says
I love these, will do stained glass window for my church, great idea with the candies.
Vittoria Lou Mawis says
Hi! I hope you don’t mind, we’re doing a feature on DIY Christmas villages for the Philippine Daily Inquirer, a broadsheet in the Philippines. We wish to include photos and a summary of the step-by-step explanation of your beautiful artwork. Credits to you of course and we’ll provide a link to your blog.
Amanda Formaro says
Thanks!
Mallory Hamby says
Is it ok to use one of these pictures to show my art class students what we will be doing in class on facebook? I will reference your blog! I just love these :)
Amanda Formaro says
Sure, just please include a link back to this post when you share the photo :) Thanks!
Eva Stosic says
Hi I make gingerbread house front to hang on my apt door from cornstarch clay it is very nice and can be used every year
Emily Marie says
Oh my gosh. These are so well done I didn’t even notice that the candies weren’t candy but buttons and trinkets! Great craft, I am definitely pinning for later.
Amanda Formaro says
Thanks Emily, so nice of you to say!
Sue {munchkin munchies} says
These are so darn cute, Amanda!
Jen says
Seriously Amanda, these are the CUTEST! You are one crafty lady!!
Amanda Formaro says
Thanks so much Jen!!
Liz says
Did this my 11 y.o. Not as beautifully decorated as yours but we had fun! A bit labor intensive but kept us entertained for a few days. My daughter now wants to do more arts and crafts! Also, could not find the dimensional effects products; ended up using some glitter glue that seemed to do the trick (well enough, lol). Thanks for the inspiration!
I don’t know how to post pics… can i send you one?
Amanda Formaro says
Hi Liz! I’d love it if you stopped by my Facebook page and posted a picture of yours there https://www.facebook.com/CraftsbyAmanda
Marva Small says
This is so cool. Thanks for this wonderful idea. Have been collecting juice cartons but wasn’t sure how to make the houses. Too late for Christmas now but I can have an early start for next year.
Amanda Formaro says
Awesome! Thanks Marva!
Debbie Berish says
I have always made these with children with Graham. crackers and icing and candy. The kids at my daycare loved making these and taking them home to eat. So much fun. Do not do daycare after 18 years. Miss doing activities.
Amanda Formaro says
Yep, me too! But this time I wanted to be able to bring it out each year without worrying about anything rotting over time :)
Jennifer says
These are cute! I think instead of the texture, I will use plain silicone. I will probably use it around the base of each one too for the weight it needs to hold it down. Unfortunately, I rarely buy cartons. I will have to start!
Amanda Formaro says
Hi Jennifer! I hope you get a chance to try them out!
amna says
Interesting
Mary Prytulka says
These houses are adorable!! what a sweet project!
Amanda Formaro says
Thanks so much mary!
Jodi says
Really cute Amanda!!!!!
Amanda Formaro says
Thank you so much Jodi!! Merry Christmas my friend, miss you!
Hani Shabbir says
Wow! These are beautiful. Love the buttons and designs.
Amanda Formaro says
Thank you Hani, I really appreciate that!
[email protected] says
Ok, these are absolutely adorable!
Amanda Formaro says
Thanks Amy!! :)
Cookie17 says
Ya did it again these are all most prettier than candy ones ,just a weeee all most lol did great job on them,thank’s for showing us how make them& I hope you & your family have a Merry Christmas…God Bless
Amanda Formaro says
Merry Christmas Cookie and thank you!