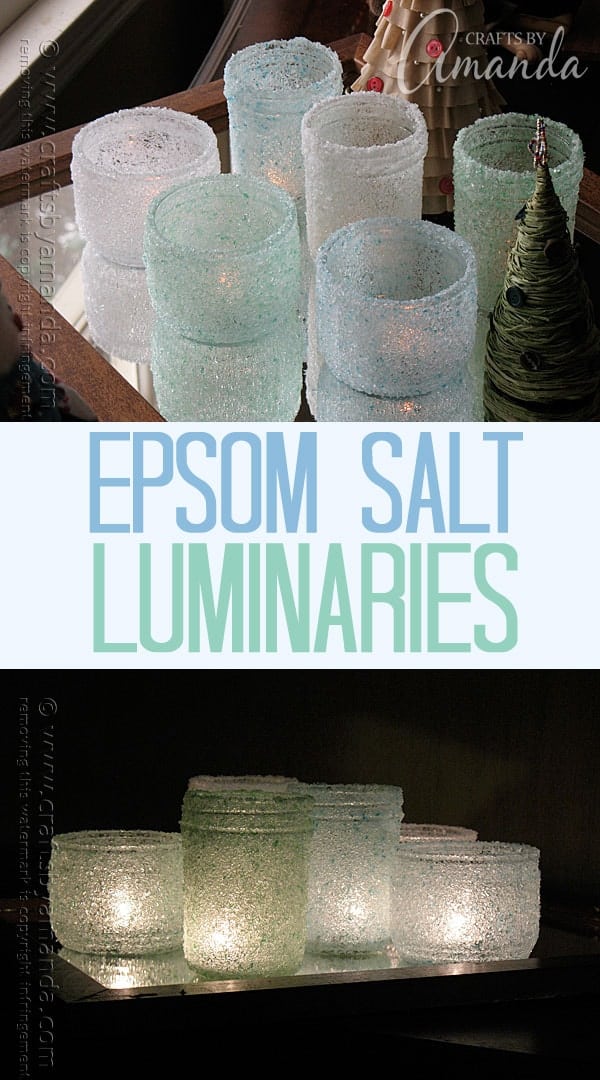
I originally made these epsom salt luminaries back in December of 2010. At that time I started seeing a few crafty ideas around the internet using epsom salts, but I wanted to come up with something different.

I had been itching to make some new luminaries, something that would be elegant and pretty against winter’s white snow. Something that says Christmas, but isn’t limited to the holiday. The idea for these epsom salt luminaries hit me and I couldn’t wait to take the idea from my head and make them a reality.
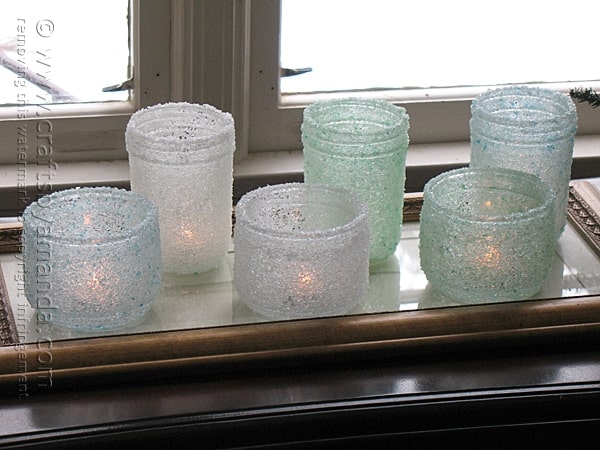
Before you begin: Please see my article on crafting with epsom salts for important information (including info on discoloration, see the picture below of them all white), especially if you plan to make these for an important event such as a wedding.

The moisture in the salt will eventually evaporate, leaving you with white salt on your jars. So please be sure and make these no sooner than one week prior to your event. This is what mine looked like after a few weeks.
These should be one of the last things you make, no more than a week before the wedding.
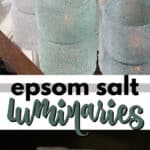
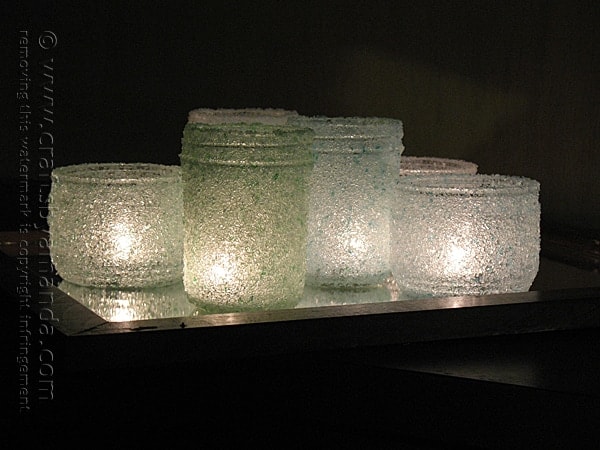
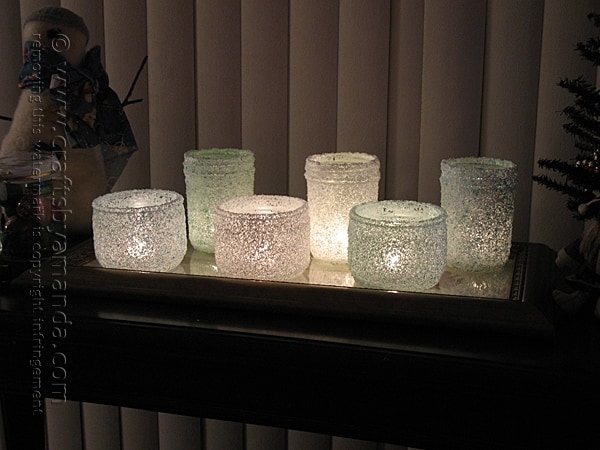
Epsom Salt Luminaries
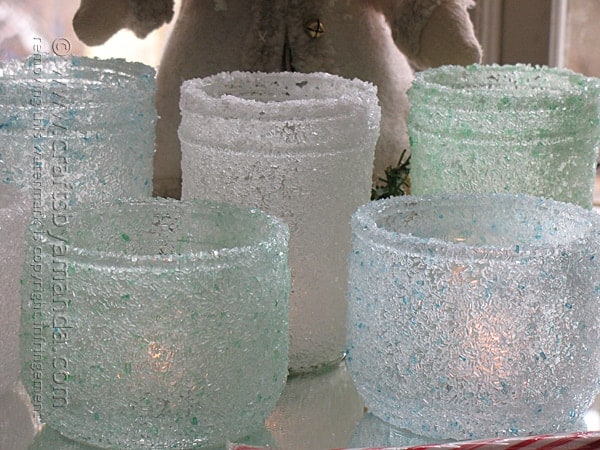
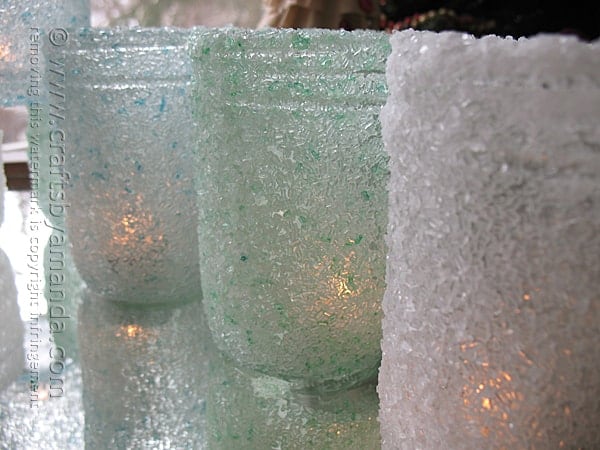
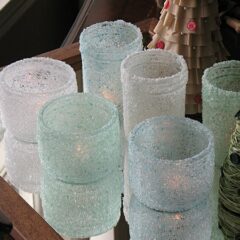
I remember seeing some really pretty sea glass luminaries in white, light blue and light green. I really wanted to make my luminaries in these colors, so I simply mixed a tiny amount of food coloring in with the Epsom salts.
TIP: If you love luminaries but don’t have time to make them, you can browse all the luminary ideas on Etsy here.
Supplies you need:
- empty jars
- epsom salts
- blue and green food coloring
- paper plates
- 3 bowls
- Mod Podge
- Clear gloss sealer
TIP: There’s a video in this post so you can see how they look when finished!
I really love how they came out and while I didn’t do it with mine, you could add a pretty white ribbon around the center tied into a bow in front for a delicate accent.

Note about jars: You can use any type of jar you want for these. I used some canning jars, and the shorter ones are from those $3 candles you get at WalMart. I always save them and clean them out once the candle is used up.
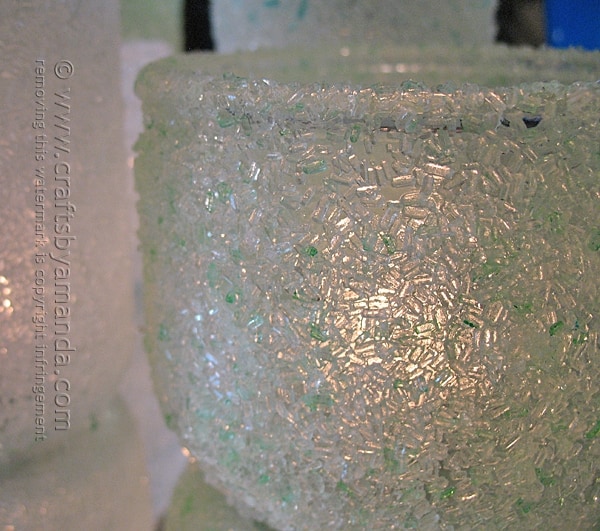
Many people have asked me what type of salts that I used. As you can see in the photo above, the salt is in crystal form, not flakes. I used a bag I had in my cabinet called Dr. Teal’s Epsom Salt Soaking Solution with Eucalyptus Spearmint![]() .
.
The key though is that they are crystals. Some epsom salts are chalkier looking (think dollar store cheap versions) and are flaked, those don’t have that shiny crystal appearance. So make sure you get the type that look like crystals or the effect will not be the same. YES they do make the room smell like eucalyptus and spearmint!
UPDATE – there are unscented Dr. Teal’s salts now, I saw them at Walmart the other day (update added November 24, 2018)
These would make pretty teacher or neighbor gifts! These can be changed for different holidays too (think Valentine’s Day!). You don’t have to limit these to wintertime, these would be a pretty addition to a beachy bathroom, or even in the summer on the porch!
Just keep in mind that the epsom salts will eventually dry out, so they are temporary. But remember you can simply soak them in water, remove the Mod Podge and start over!
Now on with the tutorial.
Note: there is a printable version of the instructions available at the bottom of this post.
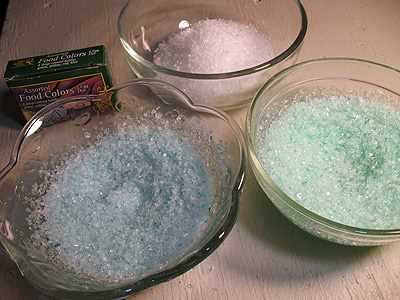
Put about one cup of epsom salts into each bowl. Add ONE DROP of blue food coloring to one of the bowls and mix until evenly distributed. Add ONE DROP of green food coloring to another bowl and mix.
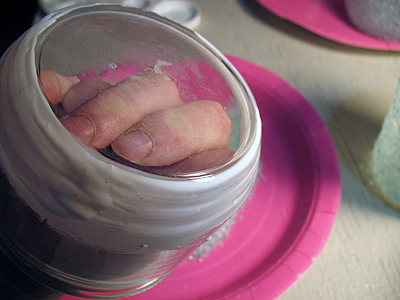
Put the white epsom salts onto a paper plate and gently shake back and forth to get an even layer. Place your hand inside the jar.
Use a paintbrush to coat the jar generously in Mod Podge. You want to use a generous amount, but not so much that it’s dripping off the jar. First paint around the bottom rim of the jar, then the body of the jar, then the top rim. (Notice that in the picture below there’s no Mod Podge on the rim. IGNORE that, just follow my instructions instead.)
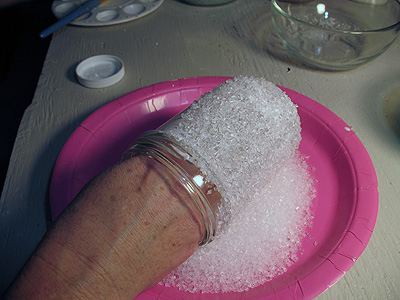
Starting at the bottom rim of the jar, roll in the epsom salts. Next roll the body of the jar and the top rim.
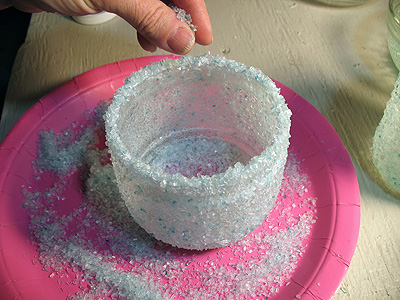
Stand the jar up onto a separate paper plate and add some Mod Podge to the top lip of the jar. Sprinkle some epsom salts onto the lip.
Repeat this process for each color. Allow each jar to dry for a few hours. Use a clean paintbrush to loosen and remove any salt that fell inside the jars and to gently knock off any excess on the outside of the jars.
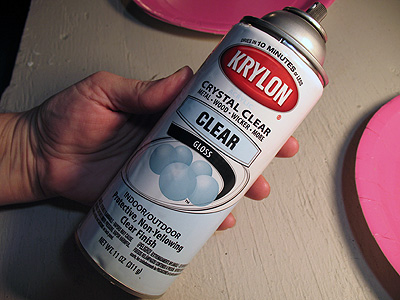
Spray with a clear gloss sealer. Let dry for about 20 minutes, repeat for a total of 3 coats.
NOTE: I tried several different coatings over the salt (Mod Podge in three different types and a triple thick paint on gloss sealer) but the spray sealer works the best.
Here are more ideas you might like:
- If you like these luminaries, you’ll probably like my Snowy Pinecone Candle Jars too.
- I also made these beautiful luminaries from doilies and some burlap and twine.
- My friend Suzy made these adorable wedding tea lights with bling, see how on her site.
- My friend Pauline will show you how to make these Flower Petal & Leaf Wax Paper Votives
Epsom Salt Luminaries: Some Winter Beauty
Supplies
- empty jars
- epsom salts
- blue and green food coloring
- paper plates
- 3 bowls
- Mod Podge
- Clear gloss sealer
Instructions
- Put about one cup of epsom salts into each bowl. Add ONE DROP of blue food coloring to one of the bowls and mix until evenly distributed. Add ONE DROP of green food coloring to another bowl and mix.
- Put the white epsom salts onto a paper plate and gently shake back and forth to get an even layer. Place your hand inside the jar.
- Use a paintbrush to coat the jar generously in Mod Podge. You want to use a generous amount, but not so much that it’s dripping off the jar. First paint around the bottom rim of the jar, then the body of the jar, then the top rim. (Notice that in the picture below there’s no Mod Podge on the rim. IGNORE that, just follow my instructions instead.)
- Starting at the bottom rim of the jar, roll in the epsom salts. Next roll the body of the jar and the top rim.
- Stand the jar up onto a separate paper plate and add some Mod Podge to the top lip of the jar. Sprinkle some epsom salts onto the lip.
- Repeat this process for each color. Allow each jar to dry for a few hours. Use a clean paintbrush to loosen and remove any salt that fell inside the jars and to gently knock off any excess on the outside of the jars.
- Spray with a clear gloss sealer. Let dry for about 20 minutes, repeat for a total of 3 coats.
Video
Expert Tips & FAQs
- DIY Mosquito Repellent Candles - July 10, 2026
- Mason Jar Solar Lights - July 3, 2026
- Patriotic Pinwheels - June 23, 2026


Keren Roose says
Do you have to spray these with the gloss if you are using them 2 days later?
Amanda Formaro says
The sealer just help to kind of stick all the salt pieces together. You can go without it, just know that you may have some salt granules fall off :)
Karen says
Well, you guys, do know that they sell that frosted chunky sparkly frost bits, at the craft store, right?
You do the SAME STEPS, the SAME WORK, with the SAME SUPPLIES, and it does not Disappear, or fall off, and you can use them as soon as they’re dry.
Why go through all the work if it is temporary?
It looks nice and all, I love it, and I would have mnade them, had it not been for the not permanent comment.
However, I will make the permanent kind, and thank you so much for letting me borrow your idea.
Amanda Formaro says
Oh that’s good to know, I’ll have to look for those!
Lesa says
I live in an old folks home. Some can’t even shop at a store.. we have craft day which many enjoy. It’s a great way to keep the blues away, exercise the mind and be together instead of alone….There is a lot of talk on TV about a great deal of lonelyness lately.
Also it’s great for the children as well. I can remember all the art projects I experienced in my early years.
Repurposing things we might send to the dump is always a great for the environment..
Projects are rewarding in many ways for some. I know, that’s why I’m here.
If your reading this… nice site Amanda👍
I’m looking for projects using small plastic bottle like prescription pill bottles. They are too small to recycle here in Rhode Island. Thanks 🙂
Amanda Formaro says
Hi Lesa. We do have some ideas for Rx bottles here! https://craftsbyamanda.com/20-uses-prescription-pill-bottles/
Ruthie says
Considering some time has gone by, have you by any chance found a way to make these more permanent? Anything that they can be covered with or sprayed with to make the salt keep that look? Thanks.
Amanda Formaro says
No there’s no way to do it. No matter what you cover them with, the salt eventually dries out.
Lynda Lynn says
Hi Amanda, I’m trying to find a way to recycle some of the plastic bottles that get used on a day to day basis. I am keeping the most unusual ones to cut the tops off of. I was hoping that maybe I could use some for the luminaries, but I didn’t know if the Modge Podge would adhere to plastic.
Amanda Formaro says
Mod Podge will work, but I don’t think the epsom salt will. You can use Mod Podge to cover them in fabric scraps, or check out my tutorial for these cute fairy house night lights! – https://craftsbyamanda.com/plastic-bottle-fairy-house-night-lights/
Lynda Lynn says
I guess I’ll go by trial and error, and if it doesn’t work maybe some tiny beads will work.
Karen says
I don’t understand the need for 3 coats.. one is sufficient..and less chance of it falling off..
Karlie says
I tried this a while back and the salt seems to fall off easy when touched. I wanted to give as gifts but I don’t think they would last long? Any suggestions
Amanda Formaro says
These are short term decorations. it’s just the nature of the salt, not much you can do about it. If you want to make something as a gift, try this instead https://craftsbyamanda.com/snowy-pinecone-candle-jars/
Barbara says
We made these with my Girl Scout troop yesterday! Loved it, and they came out beautifully. It was a great activity to do with kids.
Amanda Formaro says
Awesome, sounds like it was fun!
Katina says
I read one of the comments and asked if these luminaries can be used outside as decorations , and you said as long as they don’t get wet but what if they can be sprayed with shellac . Can it be possible to use shellac on the luminaries. So they don’t get ruined.
Amanda Formaro says
I have not tried that. I do know that when I applied Mod Podge it ruined the sheen of the crystals. If you are going to experiment, i would suggest trying it with one first just to see if it works.
Tobie says
Could you add essential oils to salt too? I’m thinking as it warms the aroma will release.
Amanda Formaro says
Let me know if you try it!
Cindy says
Can these be used as outside decorations? I’ve been looking for something to line my walk way and these would be beautiful.
Amanda Formaro says
Only temporarily. You could use them outside on a clear night when it’s not snowing or raining. But if they get wet, it will ruin them. So just be sure to bring them in! :)
Dawn Marie says
Made these a few years ago from your blog – they came out fantastic – now it is time to make MORE – your art has been among my most favourite for years now – it is amazing how I will see a project and think “That is awesome, I want to make that” and sure enough it if “By Amanda” – your instructions and personal touch are an added bonus – thank you for all the years of amazing art –
Amanda Formaro says
Wow thank you Dawn! What a wonderful comment to read this morning – you just made my day :)
Ellen says
I am the least crafty person I know, but I decided to try my hand at these. They turned out beautifully and was much easier than I had it built up in my mind. I will be proud to give these to my sisters for Christmas/
Amanda Formaro says
That’s wonderful!
Toni says
Disregard my last comment. I read so many comments and didn’t find my answer until after I posted mine.
Toni says
Can I do this ahead of time if I am not coloring the epsom salt? I was going to try it out 2 months in advance but without color.
Ruth says
I haven’t read ALL the wonderful comments (there are so many good ones!) but I must ask: Could I glue colored onionskin paper or colored vellum to the jars, then spread Mod Podge over the paper before rolling them in salt and spraying with three coats of sealer? Would the color perhaps not fade that way?
Amanda Formaro says
Hi Ruth. It’s not really the color that fades. It’s the moisture in the salt that evaporates, which causes the salt to look chalky instead of shiny after a week or two.
Candy says
hello Amanda – adore your projects – one question on the Epsom salt luminaries – why does the Krylon sealer not seal the crystals like the painted July 4th ones ?
thanks again for your wonderful work – it is appreciated!
Amanda Formaro says
Hi Candy! Even the 4th of July ones eventually dried out and I had flaking issues. Salt just fights the sealer I guess. :-/
Yvonne Campbell says
Hi, I love these jars!! I live in the UK and am wondering what Mod Podge is?? Is it PVA glue?
Amanda Formaro says
Hi Yvonne! For these yes you could use PVC watered down to make it a little thinner. Mod Podge is a decoupage medium :)
Jennifer says
I think these are so pretty! But do they not last past a week????
Amanda Formaro says
They usually last about ten days. Then you will see that the salts dry out and turn white/
[email protected] says
So beautiful and creative! Pinned!
Amanda Formaro says
Thank you Amy!
Christine says
I have done something like this using” diamond dust” but I have never colored it. I don’t like using candles as I’m afraid of fires. I have some battery operated candles that are on timers so that would make decorating so much easier.
Renee says
Could you add the food coloring or maybe a drop or two of paint to the modge podge, then brush on the glass or jar and then roll it in the salts. Would that give it the same see thru color. Do you think this would work. Thanks for any help or suggestions you can give me.
Amanda Formaro says
Hi Renee. I’m afraid that would not yield the same results. The white from the salts would cover up the colored jar. You could certainly do a test luminary and see how it works! Would love to hear your results if you do :)
kirsty says
Could you add glitter in with the salt ? I have used mod podge with just glitter with great results. I love the idea of the salt flakes. But I love a bit of sparkle
Amanda Formaro says
I’m sure that you probably could Kirsty!
Bobbie says
Love this idea! I shared it on my mothers day gift round up http://iamonly1woman.blogspot.com/2014/05/mother-day-gifts-roundup-perfect-for.html
Devon says
Hello! I was thinking about making these for my daughters frozen themed birthday party. I wanted to make some of them light purple. I saw somewhere that you can color Epsom salt with chalk. Have you ever tried that or do you think it might work. Thanks!!
Amanda Formaro says
Hi Devon, I haven’t heard of that before. If you try it, I’d love it if you stopped by and told me how it went! :)
Devon says
Here is where I found how to color epsom salt with chalk http://www.blissbloomblog.com/2013/03/make-colored-crushed-glass-glitter.html?m=1
I thought it might be easier to make a very light purple with chalk than food coloring
Amanda Formaro says
Thanks for sharing that Devon! Yes, probably would be easier. I’ve never tried the chalk method, may have to add this to my list :)
Yvonne says
i was wondering…you come up with good ideas so i was wondering if you had any ideas for the litte wood containers that brie cheese come in….i know they can be covered for containers but i thought you would figure out something really neat….thanks
Amanda Formaro says
Thanks for the challenge Yvonne. If I think of something I’ll be sure to post it on the blog. So be sure to follow along!
ann moore says
COULD YOU USE THE SMALL CHRISTMAS LIGHTS? LOVE IT !
Amanda Formaro says
For putting inside? I don’t see why not :)
Deb Edlebeck says
I made several of these using pretty long stem margarita glasses.
I put the mod pode and salts on the unside too.
They have colored crazy shaped stems and then
the white salts. They are gorgeous. After I spray
them with sealer (inside and out) I was worried
these would be a fire hazzard! What do uou think?
Amanda Formaro says
Hi Deb. Sealer spray is only a fire hazard while it’s being spray or is wet. Once it’s dry it’s fine. However, if you put salts on the inside as well as the outside I don’t think I would put a candle inside.
Mariss says
Love this idea. All the comments put my thoughts to work. Wondering if the salt would stick more permenantly using a adhesive glue that is not water based. Also rather than adding food coloring to salts how about using a stain rub either per made purchased or making your own with stain medium and acrylic paints and rubbing over salt after adhered to jars and then sealed with a good sealent maybe heavy duty non water based with a brush. Just some random thoughts.
Amanda Formaro says
Let me know if you try either one Mariss!
Marya says
Amanda, These are so lovely! I don’t understand why the salt would flake if you use a sealer. Can you please explain? I’d like to do some in white, so fading would not be an issue. In that case, how long would they last? Thanks!
Marya
Amanda Formaro says
I don’t know why it did either Marya. I get so many questions about this that I’ve decided to do an experiment. When I’m done, I’ll update the post :)
afracooking says
OI found you through this other blog official pacific merchants – I just wished I had seen this post before x-mas. THese look so great! But now I am following you so I will not miss one more brilliant idea :-)
Amanda Formaro says
Glad you stopped by! I try to post new projects several times per week :)
Gina says
Made these frosted luminaries for my cousins this year and they turned out to be really pretty! I hated the sealing part though and they had a bad paint smell to them afterward. Even though I let them air out on the patio overnight. I’ll leave them out a bit longer next time! :)
Amanda Formaro says
Yeah airing them out for a while first would be good. If you wrapped them shortly after making them that would trap the smell inside. Glad you enjoyed the project!
Jodi says
Amanda, you are a life safer!!! These are fantastic! We have VERY limited means this year and I hate the thought of not being able to give to those I love. These look fabulous and will not take much time or money to make! Thanks so much for sharing this!!!
Amanda Formaro says
Thank you Jodi! Just keep in mind, as it states in the post, that these are truly temporary items as the salt will change and dry out.
Norma says
I was looking for something to do him several cases of kosher sea salt given to me and this was similar to what I have in mind and could not remember if it was glue or not. Thank you it is a perfect craft for my Junior Church group.
Amanda Formaro says
Hope you have fun!
Terri says
hi Amanda and all herein …. i just saw this really cool project uve come up with ,Amanda and tis a GREAT idea … but i will be using more of the Plastic type containers , see through of course… for the LED lites ill place in each container once completed … for the Nursing Home Residents i see often throughout the years , as i have several friends there now.. and too .. this particular nursing home, has become a very familiar home to me .. for my late hubby was there recouperating prior his passing 6 yrs ago… i too have a special area with hubby and my ONE professional pic hanging with plants and what not in memory of our travels throughout our wonderful marriage of 30 yrs.. this idea u have shared Amanda is something ill be using , as one or several others herein mentioned about placing the lit jars at hubbys and my portrait .. what a terrific idea … everyone i know is getting a jar , as well as the items needed along with the instructions herein .. so they too can enjoy the fun of it all.. ty ty ty for sharing.. ur a gem .. keep up the good work, and HAPPY HOLIDAYS to one and all….. Blessings !
Amanda Formaro says
What a sweet gesture Terri! :)
Kandy says
I read your info piece about the epsom salts losing color. When you seal them with the clear sealant, does this stop the color loss?
Amanda Formaro says
Hi Kandy. I sealed mine and they still lost color. However, I only used one coat of sealer, so it’s possible (I don’t know for sure!) that additional coats could seal in the moisture and keep them from drying out.
gudrun says
Have a question I cant get epsom salt can i use corse salt or road salt/rock salt ?
Amanda Formaro says
Hi gudrun. I have heard that coarse salt works, but I’ve never used it so I can’t tell you for sure. Sorry!
Samantha says
I apparently did a few things wrong? 1. I didn’t read about the crystals losing color an flaking off. 2. I used too much of either mod podge or salts or both. 3. I did too many coats? Is there a way to fix this?
Amanda Formaro says
Hi Samantha. Yes they will lose their color eventually. This is a temporary project. If you have problems with the salts sticking, your best bet is to just start over. Soak the jars in warm water. This will dissolve the salt and soften the Mod Podge enough to clean it off so your jar will be clean again. Good luck!
Shannon Sakelarios says
I want to make these as centerpieces for our Christmas Party. I wondered if it would work okay if you added glitter in with the Epsom salt to roll the jars in? Thank you for sharing this! These are beautiful!
Amanda Formaro says
Yes I think that should work just fine. Just remember to create them only a couple of days before the party as the salts will eventually dry out and turn white!
Debi says
This would work on picture frames too! I’m going to try this asap!
Amanda Formaro says
Hi Debi! Just keep in mind that the salts will eventually turn white and may flake off. This is really a temporary craft!
Elizabeth Molnar says
I read the comments on these luminaries from epsom salts. I do understand that they will dry out(so being temporary), however you mention using a coat of paint of top of a design created with the salts. That made me think there must be something that stops the air from getting to them and drying them out to a dull white. The exposure to air seems to be the thing that you are saying causes a temporary condition and not a permanent condition. Also, I would think a brush on would be better than a spray. Just a thought.
Amanda Formaro says
Hi Elizabeth. It’s true, it’s the air that’s the enemy. I did spray mine with a clear sealer, but they still dried out eventually. However, I didn’t go crazy with the spray either, I only did one coat. So it is possible that you could preserve them longer with several coats of clear spray. As for a brush-on sealer, I tried three different types of Mod Podge with unattractive results. They gave the salt a muddled appearance and took away the pretty sparkling sheen.
[email protected] says
I must try to make these for the holidays…
Amanda Formaro says
Hope you enjoy the project!
Lisa B says
I love these. Did you use tea-lights or battery operated tea lights in them???
Amanda Formaro says
Either one, I used real tea lights in mine :)
gale says
do you think you could use lavender Epson salt on these and spray them after if they would work and would the salt start to fall off.
thanks
Amanda Formaro says
Hi Gale. Without having done that myself, I can’t predict how they would last. If you have time, I would recommend making one and letting it sit for a week or two and see what happens!
Cindy says
These are very pretty! Do they last forever or only a certain time limit? I am asking because you said if your going to use them for a wedding to do it a week before. You would think they last forever. Again they are pretty! :)
Amanda Formaro says
Hi Cindy :) There’s a link at the top of the post that takes you to an article I wrote about epsom salts and the discoloration that results. The moisture will eventually evaporate from the salts, leaving them white and chalky looking. That’s why I suggest doing them no longer than a week prior to your event :)
Judy Vert says
I made these last December and added a thin silver ribbon around the lips. I placed them on the white tablecloth, with a silver runner then the candles. I then added some sprayed silver twigs to go around the candles. I had 7 ladies for our weekly get together. The table was beautiful and have made some of them for gifts. Thank you for sharing this.
Amanda Formaro says
Sounds so beautiful Judy, so glad you enjoyed the project!
denice says
I had used this on my bathroom window except for the clear spray at the end makes window like nice & no one can see in, works on glass doors for cabinets or patio doors too
Amanda Formaro says
Interesting! It doesn’t flake off after the salts dry?
Becky Hamshar says
Hi there!!!
I am preparing for service with Peace Corps and was looking online for some simple crafts to do for my family when I came across your instructions for these wonderful luminaries. I just did 4 small ones and a couple of mason jars in various colors. Boy will my family be surprised to get such a gift while I am away (that is why I am doing the crafty stuff now, before I depart, so they get a gift from me while I am away- whew! Did you understand that?). Anyhoooo…. thanks for such a great tutorial. I had fun and found it to be very easy to do.
Amanda Formaro says
Hi Becky and thanks for writing! I’m so glad you had a good time making these :) Hopefully you read the part in the post about the salts turning white and flaking off. This is not a permanent project and I hope you understood that from what was written in the post.
Marie Wendel says
Why do you say that if you are using them for an event you shouldn’t make them more than 1 week in advance?
Amanda Formaro says
Hi marie, as I mentioned in the post, the liquid from the salt will eventually evaporate, turning the crystals a chalky white.
Thegirl Nextdoortattoos says
CHECK OUT THIS TWIST!! KAREN BURGESS OF ISLETON CALIFORNIA(FOR 30+YEARS) SAID TO MIX EPSOM SALTS WITH ……….BEER. BEAUTIFUL!!! HAS TO BE THIN ..SLASH….WATERY. HAVE FUN. I JUST DONT KNOW WHAT THE BEST THING IS TO WASH IT OFF. WILL POST PICTURES ON MY FACEBOOK…..Thegirl Nextdoortattoos
check it out though for sure. its beautiful when done correctly and pretty when done by me.
Lois Player says
thanks for posting this again.I must have missed seeing the part about the sealer.I have made a couple of these and the salts just flake off without a sealer. Will try that step this time….Thanks for the re-post.
Moonangel says
I made these this week with my 9 and 7 year old boys as gifts for their teachers. I didn’t use a mason jar, I found a set of tea cups and a pair of wine glasses, and I didn’t color the salt (short on time). It was very easy and really fast. Thanks for the idea.
Sammy says
I’m so making this for my mom for christmas. I’m seventeen and i am her mothers day present because technically im born on mothers day:) anyways yea im making this into a “hope” jar. sO IMMA DECORATE IT aND im making it so i can put pieces of paper with encouraging words and ecetera for her in. According to my dad she has been wanting this for a long time. This is the perfect way to decorate!
Much Thanks!
Beverly says
How do I register so I can become a part of Pinterest? Your registration form should be on the bottom of each page or at least on the home page.
Amanda says
Hi Beverly. This is not Pinterest :) If you need to register on Pinterest, please go to pinterest.com
Beverly says
How do I get the recipes, without all of the30 pages+,- of comments from others, for some of the craft ideas.
Amanda says
Click the link that says “printable version”. You’ll see it right above the list of supplies:
Epsom Salt Luminaries
by Amanda Formaro
printable version
Ashley Ward says
I just finished these and they look adorable! I use baby food jars instead since I have a ton that I’ve been saving. I printed out a template I made of Christmas trees and holly and pasted them onto the jars then applied modge podge and epsom salt. That turned out super cute and can’t wait to see them lit up with a candle! Thanks so much for the idea.
Amanda says
Great idea Ashley!
Ann says
About the salt turning white issue….could you color the jar (with mod podge and food coloring on the inside, baked) and then use plain white epsom salts on the outside with the mod podge and sealer?
Amanda says
it won’t stop the salt from turning white. I haven’t experimented yet with additional coats of sealer, but a lot of people are asking so I may just do that this weekend and report back in a couple of weeks.
Christy says
Trying these Epsom salt luminaries and it was a little tricky at first. Do u mean i should paint the jar with MP, then roll in salt, let dry, put another coat of MP, then roll in salts a second time, let dry then spray with sealer? Also MP was a bit expensive so i tried mixing Elmer’s (generic) glue with water. Is that ok or should i stick with the MP? Beautiful idea! Cant wait to find more!
Amanda says
One coat of Mod Podge and one roll in the salt. Adding Mod Podge on top of the salt will remove their sheen, it “muffles” it, for lack of a better explanation. And yes, a mixture of white glue and water will work fine :)
June Smith says
I have a whole box of glass vases in different shapes and sizes in my storage shed. You know the kind when you get with flowers delivered from the flower shop. I’m thinking some of them would work nicely with the Epsom Salt. Can’t wait to try it.
patricia magliochetti says
love this idea,they are so pretty.thank you for a great idea.i will be making them with my family.thanks again
Katie says
Found these on Pinterest and just tried them – they are great! I used white decorative sand from Michaels instead of salt. No word yet on if the color stays, but so far they look very similar!
Amanda says
Great idea using sand!
Alesia says
I am going to attempt to do this with clear glass ornaments for my Christmas tree this year. I was wondering if anyone had tried making the salt a little bit darker in color. My tree skirt is red, blue, and green. I’m worried that if I add red food colouring that my ornaments will end up being pink…
Amanda says
Hi Alesia. I have made a glass ornament, not with color, just white, BUT wanted to let you know that they will only last this season. The following year when I unpacked my ornaments, the epsom salt one was all chalky white and flaking off all over the place. However, the good news is that you can wash the salt and glue off and do them again, if that’s something that you want to do. Just keep in mind, this is a temporary decoration.
Lisa says
Could these be used outside?? I would love to line my porch and sidewalk with them.
Amanda says
You could certainly use them outside, but NOT in inclement weather. So if the weather is clear it’s fine. However, rain could be a problem. Snow might be okay, but if they are sitting in wet snow that might cause them damage.
Janette says
Great idea. I will be saving jars for next christmas and my preschoolers can make them.
What is Modge Podge? Is just a brand of white glue that you use for wood craft etc or a special glue?
I live in Australia so would need to find the equivalent.
Cheers
Janette
Amanda says
Mod Podge is a decoupage medium. I found this http://au.answers.yahoo.com/question/index?qid=20100728003835AAtu0ZE which tells you to “Just go to Spotlight and ask there for it, or to any craft or scrapbooking shop near you.” If you can’t find it or live in a remote area, you could mix white craft glue (2 parts) with water (1 part). :)
Terri McDaniel says
Thanks for sharing, love all the posts. Was wondering if you could do this with a wine bottle, drill a whole in the back to put L E D Christmas lights in. Didn’t know how to get this look.Will drill the whole then try the epson salt. I also heard you can buy lights that have a swich to turn on & off. This would make beautiful Christmas gifts!
Amanda says
I’d love to hear your results! I’ve never drilled through glass, though I know it can be done :)
Penny says
I made these. I put an electric tea light candle in each. Same effect as a wax tea light.
Sandy says
I just made these for a wedding gift. They are beautiful! Thank you!
Julia says
If you spray with 3 coats of clear gloss sealer, will the salts still dry up and flake off?
Amanda says
I couldn’t say for sure Julia, I didn’t use three coats. If you try it, I would love to hear your results!
Naomi Edwards says
If you don’t use food coloring and leave them white. Do you just put on the mod podge and roll them in the salts and then seal them? I would hate to make a gift for a friend and then it fade out. That would be embarrassing.
Thanks these are beautiful.
Amanda says
That’s correct, Mod Podge, roll in salt, let dry, seal. :) REMEMBER these are temporary as stated in the post, they will eventually turn white and lose their luster.
Khwan says
I would like to ask about “Mod Podge”. I didn’t see this in my area (Thailand) or if someone import it, it’s quite expensive. Is it possible to use another thing, such as Latex ???
Thank you in advance.
Amanda says
You could use any white glue mixed with a little water. 3 parts glue 1 part water.
Jeanne Quin says
Amanda,
After you roll the jars in the white salts, do you coat with mod podge again right a way and then roll in the blue or green? So do you coat with mod podge 3 times?
Thanks so much!
Amanda says
Just follow the step by step instructions in the tutorial, there’s a printable version without all the pictures so it’s easier to read. You only put the Mod Podge on once, right before you roll them in salt. Adding Mod Podge over the top will kill the sparkle of the salts and create a blobby looking mess.
Amanda says
I just re-read your question. Each color is separate. So you don’t roll in white first and then another color. You paint the jar with Mod Podge, then roll in whatever color salt you want. that’s it :)
Cindy says
If you cover the salt jar in a sealer does this keep them from drying out? Besides paint can you cover them in a clear acrylic with out creating a fire danger? Thought I might use this idea for out Christmas gift the preschoolers give to thier parents.
Thanks.
Amanda says
No I’m afraid they eventually will still dry out
Loreen says
Making these for my son’s winter wedding, making the epsom salts pink as that is the brides color for the wedding. making in some larger bowls and looking candles in pink water. so pretty
Loreen says
*floating
Amanda says
That will be gorgeous!
Amber says
After doing some research it looks like there are some non flammable gloss sealers. I must have bought the wrong one
Patti says
Couldn’t you just mix equal parts of the salt and Mod Podge, paint onto the jars and allow to dry. Since Mod Podge already has a sealant you wouldn’t need to spray any other sealant after it all dried.
Amanda Formaro says
Unfortunately no. The Mod Podge, when mixed with or painted over the top of the salt, turns everything into a wet blobby looking mess. I tried with several different types and each time it was a failure.
Amber says
HI there. I tried making these today, and am now waiting for the mod podge to dry. I have noticed, that the Gloss sealer is highly flammable. I bought the same one you have used in the picture..is this ok to use as these are to be used as candles? Thank you
Amanda says
I burned candles in them quite a bit and never had a problem. I believe that the flammable issue is when you are spraying it near flame. I never had a problem.
Melissa says
Once the salt loses it’s moisture the color fads and the salt turns to white powder. Another way, though more costly, you can use colored crystals found at craft stores. This is an awesome idea, fun and easy to do with children!
gloria says
how long do they last…it’s so pretty.
Amanda says
Hi Gloria. It’s been a while since I made these, but the shimmery look is short lived, a week, or two at best. The moisture in the salt will eventually evaporate, causing them to dry up and take on a chalk look. The good thing is that when that happens you can soak them in warm water which will dissolve the salt and you’ll be able to easily remove the glue and start over!
wanda says
I have a cape cod theme and there will be alot of this around my home. They are beautiful! Ty so much for sharing.Wanda
Amanda says
Oh those will look great with that decor! :)
kate says
Can you only use mod podge?
Amanda says
Hi Kate. Mod Podge is what I used, but I’m sure you could use white craft glue thinned with a bit of water :)
Pamela says
These are very pretty. I’m going to try them but I think i’ll add some tiny beads for a bit more color. Thank you for sharing your idea!
Pam
marjorie says
If these are sprayed with clear gloss spray, will that seal them and they will not deteriorate or fall off? I don’t like giving a gift that will prove temporary. Thanks
Amanda says
i can’t guarantee that will be the case. While these are fun as gifts, they are more temporary than permanent.
Lena Arrington says
This is the most creative idea I have ever seen . I am a craft person and do things as they pop out of my head. I love this, its is great, you are getting my attention good.
Amanda says
Thanks so much Lena, I really appreciate that!!
Tui says
Hi,
what is Mod Podge and what is the recipe for making Mod Podge.
Sorry silly Kiwi from New Zealand and unfamiliar with this slang :)
Cheers,
Tui*
Amanda says
Hi Tui :) Mod Podge is a decoupage medium. Look for decoupage in the store. You can always mix white glue and water to make a paintable consistency.
DONNA CHURRY says
Should the Mod Podge be Matt or Gloss?… and what color does the Epson Salt change to over time if you leave it clear/white in the first place?
Amanda says
I’m not sure that it really matters, but I used matte :) The epsom salt will turn white over time, it’ll lose its sheen and become a chalky, dry white.
Marilyn Forsyth says
These would be really pretty in a spa like bathroom with the candles surrounding a full bathtub of bubbles.
Sybil says
Love these so much we are doing tons of them for our Jan Wedding! Thanks!
Jacquelyn Jackson says
you r so creative thanks for sharing I will most certainly try as I always have the salt on hand for those sore achie muscles lol
Amanda says
Thanks Jacqelyn!
Jodi Reeves says
Could you use normal Elmer’s glue instead of modpodge? We live out in the middle of no where and getting to Wal-mart to pick some up is an ordeal. lol I love the idea and this would be a great craft to do with my girl scout troop for Christmas.
Amanda says
Hi Jodi :) While I haven’t tried it with Elmer’s, I honestly don’t see any reason why this wouldn’t work. I would say go for it :)
Jodi Reeves says
Great!!! Thanks for the reply.
Rachel says
i was wondering if you could use regular table salt instead of epsom salt?
Amanda says
I’m sure you can, but the crystals are much smaller, so the affect may be different.
glo says
Awesome idea ! Thanks. Leaving a blank heart or swirls would be pretty too. Have you tried colored sprinkles ? This leaves so many areas yet to be discovered. Thank you again. glo
Kelly Jacobs says
Thanks for the great idea! I’m planning on doing these with my girl scouts. I know they will love it!
Kristina says
These are adorable! I was on the lookout for a DIY project to spice up my mother’s soap display at fairs, and came across this. We used the candle jars since neither of us wanted a noticeable lip on the jars. And liquid soap dye works great on the salt! You can use as much as you want, the color doesn’t fade and you can make deeper shades. You can buy it at Hobby Lobby for a couple bucks.
Thanks, this was a great project!!! :)
Amanda says
How perfect using the soap dye! You’ll have to let me know if the salts eventually turn white. Sure would be nice to find a way for that not to happen :)
Nina says
These look great, can’t wait to try them
Linda says
I think these are lovely, but I wonder about more color. I would like my color to be a bit brighter with more definition
Amanda says
Hi Linda! I did not experiment with deeper color. You could certainly try, though if it were me I would only try with one jar at first and see how it goes. Too much of the liquid food coloring could make the salt too moist.
Katrina says
Love these! I’m in the process of spraying them with clear coat as we “speak”. I used scented epson salt and they smell wonderful. I got it at Dollar General for about $3. It comes in Eucalyptus and Lavender. Thanks so much for the idea! My husband was impressed:)
Amanda says
That’s awesome Katrina, so glad they worked out for you!
colleen owen says
hi amanda, great idea, love them so much, just finished 12 of them for
easter. i used the green, blue, yellow, and very little red so it would
look pink. there drying now, spray in a couple of hours. i’m excited there
so cute, thanks for the idea. colleen
Amanda says
How fun Colleen, Happy Easter!
Misty says
I want to make these for my wedding, but my question is does the salt turn white in time or is from the heat? I am getting married in June 2012 and wanted to make them now so there all done, but I want them purple. I have a battery operated tealight to put in them so I don’t think there will be much heat, but if there going to turn white now because I need to make them early, I may as well just make them white in the first place…lol
Amanda says
Hi Misty! Yes, they do still turn white in time, even without heat. I believe it’s the contact with the glue. The glue is liquid and the moisture from the glue makes them turn white eventually. What I would suggest, since you have some time, is to make one right now. No need to color the salt, because even my white ones turned white and they had no food coloring. Mark on your calendar when you made it and wait and see how long it takes before it turns white. Then you’ll have a better feel for how early you can make them :)
Misty says
Thanks!! Thats what I will try then. I know right before the wedding I will be slammmed with everything going on but maybe I can get some friends together and make a day of it :) I need 60….lol. I am also going to use baby food jars so that will make it a little faster.
Amanda says
That sounds like fun getting a bunch of friends together! Congratulations on your big day! :)
Nancy says
Gorgeous! I am going to do this, thanks for the instruction :)
Wilma Egress says
i would like to get the pictures and recipe for these thank you
admin says
Hi Wilma, the instructions are in the post :)
Lezle says
I have not tried these yet but I am definately going to. I was thinking about taking 3 of the decorated jars in different sizes and connecting them together and maybe put some ribbon around them.
Kayla says
This is such a good idea!!! I tried it out and it was so beautiful. I couldn’t stop staring at it!!!
Elaine says
I am new to crafting so I hope that this is not a stupid question but why the 3rd bowl of not colored salt? Do I need to roll the jars in both the colored and the plain to get the effect? Or is just another color option? Thanks!
admin says
Hi Elaine! My jars are green, blue and white. So I colored two of the bowls of salt and left one white :)
Sandy Fodero says
There are several different types of Mod Podge, which is the best to use for the epsom salt luminaries?
admin says
I used the matte finish for these :)
Lori Thomas says
Hi Amanda
These are so cute! I am really into decorating mason jars lately. I have three showers im using them for. I may use your idea for them if that is okay with you
admin says
Of course, hope you have fun with them!
Sarah says
I was wondering… What is mod podge?
admin says
Hi Sarah! Mod Podge is a brand name of a decoupage medium :)
Kris says
HI,
that is wonderfull, I bought some salt and food coloring today and my first one is drying now..it looks georgeous already…thanks for this post…great great great :-)
martha says
Thanks Amanda,
These jars are great. I am making 12 large mason jars for my nieces wedding. They will line the walk way for her and her new husband as they walk in the reception.
admin says
Sounds gorgeous!
Bobbi-Jo says
i think i will make these for my husbands and mine renewal of our vows in 2 years
cant wait
Janelle says
These are great. I saw where someone used baby food jars. I work in an infant room and need small inexpensive gifts for my co-workers. These will work and I can recycle the baby food jars at the same time. Thank you
mary trujillo says
i just love the the look of the jars,im gonna try it soon thanks
Carrie @ Crafty Moms Share says
Thank you for the tutorial. My daughter and I made these yesterday. I posted some pictures on my blog http://craftymomsshare.blogspot.com/2012/01/winter-candles.html if you would like to see.
Amanda Formaro says
They look great, so glad you guys had fun! :)
Nikole says
I was trying to come up with a way to decorate mason jars as a wedding favor, I was just going to spray paint them with frost and tie my heart around them. But I absolutely love this! Will so be doing these for my wedding! =D Thank you!
Amanda Formaro says
Glad you like them, and congratulations!
kiley says
thanks for sharing this! i have been looking for a way to get a temporary ‘frosted’ look for winter :)
Amanda Formaro says
You’re welcome, thanks for coming by!
Amber says
Just had my 1 year old’s snowman themed birthday party and I made these for the tables. I wanted them to stay white and I used his old glass baby food jars. They were super easy and turned out perfect, thanks for the great idea!
Amanda Formaro says
How fun! So glad they worked out for you!
Bernie Acker says
I adore this look. Was wondering if I could do these in brown somehow for an upcoming “groundhog” banquet where I need about 30 of them for the tables. I like the glitter idea too. So interesting…and I thought Epsom Salts was only for soaking my feet…lol
Ashley says
I just wanted to let you know that I followed your instructions to make these, and they came out awesome! I wrote about it on my blog, and linked to your page to give you credit for the project & instructions. If you want to see my results, you can here:
http://ashjav.blogspot.com/2011/12/epsom-salts-luminaries.html
Thanks again for the awesome idea!
Amanda Formaro says
Thanks so much Ashley, they look wonderful!
Lynette says
These are awesome, I saw these on a Pinterest space of a friend of mine, using old jars or cool shaped jelly jars and getting your epsom salts for a buck at the dollar store makes them a bargain craft. They are so pretty!!! Thanks!!!
Amanda Formaro says
Thanks Lynette! Glad you like them :)
Ashley says
JUST got done making these!! So much fun, and they all turned out great!!
Mandy says
I just made some of these and they turned out awesome! They are so easy! I did all different colors and then mixed them all together and did one that was almost tie dye looking! It’s so cool!
Malerie says
These are really pretty and easy to make for gifts or something to add to christmas decorations. For mine, I added some white and blue glitter as well and it turned out really well!
Elizabeth says
I tried to make these as a gift for Christmas. I really wanted it to work out but I had severe difficulty getting an even layer of the epsom salts around the jar. It clumped in some areas and was bald in others. I tried again and again, adding thicker layers of mod podge on each successive jar but none of them turned out anywhere near these.
Amanda Formaro says
I’m so sorry that happened Elizabeth. That’s the first time I’ve heard that. I’m wondering if maybe your epsom salts had too much food coloring in them making them too wet to stick maybe?
Ashley says
try instead of rolling it in the salt to just pick it up and sprinkle it where you need it! Worked foe me better that way!
Erica says
Love these! This may be a stupid question, but would it be possible to pour candle wax in these to make a candle in the jar, or should you just stick to a tea light candle?
Amanda Formaro says
A tea light would be better, simply because the salts will eventually turn white from the heat of the candles that burn within them. By just using tea light, you can always soak the jars to remove the salt and adhesive and then reuse the jars again. :)
Torrie B says
I don’t know if you’re still answering comments…but I found this tutorial on Pinterest and fell in love with it! We were going to make these tonight…until I realized I forgot to buy a paintbrush lol. I do have a question though…I bought the Mod Podge glossy finish and just saw you suggested the matte finish. Will the glossy make a difference or should I return for the matte finish? Even if you don’t answer…thank you so much for sharing this wonderful craft :)
Amanda Formaro says
Hi Torrie!
I mentioned the matte finish because that’s what I used, I am not positive it won’t make a different, but I THINK it should be fine. Merry Christmas!
Christy @ Raising Knights says
I was inspired by another Epsom salt craft and did a search for more. Of course, I ran across your luminaries. Love them!
I posted a collection of Epsom salt Christmas crafts and I hope it’s okay with you that I added a link (with credit) to this post: http://www.raisingknights.com/2011/12/8-diy-christmas-crafts-using-epsom.html
Happy holidays!
Amanda Formaro says
Thanks so much for the mention!
Angela Barribeau says
I’ve seen other tutorials that used the Modpodge right on the candle and then rolled in Epsom salts, too.
Amanda Formaro says
Yep those are pretty, i made a pink one last year for another site :)
Kim says
Can you clean off the mod podge when you’re finished with the salt on the jars? Acetone maybe?
Amanda Formaro says
You can soak them in warm water. The salt will dissolve the water will loosen the Mod podge. it’ll come right off! I actually just did this last week and my jars are all clean again :)
Nadine says
I’m currently in the process of making these into a pendant light fixture :) So pretty!
Amanda Formaro says
Nadine, that sounds so pretty! I have to warn you though, once the epsom salts are exposed to heat they will turn white. These are great for a wedding or party, but not so great for long time use. In fact, I just today soaked these jars and removed the salt to make new ones for the holidays :)
MommaC says
I recently found your luminaries on Pinterest and really loved them! Had to make some for Christmas gifts this year. Thanks for posting them! Here’s how mine went:
http://thebitchinspot.blogspot.com/2011/11/are-you-pinner.html
Amanda Formaro says
They look wonderful!
Danielle says
This is a great idea! Do you have any other ideas of things that may look like snow? I’m planning on spray painting wine bottles white and then doing this (or something like this.) I want to make sure it looks fab!
Amanda Formaro says
Have you ever tried SnoTex paint? It’s awesome and looks like snow and dries nice and hard!
JaeDee says
These are gorgeous. Can’t wait to make one/some. Wish the directions could easily be printed out.
clydene says
Love this idea ! I use epsom salt as a filler in my vintage milk bottles it looks just like the milk is still in the bottle.
Allison says
I made some of these a couple days ago, plan on making about 40 for party favors/centerpieces at a Thanksgiving dinner. I burned tea lights in them for one evening and they are all white. I did see all the comments left about that. Have you found any way around that? It didn’t take a few weeks, unfortunately. I’m now doubting whether these would be a good party favor idea…I’m thinking it must be the sealer that turns white?? Any suggestions you might have are appreciated. Thanks!
Amanda Formaro says
Hi Allison. Before I made these I had no idea that the salts would turn white. it doesn’t have anything to do with the sealers, it’s the actual chemical make up of the salt. I haven’t tried making any and not lighting a candle in them to see if they would still turn white. However, I did have a pillar candle that i rolled in the salt but i never lit it, and they seemed to keep their crystalization. I did a little research and found this : “Epsom salt crystals turn white when heated and dehydrated.” So in your case, since you have a little time, maybe try making one and using a battery operated LED tea light. I’m not sure how much heat those give off and that may be a good solution. i haven’t tried it myself however.
Tora Geirs says
wow just found this and think it awesome and SOOOO easy to make, going to try it SOOOOOON, thanks for sharing.
Norma Goodale says
I ran across a link on mtc forum for your lovely epsom salt jars, Amanda. Not sure if you remember me, you bought twig wreaths and a rag quilt from me way back. Think I was mainely twigs but could have been cat tail quilts in the beginning! Spent 10 years online selling those wreaths, got so busy I hardly could keep up. Lots of changes in my life! So glad I found you, will follow.
Amanda Formaro says
OMG Norma, I not only remember you but think of you often! I still have both rag quilts, in fact one of them is in the living room and the other at the foot of my bed! I loved the wreaths but alas don’t have mine anymore, they were so gorgeous. Do you still sell them?
Laura B. says
Found your luminaries on pinterest and loved the idea. Picked up some vases and glasses at Goodwill yesterday and just finished two. So easy and so pretty! I’ll be using them for a centerpiece at a table I’m hosting at my church’s women’s banquet. Thanks for sharing your creative ideas!
Amanda Formaro says
So fun, thanks Laura!
Brittany aka Pretty Handy Girl says
Amanda, I love this project. I’d like to use it in a round up of crafts that can be made with kids for holiday gifts. The post would be published on TLC’s Parentables.com website. May I have your permission to use a photo and link back to you?
Brittany aka Pretty Handy Girl
brandi Victory says
We love your site. I have a daughter that has CVID which make it where we don’t allow her to go to the movies, Walmart, etc. So she’s turned to crafts at age 10. We just finished the Halloween luminaries. She thought that was a blast and they are so darn cute with our other decorations. Now I will get her the stuff to start this one. Thank You from the bottom of a moms heart for all the ideas!
Amanda Formaro says
Oh Brandi! That must be such a challenge! Admittedly I had not heard of CVID and had to look it up. I’m so glad that some of my projects have found their way into your home and your daughter’s hands. God bless!
Colleen says
I love these, I made them tonight for a birthday party. They were very easy and quick. I think people will love them. I made fall colors, yellow, orange, and a pretty green.
My colors are deeper and I wish I had used less dye so they were more see-through. Another suggestion I have is – if using mason jars, choose ones with wide mouth top. The regular size mouth is hard to get your whole hand into, and I have small hands.
Amanda Formaro says
Oh yes, definitely using the wide mouth jars is easier. So glad you enjoyed them!
Tasha says
It might be possible to use mica or other powdered colorants (ultramarines and oxides) in these instead of food coloring… Then the color wouldn’t fade. Just mix in with the salt. This looks like a really fun project!
Amanda Formaro says
Thanks so much for those suggestions Tasha!
Liz Gossom says
I love this! This looks like a great gift idea.
Crystal says
If the colors wear off after a few weeks, can you clean the jars of the salts and re-use them? Or do you just toss them? (Personally, I would not be a fan of tossing the jars after only a few weeks …)
Amanda Formaro says
Yes, you can remove the salt and reuse them :)
Tasha says
I love these, and have actually made several of them. My question is do any of you have a problem with them turning white after you burn one or two tea lights in them? I have tried everything I know to keep this from happening, but it always does, lol.
Amanda Formaro says
I’ve had the same issue. They do turn white after a while. But the salt can simply be rubbed off with your hands and reapplied.
Jen says
Just wanted to let you know that I found this tut on Pinterest. I love it and made 6 this afternoon.
Proud new follower. Have a great weekend!
Amanda Formaro says
How fun, thanks!
Chris says
These would make GREAT and economical centerpieces!
Ms. Salti says
These are gorgeous! I found the pic that someone had pinned on Pinterest and found your blog! I absolutely love these and cannot wait to make them! Thanks for the tutorial!
Amanda Formaro says
Thanks Ms. Salti!
Erin says
I tried making these this past week. My friend is getting married and asked for candle holders, and being the crafty bridesmaid that I am I volunteered. It took some trial and error but I was able to match her colors almost exactly using different food coloring but learned very quickly that after the first coat you need to seal it if you want to add more glue the darker colors change when they get wet with the mod podge glue. I also bought my candle holders from Ikea they come in packs of 4 for 1.49$ which is a bargain when making so many. Thanks so much for the inspiration!
Amanda Formaro says
That is so fabulous! I only hope the wedding is soon? The colors do change to white after they’ve sat for a while.
Janice Couble says
What a wonderfull idea!, I am making these also for my wedding , can you tell me roughly how long it is before the color changes to white? Just so i don’t make them too early!!
admin says
Hi janice. I wish I could, I didn’t really time it. I know it doesn’t matter if you have heat or not, they will eventually turn white and I believe it’s from the moisture in the glue. I would suggest as I did for someone else, that you experiment with one now. Then you’ll know how long they will last before turning. If you make them a week ahead of time though, you should be safe :) I know that mine lasted longer than that.
Julia says
I’m not sure if this will work, but I follow this link to learn how to paint them http://www.marthastewart.com/269787/yellow-votives
Then put on the epsom salt on. I would think the colors would show thru and they would not fade. Hope it works!
Amanda says
please let me know if it works for you Julia!
Corinne says
LOVE this idea! Do you know if something other than Mod Podge would work? Maybe a tacky glue? (just cheaper) Found you on stumbleupon.com. Adding you as a favorite!
Amanda Formaro says
I’m sure a tacky glue would work fine :0)
Vicky@One Orange Giraffe says
I LOVE this idea. I found it on Pinterest. Thanks!
Kimberly O. says
Found these on pinterest — planning on making some for my best friend for Christmas (we're doing ALL handmade goodies this year!)
Amanda says
Thank you Tammy!
Tammy says
I LOVE this idea!!
Tim says
These are beautiful and oh so thrifty! Thanks for sharing. I pinned them to my board at http://pinterest.com/pin/19844038/
Amanda says
Hi Mary, so glad you enjoyed the project and that they came out great! To be honest, I wouldn't sell them. After a few weeks the salt will end up taking on a white appearance and can begin to fall off. I wouldn't feel comfortable offering these for sale. These are great for immediate use for a party, wedding or backyard get together, but long term they are not ideal.
Mary Matthews says
I absolutely loved these. So I planned for a girlfriend of my to come over and we had a craft day and made these. We made a dozen of them in no time. We made green, blue and red ones. Turned out just beautiful! If you sold these how much would you sell them for? Thank you for all your wonderful ideas.
Joni says
These are SO PRETTY!! I am totally making them for Valentine's day. Or pretty much any other holiday I can think of. BTW, I never knew how much I liked luminaries until I Stumbled on to your blog. Every time I see a new one that you've made I get a happy squeal inside. :D
Debbie says
Thanks Amanda – I'll go for the matte one & look forward to making these!
Amanda says
That's a good question Debbie. For this project I would just buy the Matte Finish. There are a lot of different kinds, but that one would suit your needs for this and work for hundreds of other projects as well :)
Debbie says
These are really beautiful! I can't wait to try some to give as gifts. I was looking to buy some mod podge – I've never used it before – and there are so many different kinds! Would it matter which ones I use for these or did you use a certain kind? Thanks…
Anonymous says
Love these !
Tasty Eats At Home says
Love these! So pretty. And I like the slight color to them.
[email protected] says
The food coloring is genius. I have to make these for my winter porch! I'll be spreading the word as well.
Missy says
These are terrific! I have relatives coming in tomorrow, so I can make these as a little extra something for them. I absolutely LOVE this. Thanks!
maggy, red ted art says
Gosh, lovely and very festive!! What is gorgeous about these, is that you can enjoy them well into Jan or Feb (if not all year round!)
Maggy
lauren@WESTFURNITUREREVIVAL says
this is such a great idea they look so festive…
Marie {Make and Takes} says
Such a cool craft! They look so pretty all lit up! I'd love to have you submit this to the M&T Spotlight: http://www.makeandtakes.com/spotlight
Kristin says
Love this idea! Great job, can't wait to try it!
Beansieleigh says
Love this idea, and can't wait to try it! I'm now a follower!.. Wishing you and yours blessings and lots of holiday fun in the days ahead! ~tina
Suz says
ps. hope it's OK l've added a link to my blog l love the idea so much?
Suz x
Suz says
What a pretty idea and so easy to do..thanks for sharing…love it
JRFrugalMom says
That is so cool, and it seems so easy. What a fabulous idea.
I made Danish Christmas Hearts and Paper Christmas Stars to cheer up our tree.
Happy Holidays!
JRFrugalMom from
Frugality Is Free
lfhpueblo says
So very pretty, thank you for sharing this.
Barbara Jean says
great project. thanks
blessings
barbara jean
Patwoman says
Love this. What a great idea!
blesid says
You had so many comments I almost didn't leave you another one, but then I thought heck, you deserve to hear, "You Rock!" one more time! Can't wait to try this out! jules
Amanda says
Thanks Eileen! I JUST saw an example of that the other day. It's very cool looking :) Thanks!
Anonymous says
Try mixing epsom salts with beer, just enough to dissolve the salts, and then daubing it on any glass, (I put it on the back of an aquarium). It dries in the same Jack Frost patterns you used to see on windows in the winter, back before they were made with double panes of glass. Thanks for the memories,
Eileen
Sandy says
I would love to see what this looks like, do you have any pictures or is it on pinterest?
Amanda Formaro says
Hi Sandy. I’ve emailed you as I’m confused by your question. There are quite a few pictures in the post and you were here, because you left a comment, so I’m not sure why you didn’t see them? Were they not displaying during your visit maybe?
Sandy says
Sorry about the confusion, I was curious how the beer mixed with the salt looked. She said it had a frost like appearance. I have no trouble viewing your pictures and very glad to see them. Can’t wait to try this.
Amanda Formaro says
I’m sorry, I was reading your comment through my admin panel, so I didn’t realize your were replying to another person other than me! Ha! Anyway, I googled the beer and epsom salt thing and here’s an example with some pictures http://www.davevanderwekke.com/learn/how-to-create-winter-frost-on-your-windows
Nicolette @ Momnivore's Dilemma says
I've been using epsom salt to wind my kids down…so I always have plenty in my home…
These would make a great gift for my SIL…
Following you now, and off to see your other projects…
Nicolette
p.s. if you have a sec, link these up to my creative juice party!
http://momnivoresdilemma.blogspot.com/2010/12/creative-juice-thursday-3.html
Online Book Shop says
This is such a great tutorial. They have such a sparkle even unlit. Great holiday craft.
Lisa says
LOVE THESE !!! They're amazing all lit up. Fantastic thrifty idea…. one I might very well try!
Simply Bungalow says
Very Pretty. What a fun project. I may have to try that.
Thanks for the inspiration!
~Heidi
Susie Dally says
LOVE this tutorial! They look frozen!
Kerri says
These are just STUNNING and would look devine with my turquoise and silver Christmas decor. Will be trying these for sure!!
Holly says
Pretty, pretty, pretty. These would be so great at a wedding too!
Funky Junk Interiors says
I LOVE this Amanda! The outcome is so gorgeous and the colours truly unique. I've featured this on SNS #61's sidebar this weekend. :)
Donna
http://funkyjunkinteriors.blogspot.com/
Linda@Coastal Charm says
I so love this THRIFTY idea…hop over and share it at my NIFTY THRIFTY TUESDAYS PARTY…hope to see ya there:) Love your blog, so I’m going to follow along. Wishing you and your family a very Merry Christmas!
Blessings,
Linda
Michelle says
I gotta make these. I love em.thank you so much!
Sara @ Our Best Bites says
Amanda, what a great site- thanks for sharing! I hope you don't mind- I snagged a couple of your pictures to link on my post. Great ideas!
Shannon says
I ADORE this craft! This would be so fun for my students to make–outside. :)
Amanda says
My epsom salts had a eucalyptus type smell, not my favorite. Adding the sealer definitely helped to kill that smell. If you want to add fragrance, I would suggest doing as you would when making bath salts. Add any color and fragrance oil before gluing to the jar. The sealer does help keep any extra loose pieces of salt from falling off. If you wanted to leave some section unsealed, I would actually suggest the lower part of the jar where the heat from the tea light is closest to. Leaving the top section unsealed could cause a couple of issues:
1) lifting the jar from the top can cause loose pieces of salt to fall off
2) loose pieces may fall inside the jar
Would love to hear if it works, so if you try it I hope you'll come back and let me know! :)
Anonymous says
I wonder if you could leave off the sealer on all or just the top part of the jar. Then put scented oil on the salts and when it warmed it would smell good? Any idea if this would work?
Amanda says
Ecofroggy – The sealer only goes on the outside of the jar, so there's no worry about the flame causing any problems. I have used this on my luminaries for years :) You can certainly use the battery operated tea lights, I have been using real tea lights since I made them. No problems :)
cathy – I haven't made anything with the round light bulbs, but do have several regular shaped incandescent bulb crafts. Here are some ideas ;) https://craftsbyamanda.com/search/label/light%20bulb
Melanie says
Hi Amanda,
I am really excited about making these luminaries, but there are many types of Mod Podge out there and I don’t know which one is the one you used. I bought some but found out it is for paper, and don’t think it will work for this project. Please let me know what you used at your earliest convenience.
Thanks you!!
Amanda Formaro says
While it is formulated for paper, you can still use it on this project. The paper formulation is the same base formula with changes made to it so that it works well with paper :)
cathyohler says
I love all your ideas and wonder if you have tried any craft with light bulbs that are perfectly round glass, except for the stem on the top. I've saved about a dozen.
Cathy
Ecofroggy says
these are wonderful :)
i have a question….on the spray sealer is it flamable? or do you just use the battery tea lites?
Amanda says
Thank you all so much! I hope you try them and let me know if you do :)
Deanna – I am not totally sure about using rock salt. Rock salt is mostly for melting ice on driveways and sidewalks and for using in an ice cream maker. I can't attest to using the rock salt, but you can buy epsom salt really cheap from walmart or even the dollar store :)
Life Goes On says
How very cute, thanks for sharing your clever project
Larissa says
SO lovely. I totally want to try this out. Thanks for sharing.
Just Another Day in Paradise
Deanna says
Could you use rock salt?
Jazzy Girl says
What an interesting thought! It sure wouldn’t hurt to try it. In fact, I think I will do so tomorrow, both with rock salt and Epsoms! Thanks for the inspiration! If I can navigate back here afterwards, I will post the results!
Shauna {SK Studios} says
saw you on Be Different, Act Normal and i love love LoVe this idea!!! definitely gonna have to make some for gifts next year! :D thanks for the inspiration ;)
Alizarine says
These are such a wonderful idea!!
Maria says
So beautiful!
Mod Podge Amy says
These are gorgeous!!
Michelle says
OH my gosh..these are so pretty!
Stephanie says
I just saw this on Finding Fabulous and had to tell you how beautiful these are! So creative. Just love them.
shopannies says
these are really pretty and I am very suprised that they are made using epsom salt
Susannah says
These are truly amazing! I can't wait to buy some epsom salts and make them, too! I love the colors, too.
http://www.uvinyl.blogspot.com
Alison says
Brilliant! I'm going to do this one with my daughter who loves crafting. Thanks!
Alison
Anonymous says
Wow what a cute ,simple & creative way to brighten up the winter! Love the idea I will be trying it as soon as I can:)
thanks for the detailed directions
Debbie (a new fan of yours)
Tiffiny Felix says
Ditto what everyone already said…really, really pretty :)
Ali Richardson says
These are really beautiful! Great job and happy holidays :)
EmilyM says
These are beautiful. Who would have thought they were made with Epsom salt. Thanks for sharing
Tiffany says
Those are so pretty! I always save my candle jars with the idea of doing something with them, now I have an idea!
Lori says
These are beautiful, I can't wait to try them. Thank you so much for posting them! I feel lucky to have found your site. Have a wonderful holiday. ~Lori
Alice says
I can't wait to try this! thanks for sharing!
Melissa says
Fabulous idea. I love epsom salt – cool stuff.
Sara @ Mom Endeavors says
I absolutely LOVE these!! So simple and beautiful!!!
Jenny @ Embellishing Life says
I will definitely be trying this…they are beautiful!
Lena Arrington says
beautiful. just got me going. ok question, can they be given as gifts.? help me out on this and thank you, Lena
tracey says
no…can’t be given as gifts,far to beautiful to give away….but I suppose if you must you could make one for me,I won’t tell :)
Amanda Formaro says
:-)
Mommyblogger says
These are so pretty. I may try my hand at them after Christmas.
Annie says
Hello Amanda,
I will give these a try during cold winter months . Lost my husband a year ago this February and these will look real pretty in front of his picture… Thank you . Annie
admin says
I’m sorry for your loss Annie! I hope you enjoy the project. :)
patricia magliochetti says
Im so sorry for your loss,i lost my father over 10 years ago to cancer
Vicki says
Annie,
I was looking at the Epsom Salt Luminary Votive holders and saw your comment about the loss of your husband and wanting to place some of these in from of his picture. I thought that was beautiful. My deepest condolences to you on the passing of your dear husband. I think it would be a lovely sentiment to honor him in this way. Created from your hands with love, to honor your love.
admin says
Ooooh :( that’s sad, but that comment wasn’t mine. :( That had to be a comment on someone’s pin from Pinterest? What a lovely gesture.
Caitlin says
I totally agree, that’s a wonderful thing for you to do. I’m sure it will turn out very nice.
AND you can do all sizes, I’m sure any shapes besides a Mason Jar would even work:)
God Bless you
Linda says
Sorry for your loss. Just lost my husband suddenly this March and I love your idea for using this by a picture.
Robin Martz says
Dear Annie, I am so sorry you lost your husband, even if I am 2 years late in saying so. I lost my husband 5 years ago and I’m still reeling! Anyway God bless you and He is who will get you through!!
Jean says
I was looking for a way to incorporate a really nice picture of my late husband who died in my arms a little over a year ago. I still feel so empty inside and was looking for something that was not too hard to do. I have always crafted but since he passed I will bring out my materials to do something but then I walk away…losing my desire to tackle anything. these look so beautiful and easy to do and I already have all the materials so I don’t have to go out and purchase anything. I like instant gratification so I really am going to do those, starting today! Thanks!
Amanda Formaro says
Oh Jean I am so sorry for your loss :-( I hope that this project will give you the joy that your heart is so severely in need of! HUGS
Terrie says
There are decals that you place on candles in memory of……. I used these for my mother and husbands parents, I lights when I am missing them. They are inexpensive and sold at joanns fabrics
Jeanne says
So sorry for the losses that have been expressed here. We all have something in common. This is such a lovely way to honor those we love who have gone on. Just remember, love never dies! Peace and God’s blessings to all!
Holli says
Amanda, you rock, these are awesome!
xoxo
Ida Okubo says
I’m going to make them for our assisted livig actities with a small battery lite in each. Thanks
Nancy says
That is a really good idea instead of candles inside!! going to do this!
Jody says
Instead of mod podge can you just use white Elmer’s glue which has been diluted when a bit if water?
Amanda Formaro says
Yes, just don’t make it too watery!
Gloricela says
I found glossy Modge Podge works better on glass. Elmer glue will hold for a while but will eventually start to peel.
Una says
Hi Amanda these look fab can you use pva instead of mod podge? Tks
Amanda Formaro says
Hi Una. Is PVA similar to white craft glue? If so, yes :)
Jo says
Hi
I’ve made these in the past using just plain table salt and they came up a treat, but the epsom salts have bigger fibres and look much prettier and thanks heaps for the tip with the food colouring, finished it off wonderfully
Ohh and I use empty baby food jars to make my lumineries, they are the perfect size for tea light candles xox
Amanda Formaro says
Thanks Jo! And yes, baby food jars make great luminaries, I agree :)
brenda says
Tries this last july and the salts caught moisture and changed the look…not pretty
Amanda Formaro says
What do you mean that they caught moisture? If the salts got wet, it’s possible that you used too much Mod Podge. I experimented with putting Mod Podge over the top of the salts as a sealer and I agree, it wasn’t pretty. A blurred blobby mess.
Connie says
humidity, probably
marie kubel says
i don’t know what mod podge is please help!
Amanda Formaro says
Hi Marie! Mod Podge is a decoupage medium. http://amzn.to/HOKlhz
Robin Martz says
It’s Feb, of 2014 and I am gonna make some of these because I LOVE candles and this really is pretty. Something to brighten up dark corners any time of year! Thank you!
trinichick says
Hi want to kno how long this craft will last, i live in a tropical country and would like to do this with my kids
Amanda Formaro says
Hi there. It doesn’t matter what climate, this is a temporary craft. While a tropical climate with more humid air may slow the evaporation process, it will still happen eventually. The beauty of it is you can soak the luminaries and remove everything then start over!
Elizabeth Standifur says
I was thinking…. Maybe instead of salt use sand or colored sugar but u would definitely have to seal it really good if u used sugar….that way it wouldn’t be temporary
Amanda Formaro says
I can’t recommend that as I haven’t tried it. But you are certainly welcome to try :)
Crystal says
Hey, sorry to post as a reply to the last comment, couldn’t find a link to post my own comment, lol… I was wondering if you add food color gel to the glue, just a drop since it’s so thick would that help it to retain color? Hmm I guess I’m about to find out.
Shantiann says
Does anyone know, will the Epsom salt still turn white after a couple of weeks even if you spray it with the sealer?
Amanda Formaro says
Yes it still does