• Home
  • About
    • About Crafts by Amanda
    • Visit Our Recipe Site
  • Work With Us
  • Join
    • Free Newsletters
    • Join our Facebook craft group
↑
  • Tutorials
    • Tutorial Index
    • Adult Crafts
    • Crafts for Kids
    • Crafts for Seniors
    • Recycled Crafts
    • Seasonal Crafts
    • Holiday Crafts
    • Free Printables
    • Craft Collections
  • Adult Crafts
    • Bath & Body
    • Beach Crafts
    • Clay Pot Crafts
    • Crafts for Seniors
    • Decoupage Crafts for Adults
    • DIY Gift ideas
    • Garden Crafts
    • Home Decor Projects
    • Kitchen Crafts
    • Light Bulb Crafts
    • Luminary Crafts
    • Mason Jar Crafts
    • Needlework
    • Photo Display Ideas
    • Recycled Crafts for Adults
    • Wearable Crafts for Adults
  • Crafts for Kids
    • Animal Crafts for Kids
    • Back to School Crafts
    • Beach Crafts for Kids
    • Camp Crafts
    • Cardboard Tube Crafts for Kids
    • Decoupage Crafts for Kids
    • Easy Crafts for Kids
    • Nature Crafts for Kids
    • Other Kid’s Crafts
    • Paper Plate Crafts for Kids
    • Recycled Crafts for Kids
    • Slimes, Doughs, & Clay
    • Wearable Crafts for Kids
  • Holiday Crafts
    • 4th of July Crafts
    • Christmas Crafts
    • DIY Gift ideas
    • Earth Day Crafts
    • Easter Crafts
    • Father’s Day Crafts
    • Halloween Crafts
    • Memorial Day Crafts
    • Mother’s Day Crafts
    • New Year’s
    • Other Holidays
    • Patriot Day Crafts
    • St. Patrick’s Day Crafts
    • Thanksgiving Crafts
    • Valentine’s Day Crafts
  • Seasonal Crafts
    • Winter Crafts
    • Spring Crafts
    • Summer Crafts
    • Fall Crafts
  • Skip to primary navigation
  • Skip to main content
  • Skip to primary sidebar
  • Skip to footer

Crafts by Amanda

crafts for adults and kid's crafts

  • Tutorials
    • Tutorial Index
    • Adult Crafts
    • Crafts for Kids
    • Crafts for Seniors
    • Recycled Crafts
    • Seasonal Crafts
    • Holiday Crafts
    • Free Printables
    • Craft Collections
  • Adult Crafts
    • Bath & Body
    • Beach Crafts
    • Clay Pot Crafts
    • Crafts for Seniors
    • Decoupage Crafts for Adults
    • DIY Gift ideas
    • Garden Crafts
    • Home Decor Projects
    • Kitchen Crafts
    • Light Bulb Crafts
    • Luminary Crafts
    • Mason Jar Crafts
    • Needlework
    • Photo Display Ideas
    • Recycled Crafts for Adults
    • Wearable Crafts for Adults
  • Crafts for Kids
    • Animal Crafts for Kids
    • Back to School Crafts
    • Beach Crafts for Kids
    • Camp Crafts
    • Cardboard Tube Crafts for Kids
    • Decoupage Crafts for Kids
    • Easy Crafts for Kids
    • Nature Crafts for Kids
    • Other Kid’s Crafts
    • Paper Plate Crafts for Kids
    • Recycled Crafts for Kids
    • Slimes, Doughs, & Clay
    • Wearable Crafts for Kids
  • Holiday Crafts
    • 4th of July Crafts
    • Christmas Crafts
    • DIY Gift ideas
    • Earth Day Crafts
    • Easter Crafts
    • Father’s Day Crafts
    • Halloween Crafts
    • Memorial Day Crafts
    • Mother’s Day Crafts
    • New Year’s
    • Other Holidays
    • Patriot Day Crafts
    • St. Patrick’s Day Crafts
    • Thanksgiving Crafts
    • Valentine’s Day Crafts
  • Seasonal Crafts
    • Winter Crafts
    • Spring Crafts
    • Summer Crafts
    • Fall Crafts
Craft Tutorials | Holiday Crafts | Valentine's Day Crafts | Be Mine Valentine Heart Wall Hanging

Be Mine Valentine Heart Wall Hanging

Author by Amanda Davis on January 18, 2010 Updated on January 15, 2019

5 from 1 vote
Jump to Project
47 shares
  • Share
  • Tweet
  • Flipboard
  • Email


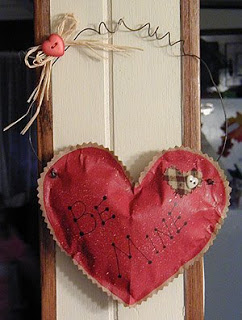
Back in 2001 I started making fun stuffed decorations with paper bags. I used to participate in a craft discussion list, and on that list was a woman who did some really amazing things with brown paper grocery bags. She was my inspiration for working with brown bags. This lovely Valentine’s Heart was one of my first creations. The possibilities are endless, only limited by your imagination and creativity.

Be Mine Valentine Heart Wall Hanging
by Amanda Formaro

Note: It is not necessary to paint the back of the heart, though you may if you like.

Print Project
5 from 1 vote

Be Mine Valentine Heart Wall Hanging

Author: Amanda Formaro

Supplies

  • brown grocery bag
  • acrylic paint in red and pink
  • toothbrush
  • paintbrush
  • fine tip black marker
  • pinking shears or other decorative scissors
  • small material scrap in gingham or other pattern of your choice
  • heart shaped buttons small pink, medium red
  • cotton batting Fiberfil
  • white craft glue Tacky glue
  • craft wire
  • pencil
  • raffia
  • hot glue gun

Instructions

  • Lay brown paper bag on flat work surface. Cut out two large sections from the front and back of the bag. Stack those sections, one on top of the other, then fold them in half. Draw half a heart, with the fold being in the middle of the heart, then cut it out with the pinking shears. Or you can use this as a pattern.
  • Beginning at the bottom of the heart, use tacky glue to connect the two layers at the seams, stuffing the heart as you go with cotton batting (Fiberfil). Work your way around the edges, carefully stuffing (but not too much!) until heart is completely closed.
  • When the glue is dry, paint the heart red, leaving the decorative edges plain as seen in the photo. When the red paint is dry, dip the bristle tips of a toothbrush into the pink paint. Test your flecking ability on a piece of scrap paper before doing this on your heart. Hold toothbrush horizontally and drag your thumb across the bristles, causing the paint to fleck spots wherever you aim it. When you are comfortable with this method, go ahead and fleck some pink paint on your heart.
  • When pink paint is dry, use the black fine-tip marker to write BE MINE, placing decorative dots at the point of each letter. Use pinking shears to cut out a small heart from the gingham scrap material. Use white glue to adhere the material heart to the upper right hand corner of your brown bag heart. Use white glue to adhere a small pink heart shaped button to the material scrap.
  • Cut a piece of craft wire long enough to wrap completely around your heart. This should be enough for your hanger. Find the middle of craft wire, wrap the middle section of the wire around a pencil about 6 or 7 times. Pull the pencil out to create the curl at the top of your hanger. Curve the wire into a hanger shape and poke each end carefully through the sides of the heart as shown in the photo. Use the skinny end of a small paintbrush to curl the ends of the wire that you poked through.
  • Using raffia, tie a bow out onto the craft wire just before where the top curls begin. Using a hot glue gun, glue the medium sized red heart shaped button to the center of the raffia. Spray the entire heart with a coat of acrylic sealant.


  • Author
  • Recent Posts
Amanda Davis
Amanda Davis is the crafty, entrepreneurial mother of four children. She loves to bake, cook, make kid's crafts and create decorative items for her home. She is a crafting expert and guru in the kitchen and has appeared online and in print publications many times over the years.
Latest posts by Amanda Davis (see all)
  • Patriotic Pinwheels - June 20, 2025
  • Paper Plate Aquarium Craft - June 17, 2025
  • Patriotic Bandana Wreath - June 13, 2025
47 shares
  • Share
  • Tweet
  • Flipboard
  • Email

Filed Under: Valentine's Day Crafts Tagged With: adult, holidays, recycle crafts

Reader Interactions

Free CraftsBy email every week

Latest crafts straight to your inbox!

Comments

  1. Anonymous says

    August 6, 2011 at 4:04 am

    This is such a fun project. I need to make a creative craft for vacation Bible school using the theme of LOVE and this would be perfect!

    Sandra L.P-A

    Reply
  2. Penelope says

    February 13, 2010 at 8:07 pm

    This is sooo cute that I found other holiday ideas with this same "recipe" like a bunny for easter. Thanks so much!!

    Reply
  3. jennwa says

    February 13, 2010 at 2:32 am

    That is adorable.

    Reply
  4. Amanda says

    February 11, 2010 at 1:35 pm

    thank you all so much for your wonderful comments! Would love to hear if you make one :)

    Reply
  5. Anonymous says

    February 11, 2010 at 1:20 pm

    This is the cutest thing I have ever seen!! It lookes proffessional. I will be making a lot of these this month, watch out!!! Thanks for the cute and green idea.

    Reply
  6. sunnymama says

    February 9, 2010 at 12:41 pm

    This is a really great idea! Thanks for the tutorial. :) I've linked to this post here:
    http://sunnydaytodaymama.blogspot.com/2010/02/50-inspiring-links-love-creativity-and_08.html

    Reply
  7. Anonymous says

    February 6, 2010 at 10:17 pm

    Thanks Amanda for your craft ideas and posting them.My daughter and I are having a valentines party and we are making the be my valentine wall hanging..your site is fun..take care

    French girl

    Reply
  8. Its So Very Cheri says

    January 30, 2010 at 3:02 pm

    We have done pumpkins like this –great idea.

    I just wanted to come by and give you a heads up that I have a really fun give-a-way starting Sunday. It will go all month long. Each week there will be several winners. I have lots of fun vendors participating.

    Cheri

    Reply
  9. The Tiny Homestead says

    January 23, 2010 at 7:00 pm

    I love the cute homespun look of this. Great idea. I may try it for my entryway just as soon as I get some "free time". :)

    Reply
  10. MONICA says

    January 23, 2010 at 1:48 pm

    uaoo,it's very beautiful!!

    Reply
  11. [email protected] says

    January 21, 2010 at 5:28 pm

    Aww, this is way cute, I love it! Thanks so much for sharing, I'll be linking.

    Reply
  12. Sue Sparks says

    January 19, 2010 at 10:04 pm

    Okay, I AM going to make these for Valentine's day! It looks like something I may actually be able to do-SO CUTE!

    Reply
  13. Amelia says

    January 19, 2010 at 8:41 pm

    Oh I love this and similar ideas with paper! I just did a post on 50+things to do with a piece of paper, but didn't put one like this!!

    Amelia.x

    Reply
  14. Tiffiny Felix says

    January 19, 2010 at 8:38 pm

    You're crafts are always so cute! Using a paper bags is very clever :)

    Reply
  15. Sonia says

    January 19, 2010 at 6:48 pm

    This is fabulously cute..I like the fact that this can be made with handy stuff and what a lovely way to reuse and recycle!

    Reply
  16. Diane {createdbydiane.blogspot.com} says

    January 19, 2010 at 1:33 am

    Very Cute!

    Reply
  17. The Apron Queen says

    January 18, 2010 at 6:20 pm

    That is so cute and I like the fact that you use the brown paper bags.
    I

    Reply
5 from 1 vote (1 rating without comment)

Leave a Reply Cancel reply

Your email address will not be published. Required fields are marked *

Rate This Project


The maximum upload file size: 640 MB. You can upload: image, video. Links to YouTube, Facebook, Twitter and other services inserted in the comment text will be automatically embedded. Drop files here

Primary Sidebar

Hi! I’m Amanda and I’m the founder and head designer of Crafts by Amanda. I have spent over 25 years creating projects to share, but it’s not just me anymore! It’s turned into a complete family affair. Come and meet the Creative Team!

Free CraftsBy email every week

Latest crafts straight to your inbox!

All Time Favorites

Learn to make these adorable ladybug painted rocks. use special outdoor paint for this adorable garden craft so you can keep garden ladybugs all summer!

Ladybug Painted Rocks…

These colorful little ladybug painted rocks are the ... Go To project

snowy pinecone candle jar luminaries

Winter Luminaries: Snowy Pinecone…

Make pretty winter luminaries that appear to be covered ... Go To project

Make this wonderful deco mesh pumpkin wreath to hang on your door this fall!

Deco Mesh Pumpkin Wreath…

Adorn your door this fall with a pretty deco mesh ... Go To project

Reuse those empty prescription pill bottles in all sorts of ways. From organizing to making cookies. Yes, cookies! See how to use your empty pill bottles!

20 Uses for Prescription Pill…

You've been collecting prescription pill bottles for ... Go To project

Meet the Family

Amanda

Founder and Designer

Kristen

Editorial Manager

Lindsay

Social Media Manager

As seen on:

Footer

Favorites

  • Jar Photo Frames
  • No-Sew Roman Shade
  • Paper Flowers
  • How to Make a Scrunchie
  • Mermaid Slime

About

  • Home
  • Meet the Creative Team
  • Work with Us
  • Privacy Policy
  • Accessibility
  • Contact Us

Images/text copyright Amanda Formaro 2020. To feature a post from Crafts by Amanda, you may use one photo credited and linked back directly to the project post.

Free CraftsBy email every week

Latest crafts straight to your inbox!

Copyright ©2025, Crafts by Amanda. All Rights Reserved.
Design by Pixel Me Designs

Rate This Tutorial

Your vote:


To share a photo with your comment click here!

A rating is required
A name is required
An email is required

Recipe Ratings without Comment

Something went wrong. Please try again.