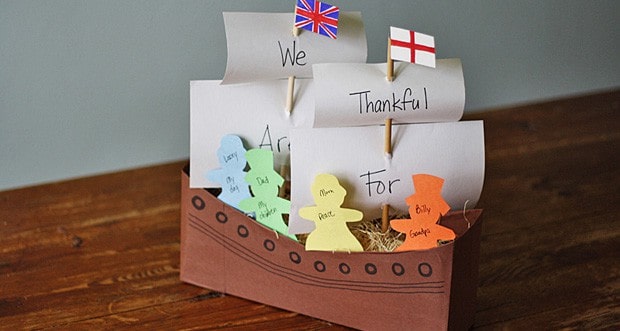
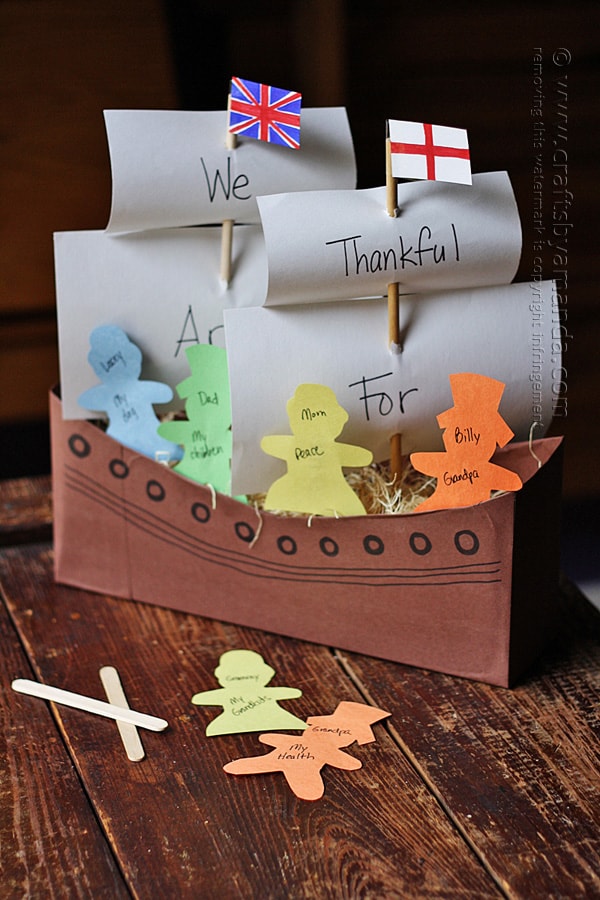
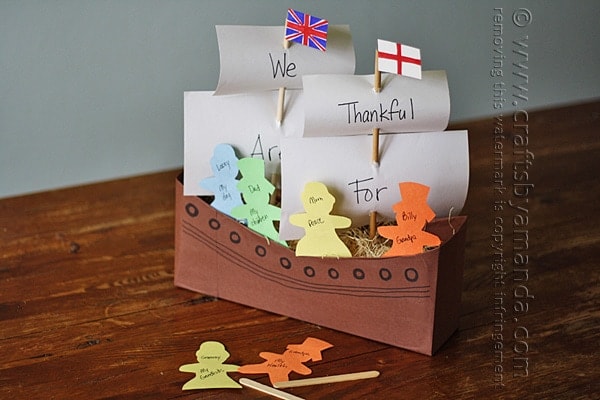
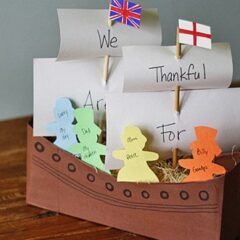
Looking for a creative way to show what your family is thankful for this Thanksgiving? Recycle an empty cereal box into the Mayflower and have family members write what they are thankful for on a pilgrim boy or girl; then insert them into the ship! Makes a great Thanksgiving craft for a memorable holiday.
I used a recycled cereal box, construction paper and a few other supplies to make this fun centerpiece. Here’s the pattern for the pilgrims or you can get it in the printable instructions below.
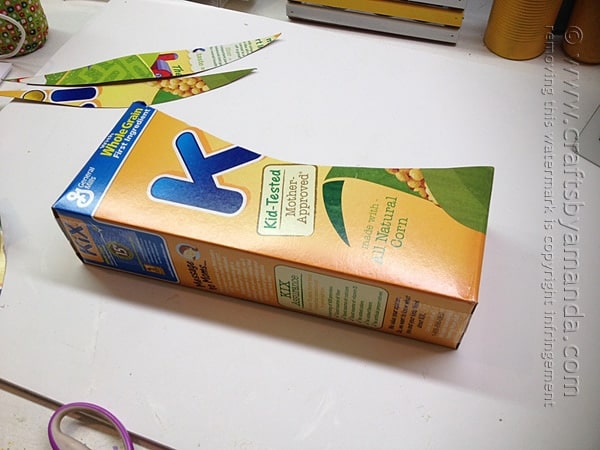
Cut the cereal box in half lengthwise. Tape the open end shut. Cut the sides to create a curved appearance as seen above.
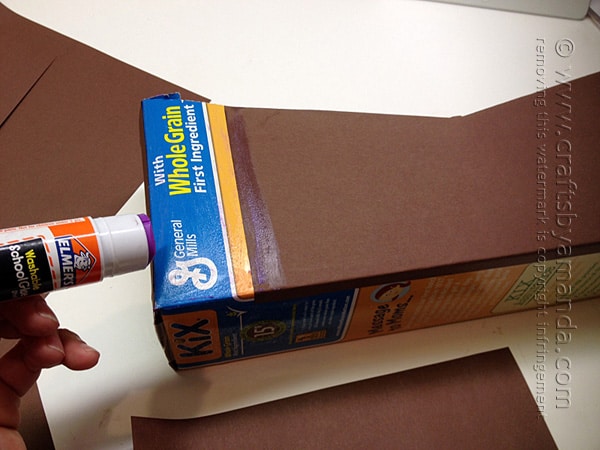
Use a glue stick to cover the box with brown paper.

Use a black marker to draw port holes and create lines or make whatever design you like.
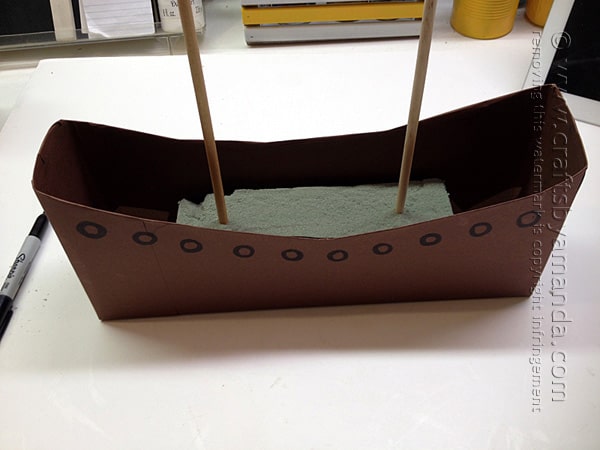
Squeeze some white craft glue inside the bottom of your cereal box. Cut the floral foam block in half lengthwise so that it does not stick out of the top of the boat when placed inside. Gently press the floral foam into the glue. Insert the dowels into the floral foam, one at each end about an inch or so from the end of the foam.
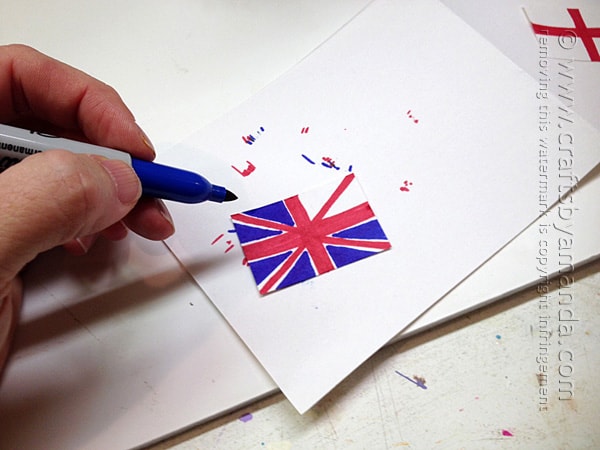
The Mayflower flew two flags during its voyage to America. One was the Union Flag of England (commonly known today as the British flag or “Union Jack”) and the other was the red and white flag called The Cross of St. George. In 1605 England and Scotland were united under King James I. The British flag we know today is a combination of The Cross of St. George Flag and Scotland’s Cross of St. Andrew’s Flag. These flags are easy to create. Simply cut out two white rectangles measuring 2-inches by 1 ¼-inches. The cross of St. George is simply a red strip going across the middle and down the middle, intersecting in the center. The Union Flag starts off the same as St. George with a red cross. Add red diagonal lines going from the center to each corner. Leaving a little white showing, color in between each red section with blue. Color on both sides.
To create the sails you will need to cut white paper into the following sizes:
2 that measure – 8-inch by 5-inch
2 that measure – 6-inch by 4-inch
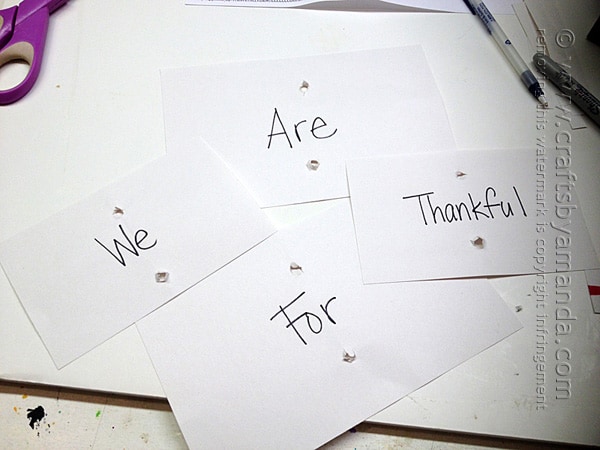
Fold the sails in half (like a book) to find the center of the paper. Using a toothpick, pen or craft knife (parental supervision may be needed) poke a hole toward the top of the sail and one toward the bottom. Both holes should run along the center of the paper and line up one on top of the other. Use a pen to write the following words on its corresponding sail:
We – small sail
Are – large sail
Thankful – small sail
For – large sail
Run the sails down the two dowels using the finished photo as a guide. Use tape to attach the flags to the top of the dowels. Fill the ship with American moss.
When family members begin to arrive for the holiday feast, have them choose a pilgrim girl or boy and write their name on the face and what they are thankful for on the body. Glue the pilgrim to a craft stick and insert into the side of the ship. Soon your Mayflower will be filled with passengers and ready for its voyage to the new world! Happy Thanksgiving!
More craft ideas
I drew some inspiration from another fun Mayflower craft on Katydid and Kid. My pattern was adapted from this cute gingerbread man on Projects for Preschoolers. Other fun centerpiece ideas for the kids to make include these Construction Paper Teepees and this Styrofoam Thankful Turkey!
Cereal Box Mayflower
Supplies
- Recycled cereal box
- Brown paper
- White paper
- Block of floral foam
- Two 12″ dowels or wooden skewers
- Scissors
- Glue stick
- White craft glue
- Markers: black red, blue
- American moss or other filler
- Pattern for pilgrims|https://craftsbyamanda.com/wp-content/uploads/2013/11/pilgrim-pattern.pdf
- Craft sticks for pilgrims 1 for each family member
Instructions
- Cut the cereal box in half lengthwise. Tape the open end shut. Cut the sides to create a curved appearance as seen above.
- Use a glue stick to cover the box with brown paper.
- Use a black marker to draw port holes and create lines or make whatever design you like.
- Squeeze some white craft glue inside the bottom of your cereal box. Cut the floral foam block in half lengthwise so that it does not stick out of the top of the boat when placed inside. Gently press the floral foam into the glue. Insert the dowels into the floral foam, one at each end about an inch or so from the end of the foam.
- The Mayflower flew two flags during its voyage to America. One was the Union Flag of England (commonly known today as the British flag or “Union Jack”) and the other was the red and white flag called The Cross of St. George. In 1605 England and Scotland were united under King James I. The British flag we know today is a combination of The Cross of St. George Flag and Scotland’s Cross of St. Andrew’s Flag. These flags are easy to create. Simply cut out two white rectangles measuring 2-inches by 1 ¼-inches. The cross of St. George is simply a red strip going across the middle and down the middle, intersecting in the center. The Union Flag starts off the same as St. George with a red cross. Add red diagonal lines going from the center to each corner. Leaving a little white showing, color in between each red section with blue. Color on both sides.
- To create the sails you will need to cut white paper into the following sizes: (2 that measure – 8-inch by 5-inch, 2 that measure – 6-inch by 4-inch)
- Fold the sails in half (like a book) to find the center of the paper. Using a toothpick, pen or craft knife (parental supervision may be needed) poke a hole toward the top of the sail and one toward the bottom. Both holes should run along the center of the paper and line up one on top of the other. Use a pen to write the following words on its corresponding sail: (We – small sail; Are – large sail; Thankful – small sail; For – large sail)
- Run the sails down the two dowels using the finished photo as a guide. Use tape to attach the flags to the top of the dowels. Fill the ship with American moss.
- When family members begin to arrive for the holiday feast, have them choose a pilgrim girl or boy and write their name on the face and what they are thankful for on the body. Glue the pilgrim to a craft stick and insert into the side of the ship. Soon your Mayflower will be filled with passengers and ready for its voyage to the new world! Happy Thanksgiving!
- Tie Dye Beach Towels - July 24, 2026
- Swirling Twirling Ladybugs - July 21, 2026
- Drip Tie Dye Backpack - July 17, 2026


Cheryl says
Love the combination of history and art.