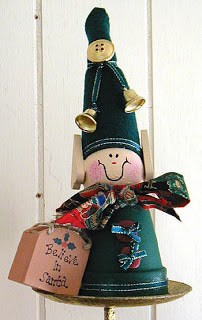
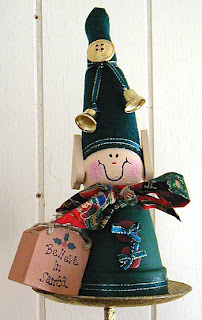
I have made many different clay pot crafts. I went crazy one Christmas and made snowmen, Santa and Mrs. Claus, reindeer, and this cute little elf. I originally made this in 2001 for FamilyCorner.com, he’s definitely among my favorites!
If you would like to make one of these cuties, follow the instructions in the tutorial below:
Clay Pot Elf
designed by Amanda Formaro
Clay Pot Elf
Supplies
- 1- 1 1/2 " diameter wooden ball
- 1- 2 1/4 " diameter clay pot
- wide ribbon with holiday pattern
- thin green ribbon
- green felt
- two red buttons
- two wooden hearts for ears
- gold button
- 2 small gold bells
- purchased embellishment such as our "Believe in Santa" bag
- acrylic paints in flesh red, pink, and black
- white craft glue
Instructions
- Place newspaper down on work surface. Turn clay pot over and glue wooden ball to bottom of pot. Glue hearts upside down to the sides of the wooden ball to create pointy elf ears. When glue is dry, use large paint brush to paint the outside of the clay pot green and the entire wooden ball and ears with flesh colored paint. Let dry and apply a second coat.
Body
- Tie ribbon around the neck, fashion a bow and trim ends. Thread thin green ribbon through the button holes and tie bows, trim ends. Glue buttons to the front of the clay pot. Spread a thin coat of white craft glue around the bottom rim of the clay pot, place a border of thin green ribbon all the way around the bottom of the pot. Glue purchased "Believe in Santa" bag, or other embellishment, to the side of the body.
Hat
- Cut a tall triangle out of green felt. Apply some glue to the elf''s forehead. Position the bottom of the felt triangle over the glue. Wrap around to the back of the head. Glue in place. Glue back seam of the felt together, bring to a point at the top (trim if needed to make it fit). Gently tie a piece of thin green ribbon around the top of the hat, about an inch from the top. Tie in a know loosely so that it does not bunch together. Carefully thread bells onto the ends of the ribbon that you just tied in place. Tie bells on and adjust height. Tighten knots and trim ends off. Glue a gold button above the ribbon. Position a piece of thin green ribbon around the brim of the hat (see photo) and glue in place.
Face
- Using a small sponge, gently dab on a thin amount of pink for the cheeks. Use black paint to dot on eyes and put on mouth. Use red paint for the nose. You may also sponge on a small amount of red over the pink cheeks if the pink is too light.
- Watercolor Luminaries - February 11, 2025
- Free Valentine Printables: Cards, toppers, and tags - February 4, 2025
- Valentine Hugs - January 31, 2025


katy walters says
made the elf for my hair dresser’s xmas present this year-put my own spin on it with polymer clay candy cane instead of shopping bag.looks cute! i’m sure she’ll like it.
Amanda Formaro says
How fun! So glad you were inspired!
Suzanne says
How adorable!
jennwa says
Another super cute idea.
KKL Primitives says
Love this elf Amanda, so cute and looks very easy to do – my grandkids would enjoy making one of these! Thanks for sharing!
~Neenee~