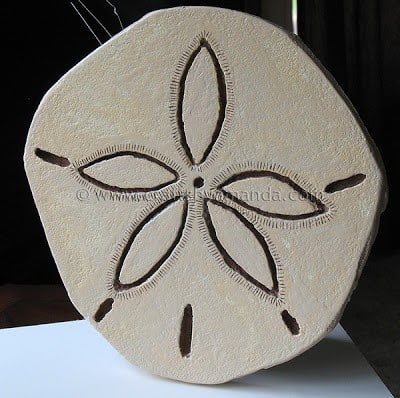

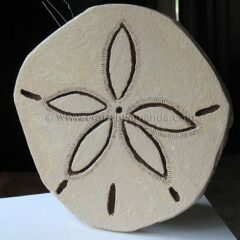
I am growing very fond of beach themed decor. My bathroom is a very slow growing project, but I’m always looking for something to jazz it up. I ran across an oversized sand dollar in the April 2011 Pottery Barn catalog with a $99.00 price tag. I loved the idea and the look, but decided I wanted to try to make my own.

The Pottery Barn version is no longer available on their site, but I did save the catalog so you could see where my inspiration came from.
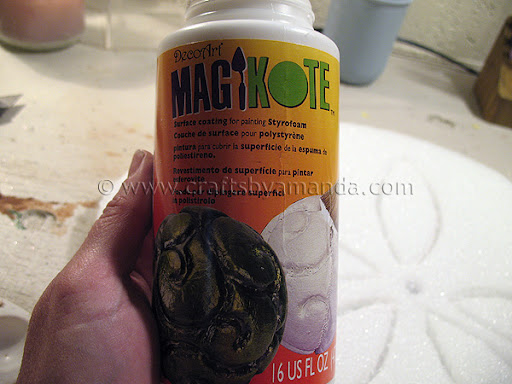
I’m also a designer for DecoArt, so when they asked me to create some projects using their new Magikote![]() product this was the first thing I thought of. Magikote is formulated for Styrofoam. You paint it on, let it dry, then sand it smooth. I creates a great paintable surface. Check out this amazing starfish over at DecoArt, I love it!
product this was the first thing I thought of. Magikote is formulated for Styrofoam. You paint it on, let it dry, then sand it smooth. I creates a great paintable surface. Check out this amazing starfish over at DecoArt, I love it!
Originally I thought I would make it from wood, but Styrofoam is so much easier to cut, not to mention lightweight! Considering the size of this sand dollar, the weight is actually quite important, especially if you plan to hang it on the wall. Also, because it is so light, you can spare your wall a hole and use wall putty to hang this.
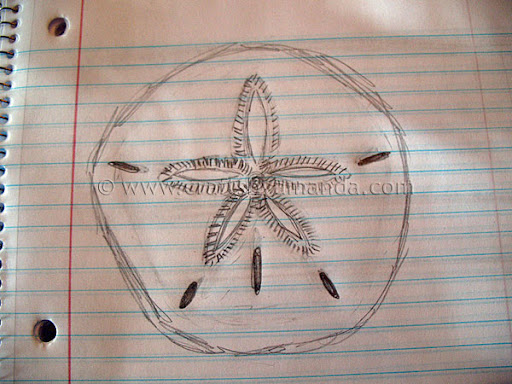
It’s important to note that while I drew my inspiration from the Pottery Barn sand dollar, I wasn’t looking to copy it exactly. Instead I googled several sand dollar images and went from there. The first thing I did was sketch out my idea.
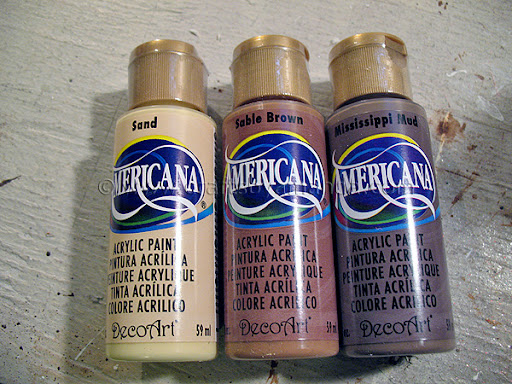
Then I chose my colors. I used Americana Sand, Sable Brown, and Mississippi Mud. While not pictured here, I also used Bleached Sand.
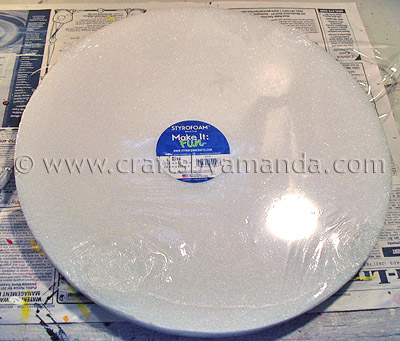
I started with a Styrofoam 15/16 in x 15 7/8 inch Disc I found at Michael’s.

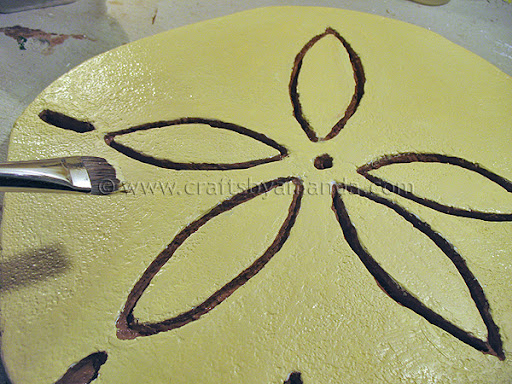
Using a craft knife I cut around the edges of the Styrofoam disc to create a sand dollar shape. Next I used a craft knife to carve the design of the sand dollar into the Styrofoam disc.
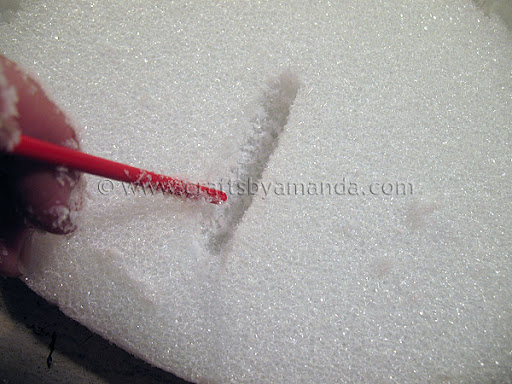
I made the carved indents a bit deeper and wider using the handle end of a paintbrush.

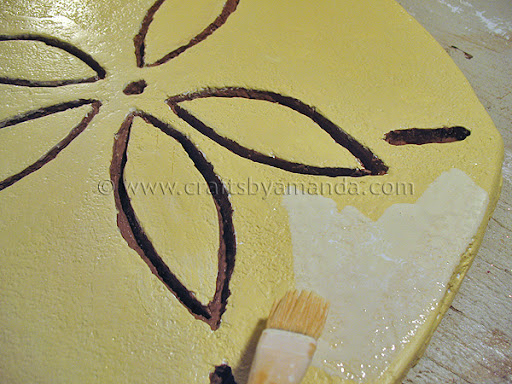
Now you apply 3 coats of MagiKote to the top, sides and inside the indents of the Styrofoam disc, allowing 2-3 hours dry time between each coat.
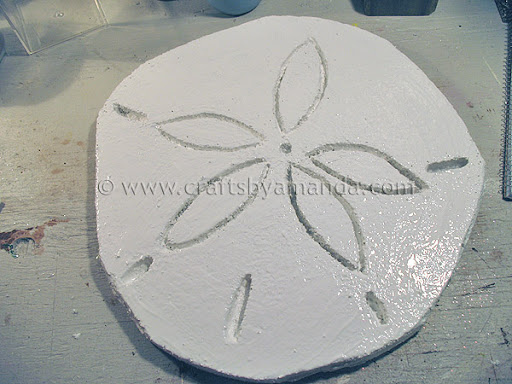
Apply 1-2 coats to the back as well.

Sand the entire surface to remove any rough edges.
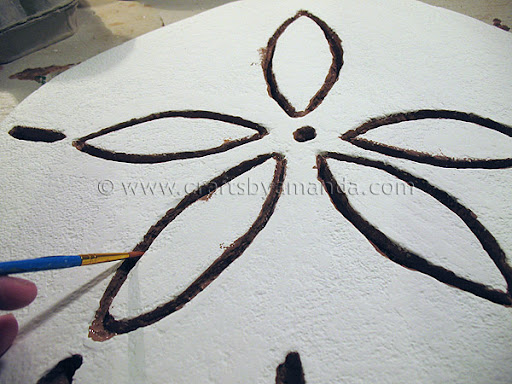
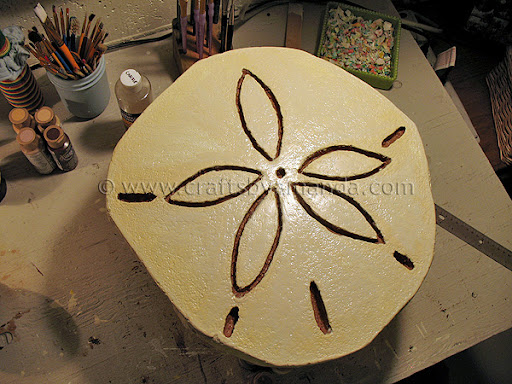
Paint inside of each indentation with Sable Brown.
Paint the entire top and side surfaces with Sand.
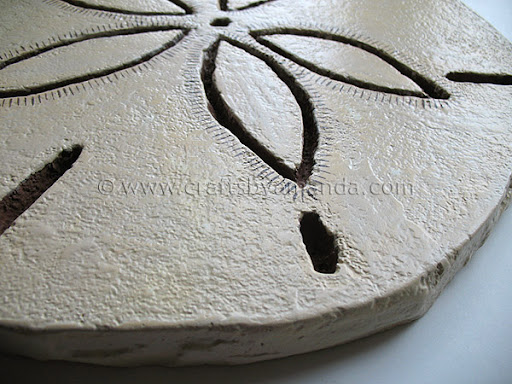
Make a white wash by mixing 1 part Bleached Sand with 2 parts water. Use paintbrush to apply white wash over the entire surface. Gently wipe off excess with a dry cloth. Continue applying and wiping until you reach the desired affect.
Use paintbrush and Mississippi Mud to add small lines around all of the star’s arms.
Apply a coat of DuraClear Satin Varnish.
I did have to ship this to DecoArt so now I need to make another one for me! I think the second time around I will use a lighter brown so that the star itself is more subtle. Other than that I’m pretty happy with the results!

Giant Sand Dollar
Supplies
- styrofoam
- craft knife
- paintbrush
- MagiKote
- sandpaper
- dry cloth
- DuraClear Satin Varnish
Paint (all Americana)
- Sand
- Sable Brown
- Mississippi Mud
- Bleached Sand
Instructions
- The first thing I did was sketch out my idea.
- Then I chose my colors. I used Americana Sand, Sable Brown, and Mississippi Mud. While not pictured here, I also used Bleached Sand.
- I started with a Styrofoam 15/16 in x 15 7/8 inch Disc I found at Michael’s.
- Using a craft knife I cut around the edges of the Styrofoam disc to create a sand dollar shape. Next I used a craft knife to carve the design of the sand dollar into the Styrofoam disc.
- I made the carved indents a bit deeper and wider using the handle end of a paintbrush.
- Now you apply 3 coats of MagiKote to the top, sides and inside the indents of the Styrofoam disc, allowing 2-3 hours dry time between each coat.
- Apply 1-2 coats to the back as well.
- Sand the entire surface to remove any rough edges.
- Paint inside of each indentation with Sable Brown.
- Paint the entire top and side surfaces with Sand.
- Make a white wash by mixing 1 part Bleached Sand with 2 parts water. Use paintbrush to apply white wash over the entire surface. Gently wipe off excess with a dry cloth. Continue applying and wiping until you reach the desired affect.
- Use paintbrush and Mississippi Mud to add small lines around all of the star’s arms.
- Apply a coat of DuraClear Satin Varnish.

Did you enjoy this post? Why not subscribe to my feed, or better yet, to my free newsletter – Foodie in the Craftroom, which provides not only crafts but recipes from my other blog, Amanda’s Cookin’ as well!
- Swirling Twirling Ladybugs - July 21, 2026
- Drip Tie Dye Backpack - July 17, 2026
- Mini Coastal Clay Houses - July 14, 2026


Teri @ The Freshman Cook says
Very cute! I have not tried Magikote, but I am looking forward to picking some up and experimenting! Thank you for sharing at Celebrate It!
Courtney @Crafts by Courtney says
I LOVE this idea!! I recently did a Beach home decor post. I live in Florida so something like this would work anytime of the year.
This is just so clever and cute. I might have to make one next year when I decorate for a beach theme again!
Amanda Formaro says
Thanks Courtney :) It was definitely a fun project!
Toqua's Crafts says
This is WONDERFUL!
I found you via CraftGossip.com on Facebook.
I have a friend that LOVES the beach… and I'm thinking she may get my homemade version of this for Christmas!
Thank you!
(I signed up for your newsletter)
craftsncoffee says
Wow, wow, wow! This sand dollar is incredible! I've posted a link on the StyroCraft Facebook page. Thank you for sharing your tutorial! Sharon, http://www.craftsncoffee.com; http://www.styrofoamcrafts.com.
Melissa says
Thank you so much, my bestie is getting married in Sept w/ a beach theme, I am going to make one or 2 for her!!! :)
Kathryn says
I am not familiar with MagiKote – could you do a post about what it is, what its craft applications and successes and any failures of its use?
BigBearswife says
I love sand dollars! this looks really good! and from styrofoam!! how cool!
Maya @ Completely Coastal says
This is awesome!! I'd love to feature your project on my blog…, I might try this myself!
Abigail says
This is wonderful!
Megan says
Hello,
I came across your blog and was very interested. I just had a couple of questions, so if you could e-mail me back that would be great! Thank you for your time.
Amanda says
What a great idea, I amy trying to add a bit more color to my living room right now & this may just be something I have to put in there. Thanks for letting us in on how you did it! I become a follower.
~Amanda @ creatingamongstboys.blogspot.com
Amanda says
@Lana – not sure if the cardboard would work, but if you try it I'd love to hear about your results!
btanders says
Very cool and fun! I like your thriftiness (if that's a word).
feelincrafty says
Love the idea and the fact that it's a sand dollar! I'm totally making one for our beach house!
Confessions of a Stay at Home Mommy says
I love it!! I hope you will link up to the Tuesday Confessional link party going on now. I'm co-hosting with A Reason to Skip the Housework, so your post will be seen on BOTH blogs!
http://www.craftyconfessions.com/2011/07/tuesday-confessional-and-tuesday-time.html
I hope to see you soon!
~Macy
Anonymous says
Oh my! I have never heard of Magikote but can't wait to get some and try this. I have lots of styrofoam sheets in the workshop and just started looking at sites to figure out what to do with them. I hit the jackpot finding you! Just signed up for your newsletter. Thanks!
simone says
Hi, new follower, love the idea, you are so crafty:) I saw the sand dollar in the catalog as well and wanted one. Might have to try this. cheers
Inspire Me Heather says
Too cool! Really, I think your sand dollar is just gorgeous – well done!
Emmy says
There is a story to the sand dollar. You might want to look for it.
Lana Bisson says
This is amazing!!! I love beach art too. Gonna hafta try this too. I was wondering if you can use the thicker cardboard(corregated) and cover it with drywall mud and carve it out while its still damp? then paint an age it when dry? do you think that would work. The cardboard might curl but I could probably reinforce it till it drys.
Lucy Designs says
this is just great, love it! I love all things oversized like this :)
Six Sisters says
That looks awesome! Better than Pottery Barn! :) We would love for you to come share this at our "Strut Your Stuff Saturday" link party! http://sixsistersstuff.blogspot.com/2011/07/strut-your-stuff-saturday-week-2.html
Love,
The Sisters @ sixsistersstuff.blogspot.com
Miss Charming says
It turned out great! (Thanks for introducing me to the magikote. The creative wheels are turning.)
Laura at Ms. Smartie Pants says
That is amazing! How smart you are!!!
Maria Filomena says
E ficou magnífico….
Congratulações…
com abraços de Maria Filomena