
I’m kind of on a monster kick this week. Halloween is almost here and I’m actually kind of bummed that it’ll be over in a few days. Monster crafts are such fun, they allow you and your kids to be so creative! These treat bags are no exception.
Before I give you the instructions, here are some tips on adjusting them for time, ease of preparation, and/or age of your child. Such a fun craft for the kids!
AMANDA’S TIPS
1) Because the paint takes a little while to dry, you can either buy already colored bags, use white bags, or just skip the color all together. Another option is to paint them ahead of time.
2) I used construction paper for the facial features. You can certainly paint yours on, but that means more drying time. You an also use felt or craft foam.
3) The supplies I used to make these bags are generally things that most moms that craft with their kids will already have on hand. If you don’t have any of these items, they are inexpensive and can be found at discount department stores such as WalMart or Kmart.
4) I used a glue stick for this project because it doesn’t leave lumps and bumps under the construction paper like liquid glue can. You can certainly use white craft glue or school glue for this, just smooth it out with your finger before pressing the item onto the bag.

5) I used a glaze coat on these because paint not only looks dull, but does run the risk of being scraped off. It’s optional though, and certainly not necessary for the finished product.
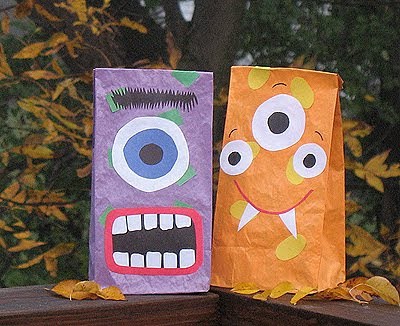
Halloween Monster Treat Bags
THE INSTRUCTIONS
You will need
brown paper lunch bag
construction paper
glue stick
scissors
black marker
acrylic craft paint
spray glaze or acrylic sealer (optional)
What you do
Paint bag whatever color you like. Stand them up and let then dry. Add another coat and let dry again.

While bag is drying, cut facial features out of construction paper. You can use your imagination to make some fun eyes, mouths, and hair, or use the pattern I’ve created here.


Cut polka dots, squares, stripes, or any other type of decoration you would like to use for your monster.
Using your glue stick, decorate the bag using the stripes, squares, or polka dots. Be sure to cover the entire piece of construction paper with glue before pressing on to the bag so that none of the corners stick up.
Fold down the top of the bag so that you don’t accidentally glue your facial features too high.
Use a glue stick to put facial features together before gluing them to the bag. For example, glue the blacks of the eyes to the whites, glue teeth to mouth, etc. Next, glue the facial features to the bag. Use a marker to add thin eyebrows.
Let everything dry, then if you like, add a coat of sealer spray. Let dry again and fill with treats. You can punch a hole through the top of the bag and tie with ribbon if you like.

Halloween Monster Treat Bags
Supplies
- brown paper lunch bag
- construction paper
- glue stick
- scissors
- black marker
- acrylic craft paint
- spray glaze or acrylic sealer optional
- monster bag pattern
Instructions
- Paint bag whatever color you like. Stand them up and let then dry. Add another coat and let dry again.
- While bag is drying, cut facial features out of construction paper. You can use your imagination to make some fun eyes, mouths, and hair, or use the pattern I’ve created here.
- Cut polka dots, squares, stripes, or any other type of decoration you would like to use for your monster.
- Using your glue stick, decorate the bag using the stripes, squares, or polka dots. Be sure to cover the entire piece of construction paper with glue before pressing on to the bag so that none of the corners stick up.
- Fold down the top of the bag so that you don’t accidentally glue your facial features too high.
- Use a glue stick to put facial features together before gluing them to the bag. For example, glue the blacks of the eyes to the whites, glue teeth to mouth, etc. Next, glue the facial features to the bag. Use a marker to add thin eyebrows.
- Let everything dry, then if you like, add a coat of sealer spray. Let dry again and fill with treats. You can punch a hole through the top of the bag and tie with ribbon if you like.
- Tie Dye Beach Towels - July 24, 2026
- Swirling Twirling Ladybugs - July 21, 2026
- Drip Tie Dye Backpack - July 17, 2026


Amanda says
Thank you so much!
creativenimi says
Absolutely fantastic.Love all your creations. You truly have a creative mind.
Amanda says
Thanks everyone! And thank you for the feature Kim!
Kimbo West @ a girl and a glue gun says
I featured you on my blog…
kimboscrafts.blogspot.com
Catch A Falling Star says
These are really cute!
I would take them to lunch for myself lol!
Sandra {sawdust and paper scraps} says
Love this idea for something cute and easy that my daughter can make all by herself for goody bags. She always wants to have complete creative licence but I like to have lots of inspiration pictures laying around for her to see and hopefully she'll think it was her own idea in the end. Tricky! Thanks
Great idea to have a party linky party. I love it.
PEACHES says
LOVE THESE!!! What a great idea. I am going to try this using those extra large brown paper bags used for yard waste. Won't be as cool and colorful as yours, but they will look great lined up in my little yard!
Becca says
These are great Amanda! I'll be featuring them on BCD on Sept. 27th! Thanks for the link!
Laura Ingalls Gunn says
The bags are completely adorable!
Handy Man, Crafty Woman says
What a great craft idea! Love it. My son would love to make these.
megan says
These are too cute! Good job Amanda! I'm so glad Fall is right around the corner!
Amanda says
Love your site too craft passion :) Thanks for coming by!
Thanks foodie! :)
foodie ffanatic says
Just too cute!
Craft Passion says
Glad to find you here :) Your site is wonderful, I love it a lot. I am subscribing to your feed too :)