
We’ve all seen the fun Halloween and Christmas luminaries made from milk jugs. This is a different twist on that basic idea and a fun way to light up your yard or walkway for Halloween! I recently guest posted over at Someday Crafts with this project, but in case you missed it, here it is! Let’s get started, shall we?

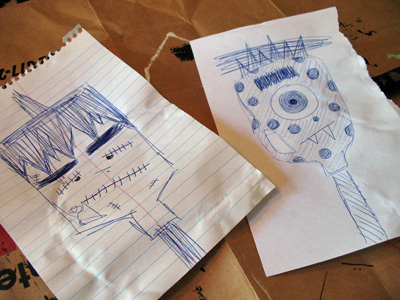
Before making these I sketched out a couple of ideas.
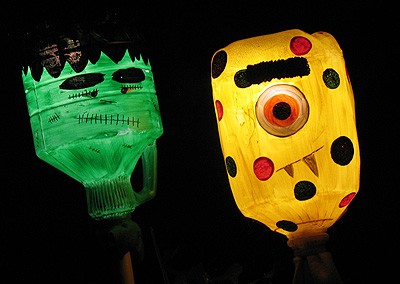
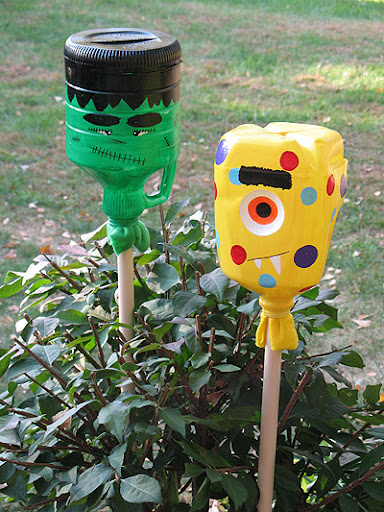
Monster Yard Lights
Printable version at the bottom of this post
You will need:
Empty plastic milk jug
Empty plastic Sunny D jug
Acrylic paint: white, black, green, yellow, purple, red, light blue, orange
1 1/4″ spouncer
3/4″ spouncer
Large paintbrush
Small paintbrush
Sharpie marker
White paint pen (optional)
Clear gloss sealer spray
2 battery operated tap lights
Wall mounting putty or hot glue
Old broom handles or tall branches or sticks
What you do
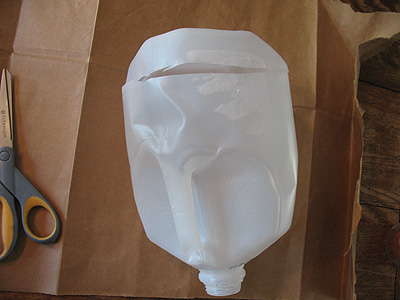
Decide which side of the jug will be the front, where your monster’s face will go. Turn the jug over to the other side and cut the bottom of the jug, about 2″ from the bottom, in a horizontal line. Do not cut the entire jug open, just about a third of the way around, enough to open it. This will give you access to the light. Repeat this process on the Sunny D jug as well.
Paint the Sunny D jug green and the milk jug yellow. Let the paint dry completely then paint each jug with a second coat.

If you milk jug has circle indents in the side, that’s a great place for the eyeball! I left mine unpainted when I did the yellow, then painted the indented circle white. If you jug doesn’t have the indents you will simply paint the eyeball on instead.

Yellow Monster
To add the polka dots to the yellow jug, use the two spouncers and red, purple and light blue paint.
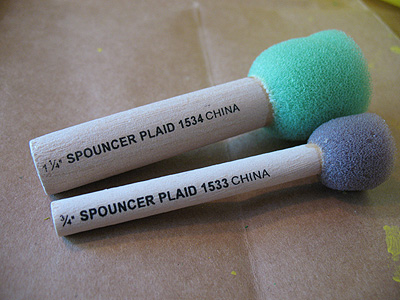
Simply dip the spouncer in the paint, remove excess by gently pressing onto plate or scrap paper and twirling. Then just place spouncer on jug and gently add pressure.

Use the larger spouncer dipped in orange paint to the add the center of the eye.
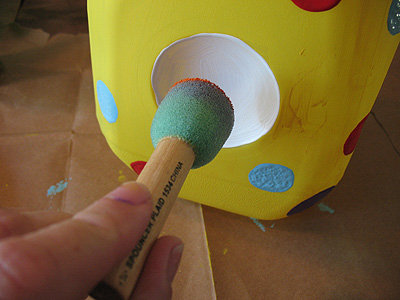
Dip large paintbrush into black paint. To create the eyebrow, bounce the paintbrush straight up and down across the top of the eye.
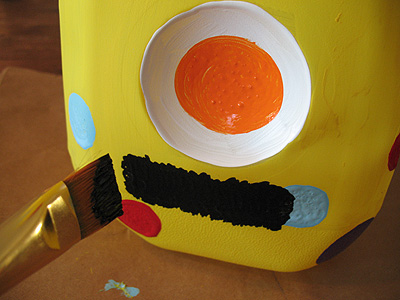
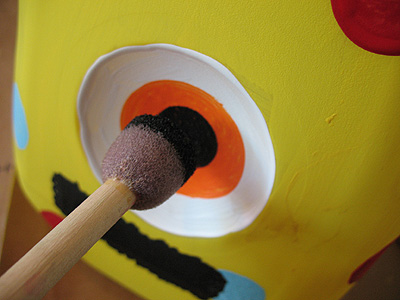
When the orange is dry, use the smaller spouncer to add the black of the eye.
Use the white paint pen (or a pencil) to draw on teeth. Fill in with white paint using small paintbrush. Use Sharpie marker to add the mouth line. Set the yellow jug aside to dry.

Green Monster
Use the large paintbrush to add the monster’s hair. The hair will take up about 1/3 of the jug. Paint on the eyebrows.
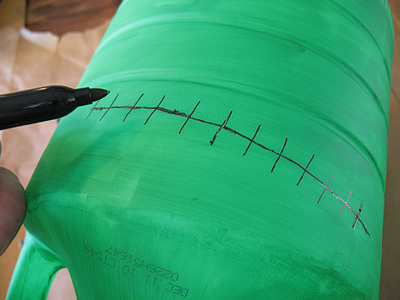
Use the Sharpie marker to draw on the mouth, eyes, nose and stitches. When using the marker, use a light hand. Pressing too hard with the marker will tear through the paint.
Add the whites of the eyes then dot on the black with the handle end of the small paintbrush.
(NOTE! I realize the photo below differs from my instruction here. I’m a “work as I go” kinda crafter, then I provide the most logical instruction in the tutorial. The eyes were an after thought and I ended up building them backwards. The instructions however would be easier than how I ended up doing it ;))

Carefully draw over the stitch lines again with the marker for a second coat.
When everything has dried, give the jugs a coat of sealer. Let dry 20 minutes before applying a second coat of the sealer.
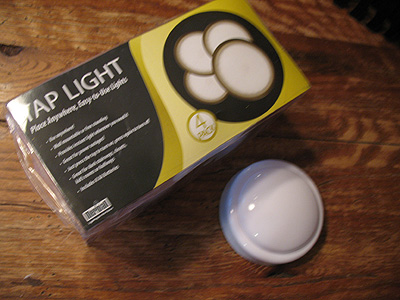
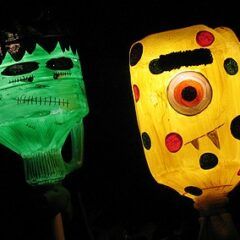
Press some wall putty to the bottom of a tap light. Insert the tap light inside the jug and attach it to the inside top of the head with the putty. Push the tap light to turn on. You could use a hot glue gun instead of wall mounting putty if you prefer.
Insert a broom handle or sturdy stick into the jug opening. If the stick is much smaller that the opening, causing the jug to wiggle around, take a sheet of felt and fold it in half. Place the felt on top of the stick then push the opening of the jug over the top of the felt and stick. This will fill the gap and give the jug stability.
TIPS
1) Wall mounting putty is inexpensive and available at WalMart, craft stores and home improvement centers. It’s ideal for many things and doesn’t leave holes in your walls.
2) The tap lights I used I found at WalMart. They are battery operated and came in different sized packs. The one I purchased was a 4 pack, came complete with batteries and was a whopping $3.96. :)
3) If you have an old broom, rake or snow shovel that you aren’t using those are great for the stakes. It’s even better if the handle is removable as you can just put it back on after Halloween, no harm done. I actually needed a couple of rakes anyway, so I grabbed a couple of cheap ones from Walmart for $5 each and used those handles.
4) You could dress these up even more by attaching a long branch in a cross form with the broom handle. Attach it with tape and/or twine, then drape a sheet over it so it looks like it has arms :)
5) When painting on plastic, let the first coat dry completely before trying to add the second coat or the first coat may peel. When adding the second coat, be sure to use a light hand.
Halloween Monster Yard Lights
Supplies
- Empty plastic milk jug
- Empty plastic Sunny D jug
- Acrylic paint: white black, green, yellow, purple, red, light blue, orange
- 1 1/4 " spouncer
- 3/4 " spouncer
- Large paintbrush
- Small paintbrush
- Sharpie marker
- White paint pen optional
- Clear gloss sealer spray
- 2 battery operated tap lights
- Wall mounting putty or hot glue
- Old broom handles or tall branches or sticks
Instructions
- Decide which side of the jug will be the front, where your monster's face will go. Turn the jug over to the other side and cut the bottom of the jug, about 2" from the bottom, in a horizontal line. Do not cut the entire jug open, just about a third of the way around, enough to open it. This will give you access to the light. Repeat this process on the Sunny D jug as well.
- Paint the Sunny D jug green and the milk jug yellow. Let the paint dry completely then paint each jug with a second coat.
- If you milk jug has circle indents in the side, that's a great place for the eyeball! I left mine unpainted when I did the yellow, then painted the indented circle white. If you jug doesn't have the indents you will simply paint the eyeball on instead.
Yellow Monster
- To add the polka dots to the yellow jug, use the two spouncers and red, purple and light blue paint.
- Simply dip the spouncer in the paint, remove excess by gently pressing onto plate or scrap paper and twirling. Then just place spouncer on jug and gently add pressure.
- Use the larger spouncer dipped in orange paint to the add the center of the eye.
- Dip large paintbrush into black paint. To create the eyebrow, bounce the paintbrush straight up and down across the top of the eye.
- When the orange is dry, use the smaller spouncer to add the black of the eye.
- Use the white paint pen (or a pencil) to draw on teeth. Fill in with white paint using small paintbrush. Use Sharpie marker to add the mouth line. Set the yellow jug aside to dry.
Green Monster
- Use the large paintbrush to add the monster's hair. The hair will take up about 1/3 of the jug. Paint on the eyebrows.
- Use the Sharpie marker to draw on the mouth, eyes, nose and stitches. When using the marker, use a light hand. Pressing too hard with the marker will tear through the paint.
- Add the whites of the eyes then dot on the black with the handle end of the small paintbrush.
- Carefully draw over the stitch lines again with the marker for a second coat.
- When everything has dried, give the jugs a coat of sealer. Let dry 20 minutes before applying a second coat of the sealer.
- Press some wall putty to the bottom of a tap light. Insert the tap light inside the jug and attach it to the inside top of the head with the putty. Push the tap light to turn on. You could use a hot glue gun instead of wall mounting putty if you prefer.
- Insert a broom handle or sturdy stick into the jug opening. If the stick is much smaller that the opening, causing the jug to wiggle around, take a sheet of felt and fold it in half. Place the felt on top of the stick then push the opening of the jug over the top of the felt and stick. This will fill the gap and give the jug stability.
Be sure to check out my Halloween luminaries and my Jack O’Lantern TV!

- Patriotic Pinwheels - June 23, 2026
- Fingerprint Daddy & Me Coffee Mug - June 12, 2026
- Patriotic Bandana Wreath - June 9, 2026


Micky says
Made these today with my 5 year old. They turned out great and your tutorial was so easy to follow! thanks so much for the great idea. Can’t wait till dark so we can see them light up. Wish I could post pics here to show you are final pieces.
Amanda says
That’s great Micky! So glad you had a good time!
Debra says
Those are FANtastic!
brandy Navarro says
These are so cute! Can I ask what is at the bottom of the jugs? It looks way cuter than just the jugs
Amanda says
Hi Brandy! Did you mean the folded fabric at the bottom? It’s just a sheet of felt :)
Amanda says
I'm a little slow in responding but wanted to say thanks to everyone for the features and the comments!
Karlista says
Oh my gosh! Such a CUTE craft! How did you come up with this? I featured the tutorial on my blog and facebook page! Check it out!
http://www.facebook.com/#!/EZcrafts
http://www.ezcrafts.karlista.com
Sandy Ang says
Love the idea and the tutorial !
Mindy says
I featured you! :)
http://mokutekibaby.blogspot.com/2010/10/monster-yard-lights.html
Petit Eco KIDS says
Hi Amanda! Great project and I love that it's recycled! Would love to link to this from one of my craft roundup posts if OK with you? Flavia
Kristen Duke Photography says
great idea:) I'm excited to see what you do on crafting with the stars!
Mandi says
Hey Lady! I just wanted to swing by and say good luck on the competition! Its going to be so fun, I cant wait to see what you come up with!
love your guts
mandi
p.s. I am so going to kick your trash! :)
p.s.s. Dont hate me for saying that mmmmkay?
Heather says
Those are really cute! Come link up to my party memakingdo.blogspot.com
Stephanie Lynn @Under the Table and Dreaming says
You've been featured today! Thanks so much for joining the Sunday Showcase Party- I greatly appreciate it. Stop by and grab a featured button if you like. Hope you have a wonderful weekend. – Stephanie Lynn
Shayna @ Texas Monkey says
Oh these are great, I love it! I'd love for you to link up with All About You Monday and show them off. They'd fit perfect with our Halloween Party theme this week.
http://texasmonkey.blogspot.com/2010/10/all-about-you-monday-link-up_18.html
Also could I share this in my parenting/kid event newsletter? I'll give you the credit and a link back of course.
Amanda says
Thanks Joselyn!
Joselyn says
Recycled crafts are the best! Great job!
Amanda says
Thanks everyone! Can't wait for Halloween! :)
Hanna says
Hi there! I am your newest follower!! I found you on the weekend linky! I love finding new blogs and your is lovely:) You can find me at http://www.bouffeebambini.blogspot.com
Bella says
Um wow, these are cool, and its SUPER great to know how cheap those tap lights are, what great tips you ahve given us. I seriously have my garage overflowing with milk jugs, bottles, newspapers, etc. Just waiting to start doing some crafts. This is an awesome tutorial. I LOVE your link for the link parties you participate in, so naturally I added mine too, hope thats what its there for,,, **6 weeks 2 Spook**, hope you come to join with this and ANY or ALL of your awesome halloween ideas. I need all the help I can get, have only 2 weeks till the big day, and I have a party to throw. Thanks!!!! Bella
RecycleCindy says
Fantastic recycled project! I just love the monster faces and the way you decorated the jugs. Stumbled it also.
Katie says
LOVE these!!!
Jess @ Frugal with a Flourish says
Those are simply adorable! Love it!!
Heather says
Cool! Thanks – I'm always looking for monster ideas!
Ash says
I love these! So cute, I just made the plain old ghosts out of milk jugs, these are so much cuter!
Amanda says
Thanks you guys! I love Halloween, I think it's the funnest crafting holiday ;)
[email protected] says
Those are fabulous! Super cute lit up and in the daylight! Thanks so much, I'll be linking.
Kristen @ ladybug-blessings.com says
you have the cutest things that you come up with!! I love it!!
Erin says
You make the coolest Halloween crafts! I love these!!!
Lorie says
As soon as I saw the images in my Google REader I KNEW they were yours! Love all of your Halloween ideas!!