• Home
  • About
    • About Crafts by Amanda
    • Visit Our Recipe Site
  • Work With Us
  • Join
    • Free Newsletters
    • Join our Facebook craft group
↑
  • Tutorials
    • Tutorial Index
    • Adult Crafts
    • Crafts for Kids
    • Crafts for Seniors
    • Recycled Crafts
    • Seasonal Crafts
    • Holiday Crafts
    • Free Printables
    • Craft Collections
  • Adult Crafts
    • Bath & Body
    • Beach Crafts
    • Clay Pot Crafts
    • Crafts for Seniors
    • Decoupage Crafts for Adults
    • DIY Gift ideas
    • Garden Crafts
    • Home Decor Projects
    • Kitchen Crafts
    • Light Bulb Crafts
    • Luminary Crafts
    • Mason Jar Crafts
    • Needlework
    • Photo Display Ideas
    • Recycled Crafts for Adults
    • Wearable Crafts for Adults
  • Crafts for Kids
    • Animal Crafts for Kids
    • Back to School Crafts
    • Beach Crafts for Kids
    • Camp Crafts
    • Cardboard Tube Crafts for Kids
    • Decoupage Crafts for Kids
    • Easy Crafts for Kids
    • Nature Crafts for Kids
    • Other Kid’s Crafts
    • Paper Plate Crafts for Kids
    • Recycled Crafts for Kids
    • Slimes, Doughs, & Clay
    • Wearable Crafts for Kids
  • Holiday Crafts
    • 4th of July Crafts
    • Christmas Crafts
    • DIY Gift ideas
    • Earth Day Crafts
    • Easter Crafts
    • Father’s Day Crafts
    • Halloween Crafts
    • Memorial Day Crafts
    • Mother’s Day Crafts
    • New Year’s
    • Other Holidays
    • Patriot Day Crafts
    • St. Patrick’s Day Crafts
    • Thanksgiving Crafts
    • Valentine’s Day Crafts
  • Seasonal Crafts
    • Winter Crafts
    • Spring Crafts
    • Summer Crafts
    • Fall Crafts
  • Skip to primary navigation
  • Skip to main content
  • Skip to primary sidebar
  • Skip to footer

Crafts by Amanda

crafts for adults and kid's crafts

  • Tutorials
    • Tutorial Index
    • Adult Crafts
    • Crafts for Kids
    • Crafts for Seniors
    • Recycled Crafts
    • Seasonal Crafts
    • Holiday Crafts
    • Free Printables
    • Craft Collections
  • Adult Crafts
    • Bath & Body
    • Beach Crafts
    • Clay Pot Crafts
    • Crafts for Seniors
    • Decoupage Crafts for Adults
    • DIY Gift ideas
    • Garden Crafts
    • Home Decor Projects
    • Kitchen Crafts
    • Light Bulb Crafts
    • Luminary Crafts
    • Mason Jar Crafts
    • Needlework
    • Photo Display Ideas
    • Recycled Crafts for Adults
    • Wearable Crafts for Adults
  • Crafts for Kids
    • Animal Crafts for Kids
    • Back to School Crafts
    • Beach Crafts for Kids
    • Camp Crafts
    • Cardboard Tube Crafts for Kids
    • Decoupage Crafts for Kids
    • Easy Crafts for Kids
    • Nature Crafts for Kids
    • Other Kid’s Crafts
    • Paper Plate Crafts for Kids
    • Recycled Crafts for Kids
    • Slimes, Doughs, & Clay
    • Wearable Crafts for Kids
  • Holiday Crafts
    • 4th of July Crafts
    • Christmas Crafts
    • DIY Gift ideas
    • Earth Day Crafts
    • Easter Crafts
    • Father’s Day Crafts
    • Halloween Crafts
    • Memorial Day Crafts
    • Mother’s Day Crafts
    • New Year’s
    • Other Holidays
    • Patriot Day Crafts
    • St. Patrick’s Day Crafts
    • Thanksgiving Crafts
    • Valentine’s Day Crafts
  • Seasonal Crafts
    • Winter Crafts
    • Spring Crafts
    • Summer Crafts
    • Fall Crafts
Craft Tutorials | Holiday Crafts | Halloween Crafts | Plastic Spoon Monsters
Halloween Crafts

Plastic Spoon Monsters

Author by Amanda Davis on October 28, 2019 Updated on October 4, 2020

5 from 2 votes
Make these adorable plastic spoon monsters with the kids for Halloween! Some monsters are scary, but these ones just want to go trick or treating!
Jump to Project
Make these adorable plastic spoon monsters with the kids for Halloween! Some monsters are scary, but these ones just want to go trick or treating!
951 shares
  • Share
  • Tweet
  • Flipboard
  • Email

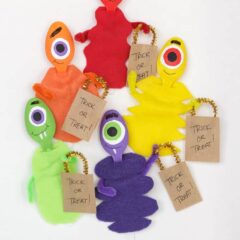
Monsters and Halloween go hand in hand. They don’t always have to be scary though, like my monster bookmarks, which are pretty darn cute! All these plastic spoon monsters want to do is go trick or treating! So what do you say? Want to make some cute monsters of your very own?

Monster trick or treaters made out of plastic spoons and paint


Make Fun Plastic Spoon Monsters

This easy craft for kids has Halloween written all over it… seriously. Did you see the trick or treat bags?? The kids can make these plastic spoon monsters and display them in a diorama, just poke the handles into some foam!

Green plastic spoon monster

They can also double as puppets so kids can put on a Halloween puppet show. Either way, it’s a fun afternoon of make-believe!

Purple plastic spoon monster

You can decorate their faces however you like, though I am partial to the cyclops look. One eye, one eyebrow, and usually one fang!

Red plastic spoon monster

I also think monsters with multiple eyes are super cute! I like making their eyes go in different directions.

Orange plastic spoon monster

Seriously, if one of these cute little guys walked up to you, you would totally take them trick or treating, right??

Yellow plastic spoon monster

Ok, enough chatter. Let’s get on with it. Gather your supplies and get ready to make these cute plastic spoon monsters!

Colorful felt and twist ties for making plastic spoons monsters

I made five plastic spoon monsters, but the instructions below are for just one. I chose five different colors and matched them all up. You can mix and match and do whatever you want! For paint, I used Americana in Bright Orange, Sour Apple, Bright Yellow, Lavender, and Red Alert.

Supplies for one plastic spoon monster:

  • Felt in color of your choice, cut into a 4″ x 3″ rectangle
  • Pipe cleaner (same color as felt)
  • Plastic spoon
  • Acrylic craft paint in black, white and color to match your felt
  • Paintbrush
  • Scissors
  • Round sponge applicators (spouncers)
  • Hot glue gun

For trick or treat bag:

  • 1/3 gold pipe cleaner
  • Paper bag cut into 2″ x 1.5″ rectangle
  • Fine point black marker


Painting spoons

Paint the back of the spoon and halfway down the handle. Allow to dry and repeat for a second coat.

Using a spouncer to make eyeballs on plastic spoons

Use spouncers dipped in white and black paint to add eyes. Allow to dry completely.

Using a spouncer to make plastic spoon monster eyeballs

I like the double-ended spouncers. There are two different sizes in one. Check your local craft store to see what they have.

Drawing on eyeballs to red plastic spoon monster

Use the handle end of a paintbrush to add circles that are smaller than your spouncers.

NOTE: I know that some of my photos show the steps out of order. For your best results, follow my written instructions. Let all the paint dry before adding the felt costumes. I realize that my images don’t always reflect that, but that’s because I am making the mistakes on your behalf so you don’t have to! ;)

Cutting felt for plastic spoon monsters

Meanwhile, while the paint is drying, fold the felt rectangle in half lengthwise and cut a small slit 1/2-inch from the top.

Unfold felt and trim off excess above the slit. Be careful not to cut it too close.

Felt cut into shapes for monster clothes

Cut around the edges of the felt to create fun shapes for the monster costumes.

Adding felt clothing to plastic spoon

When the paint is completely dry, insert the handle of the spoon into the slit of the felt so that the handle ends up behind the felt. Use a dab of hot glue to secure the felt to the “neck” of the spoon monster.

For the next step you will need to lift the felt and move it out of your way which is why the painted faces should be completely dry before you do this!

For the next step, you will need to lift the felt and move it out of your way which is why the painted faces should be completely dry before you do this!

For the arms, fold pipe cleaner in half and twist around the middle of the spoon handle. Stretch pipe cleaner arms to the left/right.

For the arms, fold a pipe cleaner in half and twist around the middle of the spoon handle. Stretch pipe cleaner arms to the left/right. Bring the felt back down and secure it to the spoon handle with hot glue.

Write “TRICK OR TREAT!” on the paper bag rectangle.

Write “TRICK OR TREAT!” on the paper bag rectangle. Bend the gold piece of pipe cleaner in half and curve the bend to look like a bag handle. Hot glue the handle to the back of the treat bag.

Twist the end of one of the arms around the treat bag handle. Position the arms however you like!

colorful monsters made from plastic spoons

I hope you had fun making these cute little monsters from plastic spoons! I have some other crafts you will probably enjoy like these plastic spoon bugs and these plastic spoon snowmen! And I told you I love to make monsters. So be sure to check out ALL my monster crafts here!

Make these adorable plastic spoon monsters with the kids for Halloween! Some monsters are scary, but these ones just want to go trick or treating!
Print Project
5 from 2 votes

Plastic Spoon Monsters Go Trick or Treating

Make these adorable plastic spoon monsters with the kids for Halloween! Some monsters are scary, but these ones just want to go trick or treating!
Age Group: Kids Crafts
Project Type: Halloween
Author: Amanda Formaro

Supplies

For one monster:

  • Felt cut into a 4" x 3" rectangle
  • Pipe cleaner same color as felt
  • Plastic spoon
  • Acrylic craft paint in color to match felt black and white
  • Paint brush
  • Scissors
  • Round sponge applicators spouncers
  • Hot glue gun

For trick or treat bag:

  • 1/3 gold pipe cleaner
  • Paper bag cut into 2" x 1.5" rectangle
  • Fine point black marker

Instructions

  • Paint the back of the spoon and halfway down the handle. Allow to dry and repeat for a second coat.
  • Use spouncers dipped in white and black paint to add eyes. Use the handle end of a paintbrush to add circles that are smaller than your spouncers. Allow to dry completely.
  • Meanwhile, fold felt rectangle in half lengthwise and cut a small slit 1/2-inch from the top.
  • Unfold felt and trim off excess above the slit. Be careful not to cut it too close.
  • Cut around the edges of the felt to create fun shapes for the monster costumes.
  • When the paint is completely dry, insert the handle of the spoon into the slit of the felt so that the handle ends up behind the felt. Use a dab of hot glue to secure the felt to the “neck” of the spoon monster.
  • For the next step you will need to lift the felt and move it out of your way which is why the painted faces should be completely dry before you do this!
  • For the arms, fold pipe cleaner in half and twist around the middle of the spoon handle. Stretch pipe cleaner arms to the left/right.
  • Bring the felt back down and secure it to the spoon handle with hot glue.
  • Write “TRICK OR TREAT!” on the paper bag rectangle.
  • Bend the gold piece of pipe cleaner in half and curve the bend to look like a bag handle. Hot glue the handle to the back of the treat bag.
  • Twist the end of one of the arms around the treat bag handle. Position the arms however you like!

This post originally appeared here on Sep 4, 2017.

How to make Plastic Spoon Monsters!

  • Author
  • Recent Posts
Amanda Davis
Amanda Davis is the crafty, entrepreneurial mother of four children. She loves to bake, cook, make kid's crafts and create decorative items for her home. She is a crafting expert and guru in the kitchen and has appeared online and in print publications many times over the years.
Latest posts by Amanda Davis (see all)
  • Mason Jar Aquarium - May 23, 2025
  • Make Bracelets from Recycled T-shirts - May 20, 2025
  • Spring Scavenger Hunt - May 9, 2025
951 shares
  • Share
  • Tweet
  • Flipboard
  • Email

Filed Under: Easy Crafts for Kids, Halloween Crafts Tagged With: felt, halloween, kid's crafts, Monster Crafts, plastic spoon, plastic spoons

Reader Interactions

Free CraftsBy email every week

Latest crafts straight to your inbox!

Comments

  1. Ann Sweeney says

    October 4, 2017 at 9:04 am

    I love your ideas and pictures, do you have a book I could purchase for my

    my own ideas and brain storms.

    Reply
    • Amanda Formaro says

      October 9, 2017 at 11:03 am

      Hi Ann :) I have a few kid’s craft books here http://amzn.to/2xrIyhz

      Reply
  2. Jennifer Perkins says

    September 5, 2017 at 8:17 am

    Love how the cyclops action. I’ve got some plastic spoons left over from various parties that will soon get a makeover!

    Reply
    • Amanda Formaro says

      September 8, 2017 at 6:30 pm

      Glad you liked them, thanks Jennifer!

      Reply
5 from 2 votes (1 rating without comment)

Leave a Reply Cancel reply

Your email address will not be published. Required fields are marked *

Rate This Project


The maximum upload file size: 640 MB. You can upload: image, video. Links to YouTube, Facebook, Twitter and other services inserted in the comment text will be automatically embedded. Drop files here

Primary Sidebar

Hi! I’m Amanda and I’m the founder and head designer of Crafts by Amanda. I have spent over 25 years creating projects to share, but it’s not just me anymore! It’s turned into a complete family affair. Come and meet the Creative Team!

Free CraftsBy email every week

Latest crafts straight to your inbox!

All Time Favorites

snowy pinecone candle jar luminaries

Winter Luminaries: Snowy Pinecone…

Make pretty winter luminaries that appear to be covered ... Go To project

Make this wonderful deco mesh pumpkin wreath to hang on your door this fall!

Deco Mesh Pumpkin Wreath…

Adorn your door this fall with a pretty deco mesh ... Go To project

Learn to make these adorable ladybug painted rocks. use special outdoor paint for this adorable garden craft so you can keep garden ladybugs all summer!

Ladybug Painted Rocks…

I'm going to show you how to make these adorable ... Go To project

Reuse those empty prescription pill bottles in all sorts of ways. From organizing to making cookies. Yes, cookies! See how to use your empty pill bottles!

20 Uses for Prescription Pill…

You've been collecting prescription pill bottles for ... Go To project

Meet the Family

Amanda

Founder and Designer

Kristen

Editorial Manager

Lindsay

Social Media Manager

As seen on:

Footer

Favorites

  • Jar Photo Frames
  • No-Sew Roman Shade
  • Paper Flowers
  • How to Make a Scrunchie
  • Mermaid Slime

About

  • Home
  • Meet the Creative Team
  • Work with Us
  • Privacy Policy
  • Accessibility
  • Contact Us

Images/text copyright Amanda Formaro 2020. To feature a post from Crafts by Amanda, you may use one photo credited and linked back directly to the project post.

Free CraftsBy email every week

Latest crafts straight to your inbox!

Copyright ©2025, Crafts by Amanda. All Rights Reserved.
Design by Pixel Me Designs

Rate This Tutorial

Your vote:


To share a photo with your comment click here!

A rating is required
A name is required
An email is required

Recipe Ratings without Comment

Something went wrong. Please try again.