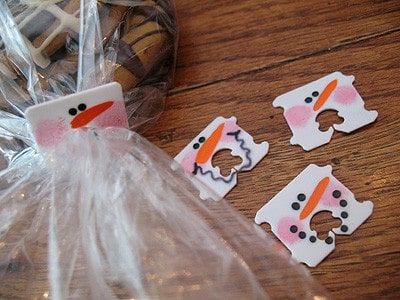

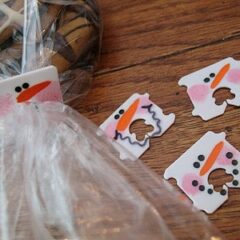
Don’t throw out those little plastic bread tag clips that come on packages of bagels, English muffins and sandwich buns. Instead, save them to make these cute little snowmen for securing your Christmas treat bags!
You probably remember the recycled bread tag monsters that I made for Halloween. Right after making those I knew I wanted to make some for Christmas too. I finally had some time to make these and just in time for your holiday treat bags. These would be perfect on these adorable little hot chocolate on a stick!
 These were actually very easy and I think I like the ones without mouths better than the ones with mouths. Either way, I think they came out cute and took almost no time at all!
Recycled Bread Tag Snowmen
printable version
plastic bread tags
acrylic paint: orange, pink and black
toothpicks
sealer spray, matte finish
If your bread tags are any color but white, you will need to paint them with white acrylic paint first.
 First I sketched out some ideas. I really recommend doing this whenever you are trying to make something from your head a reality.
 You want to do the cheeks first. Use an old scruffy brush and dip it in pink paint. Dab off the excess paint on a piece of paper.
 Dab the cheeks on with the pink paint.
 Practice making the noses on a piece of paper.
 Add noses to the bread clips.
 Dip the handle end of a small paintbrush into black paint. Dot on the eyes.
 Use the same dotting method to add a mouth if you like, or use a Sharpie marker. NOTE: If using a Sharpie, let these sit for several hours before spraying with sealer, otherwise the ink may run.
 If not using Sharpie, just allow the paint to dry then spray with sealer.
| Get the recipe for these chocolate drizzled gingerbread cookies |
 Now attach to your treat bags, like I did on these chocolate drizzled gingerbread cookies! These would also be great tags for a bag of these homemade bath bombs for kids to make!
Recycled Bread Tag Snowmen
Supplies
- plastic bread tags
- acrylic paint: orange pink and black
- toothpicks
- sealer spray matte finish
Instructions
- If your bread tags are any color but white, you will need to paint them with white acrylic paint first.
- First I sketched out some ideas. I really recommend doing this whenever you are trying to make something from your head a reality.
- You want to do the cheeks first. Use an old scruffy brush and dip it in pink paint. Dab off the excess paint on a piece of paper.
- Dab the cheeks on with the pink paint.
- Practice making the noses on a piece of paper.
- Add noses to the bread clips.
- Dip the handle end of a small paintbrush into black paint. Dot on the eyes.
- Use the same dotting method to add a mouth if you like, or use a Sharpie marker. NOTE: If using a Sharpie, let these sit for several hours before spraying with sealer, otherwise the ink may run.
- If not using Sharpie, just allow the paint to dry then spray with sealer.
- Now attach to your treat bags, like I did on these chocolate drizzled gingerbread cookies!
- Patriotic Pinwheels - June 23, 2026
- Fingerprint Daddy & Me Coffee Mug - June 12, 2026
- Patriotic Bandana Wreath - June 9, 2026


Ann says
Do you need to really use the sealer? I was going to do this as a school project and I would love
to skip this step. Let me know! Thank you! Ann
Amanda Formaro says
You can probably skip it!
d says
Cute
Claire says
SUPER IDEA!!! We could also put little thoughts at the back, like :……LOVE…..FRIENDS……..JOY………..PEACE……FAMILY….
I wonder if they would work as a glass marker. Has anyone tried??????
Amanda Formaro says
Hi Claire. Not sure what you mean as a glass marker?
Claire says
To put at the stem of your glass to re-locate it during a party.
(I am writing from Quebec, and being French, maybe I do not have the right english name for this)
Amanda Formaro says
Hi Claire! I get what you’re saying, a wine glass name tag of sorts :) LIke a wine glass charm!
Claire says
Yes!!! I have tried it, but the hole is too small, maybe it would take bigger plastic tags.
JDaniel4's Mom says
These are adorable! What a great way to reuse bread tags!
I would love for you to link this up to the Holiday Hop of Goodies on my site. http://www.jdaniel4smom.com/2012/11/holiday-hop-of-goodies-introducing-our.html
Elle says
OMG. These are stinkin’ adorable! I love the stuff you do, Amanda.
Amanda says
Thank you Elle! :)
Jena says
you could probably use Q-tips to make the marks for the cheeks.
These are so cute!
Susan says
Fabulous! Thank you for sharing.
Candace says
Just too cute for words!!! Very clever and creative. Thanks.
Rena says
Oh, these are awesome! I loved your little monster ones, but I wasn’t sure what I’d do with those. These would make a great addition to a food gift!
Lindsay says
Super cute & unique idea!! I featured this on my blog today, feel free to come check it out :)
http://artsyfartsymama.blogspot.com/2011/11/pinteresting-features-n-shtuff-11.html
Cathy Coates says
These are just the cutest ideas I’ve ever seen! I MUST borrow your idea with the snowman for Christmas cookies for friends! The ideas are endless! Chicks and bunnies for Easter, clowns for parties! These are just GENIUS! Thank you for sharing!!!
mercedes Medina says
OMG…I have been saving big bread tags I new they would come in handy cause they were so. I bake for xmas for the teachers at work and is always looking for the right color ribbon….But now I love to paint and do crafts things and this one, was a winner. Thank you so much for this Ideal. Great work. Mercedes
Cap Creations says
Cute!
MeanestMotherInTheWorld says
These are SOOO cute! I am just stumbling acrost your blog now and wishing I had found you over the holidays :)
LOVE your craft ideas :)
Amanda says
They are so cute Jenny! Love the glitter idea, perfect!
Jenny @ Embellishing Life says
You make the cutest stuff! I love these! Back when you made the monster tags I was inspired to make some of my own! If you'd like to see them you can find the link here:
http://embellishinglifeeveryday.blogspot.com/2010/10/frankentags-and-pumpkins-ones-too.html
Amanda says
Thanks so much everyone!
Mary says
Hi, I found your blog at My Romatic Home. I love your bread tags, too cute! I would like to invite you to post this over at my new link party, Masterpiece Monday, at my blog, Boogieboard Cottage. The link is already up. I hope you can join the party!
Happy New Year,
Mary
Patti says
very clever…they are so cute on the treat bags!
Jenn Erickson says
Visiting from the linky party at "My Backyard Eden" and had to come by, Amanda, to say this: Genius! Positively genius! I love your creativity and cleverness!
Diane {Created by Diane} says
So cute, I love how creative you are!
Judy Bagwell says
I always save the tags, but never sure what to do with them. Thanks for the great idea!!
Naturally Me Creations says
What an absolutely cool idea! Much more unique than just tying a ribbon to seal the package. :)
kimbuktu says
Very cute, and simple. A perfect combination!
Michelle@Somedaycrafts says
Another Darling idea! I am featuring this today at somedaycrafts.blogspot.com. Thanks for all your inspiration.
Lowri says
Awesome idea – thanks for sharing!
Jenny Harris says
Adorable! What a great idea!
AmieAnn says
These are sooo stinkin cute! I might even love them just a bit more than the Halloween ones.. but only because Snowmen have my heart! Hope you will share with my Pink Hippo Party @ http://pinkapotamus.blogspot.com/2010/12/pink-hippo-party-9.html
Ashley says
WOW HOW CUTE!!! I love it :)
I'm your newest follower! Feel free to stop by and follow back: http://ashleycreations-a.blogspot.com/2010/12/monday-blog-hops.html
Thanks!
– Ashley
Erin says
These are so stinkin' cute! You are amazing!
Kathy @ Creative Home Expressions says
That is the cutest idea I've seen, Amanda! How creative and what a great way to add a little something to a package like cookies or candy.
Gloria Westerman says
This is fabulous!!!!!!!!! What a bright idea…..will have to try these…..
Merry Christmas…..
Liz says
Great idea!
I'm giving you a Stylish Blogger Award! Come and get it from my blog! http://fastdaze.blogspot.com/2010/12/award-time.html
Its So Very Cheri says
I am posting about these tomorrow.
Cheri
Alison says
WOW!! What a darling idea!!
the treat girl says
Waaaaaaay cute!!!!!!!!!!!!!
phasejumper says
Visiting from Red Ted Art. These are ADORABLE!
Cinnamon Rose Cottage says
Hello Amanda,
I love your blog and I am having a Christmas link party on my blog and would love if you would add a link.
http://cinnamonrosecottage.blogspot.com/2010/12/have-merry-christmas-link-party.html
Merry Christmas,
Beverly
Erin says
These are super cute Amanda! They really add something to a gift! Thanks for sharing.
Mod Podge Amy says
Awesome Amanda – so quick and easy! I linked to these on Paint Me Plaid. You rock girl! Happy Holidays! xo
maggy, red ted art says
These are VERY cute and made me smile. What greedy little snowmen… eating all those cookies!
Maggy
(And thanks for linking up!)
Ali Richardson says
So adorable!
beth says
Oh my, this is so clever! Love it!
Tanya says
Love these! Great idea :)
Vera @ Cozy Little Cabin says
Too, too, cute! Thanks for sharing this great, simple idea! I think even *I* can do this one!
Amanda says
Cute idea! Or it might look like it's eating the bag, LOL but a hungry snowman means that the treats in the bag are yummy right? :) :)
Anonymous says
You could paint around the hole to make it look like the snowman is singing.
Andrea says
Oh I love this! This is on my list for next year! Thanks So Much:)
Maria Gridley says
cute cute cute idea!!! :) I LOVE it!
Jane says
This kills me! It is so simple and brilliant! That's it! I am making it an assignment for my students to bring in bread tags!