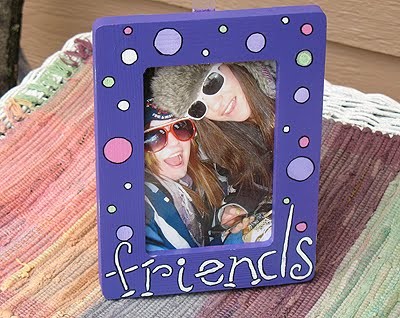

My teen daughter needed a gift for her friend’s birthday. She didn’t want to just buy it though. You see this particular friend of hers made Kristen an amazing portrait of the two of them in art class this past winter, so she wanted Jordan’s gift to be just as special. Kristen is creative, but she doesn’t craft much, so she needed something fairly easy that produced a great result.
(By the way, come take a look at the Spiderman cake I made for Jordan’s birthday!)
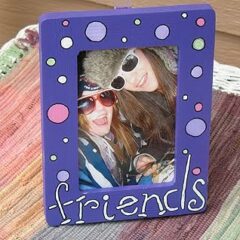
Luckily for me DecoArt had just sent me a couple of frame stencils they recently introduced. The timing was perfect, so Kristen picked out the paint colors and we went to work! There are quite a few different stencil designs to choose from, but according to Kristen, flowers were out. Polka dots would be cool, but she wanted the word “friends” on the frame as well. So we combined the “Dots” stencil and the “Friends” stencil.
The concept is actually quite cool. The stencils are made to fit right on top of the frame, then you just pounce the paint onto the stencil, remove, and add a clear coat! This would be great for summer camp, sleepovers, or a group project at a birthday party. We’ve all seen the inexpensive wooden frames, most craft stores sell them for $1.00 each, and the stencils are retailing for $1.25. Grab a few stencils, a stack of frames, and what a fun craft this would be for a bunch of giggling girls!
FYI – These frames are available at some JoAnn Fabric stores as of August 1st, 2010 and will be hitting more stores as time progresses. You can also order them online.
Make a Friends Stenciled Frame
DecoArt Dots stencil
DecoArt Friends stencil
Tape
Wooden 4″x6″ frame to match stencil
Acrylic paint: purple, white, pink, light green
Sponge applicators or stencil pouncers
Clear acrylic sealer (gloss)
Black Sharpie
Photo

Paint the frame, front and back, with purple paint. Let dry completely.
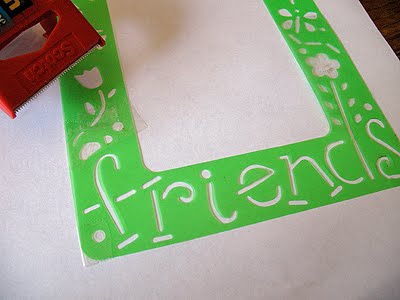
On the “Friends” stencil, cover the areas close to the word “friends” with tape so that the paint doesn’t get through those areas.
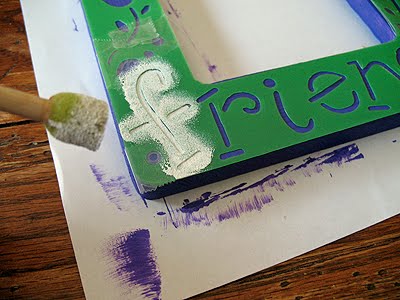
Place the “Friends” stencil on top of the painted frame. I secured mine to the side with a little tape. Dip applicator in white paint and pounce off the excess paint onto a paper towel. Hold the stencil down with your fingers and pounce applicator onto the stencil. When stenciling, remember to pounce your applicator straight up and down and not at an angle. Pouncing at an angle can cause the paint to get under the stencil. When finished, lift the stencil off the frame and wait for the wait paint to dry before moving on to the next step.

To add the polka dots, place the “Dots” stencil on top of the frame. You will be able to see the word “friends” that you just added through the dot stencil, which will keep you from accidentally painting a dot over the letters. Use the pink, white and light green paint to add the polka dots using the same stencil method as above.
Allow all the paint to dry, then outline the letters and the dots with a black Sharpie. Leave for about half an hour, just to make sure the marker has dried. Spray or coat with a gloss sealer.
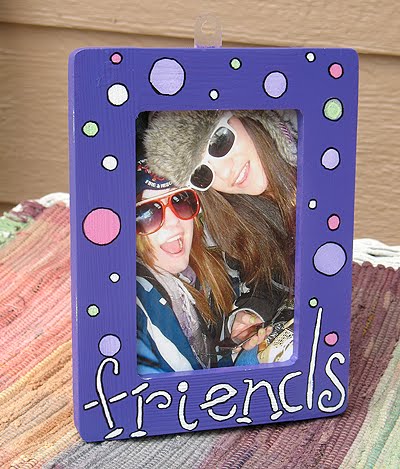
Stenciled Frame
Supplies
- DecoArt Dots stencil
- DecoArt Friends stencil
- Tape
- Wooden 4"x6" frame to match stencil
- Acrylic paint: purple white, pink, light green
- Sponge applicators or stencil pouncers
- Clear acrylic sealer gloss
- Black Sharpie
- Photo
Instructions
- Paint the frame, front and back, with purple paint. Let dry completely.
- On the "Friends" stencil, cover the areas close to the word "friends" with tape so that the paint doesn't get through those areas.
- Place the "Friends" stencil on top of the painted frame. I secured mine to the side with a little tape. Dip applicator in white paint and pounce off the excess paint onto a paper towel. Hold the stencil down with your fingers and pounce applicator onto the stencil. When stenciling, remember to pounce your applicator straight up and down and not at an angle. Pouncing at an angle can cause the paint to get under the stencil. When finished, lift the stencil off the frame and wait for the wait paint to dry before moving on to the next step.
- To add the polka dots, place the "Dots" stencil on top of the frame. You will be able to see the word "friends" that you just added through the dot stencil, which will keep you from accidentally painting a dot over the letters. Use the pink, white and light green paint to add the polka dots using the same stencil method as above.
- Allow all the paint to dry, then outline the letters and the dots with a black Sharpie. Leave for about half an hour, just to make sure the marker has dried. Spray or coat with a gloss sealer.
More from me you might like:
Back to School: Homework Before Play Sign
Wooden Frame Redo – Framed Seashells
Safety Pin Bracelet
More fun stuff from the interwebs:
Flowered Frame Craft – From Free Kids Crafts
Peace Sign Pillow – from Making Friends
Picture Frame Crafts – from About.com
Puzzle Frame – from FamilyCorner.com
- Swirling Twirling Ladybugs - July 21, 2026
- Drip Tie Dye Backpack - July 17, 2026
- Mini Coastal Clay Houses - July 14, 2026


creativejewishmom/Sara says
Handmade gifts are always the best! and this is so cute! Thanks for sharing on Craft Schooling Sunday as always the party is just so much better with you there! and the cake is great too!
Alida L. says
How do you get your stencils to come out so perfect? It looks great!
malia says
super duper cute… i love stencils. but my finished products don't look as good as yours!
Barbara Jean says
cute idea for a fun frame!
thanks
blessings
barbara jean
José Maria Lobato says
Hello, liked your work very much, surely I will come back for a closer look and to get some inspiration, if you don't mind!!! José
Melissa says
Good for your daughter and what a special gift for a special friend!!