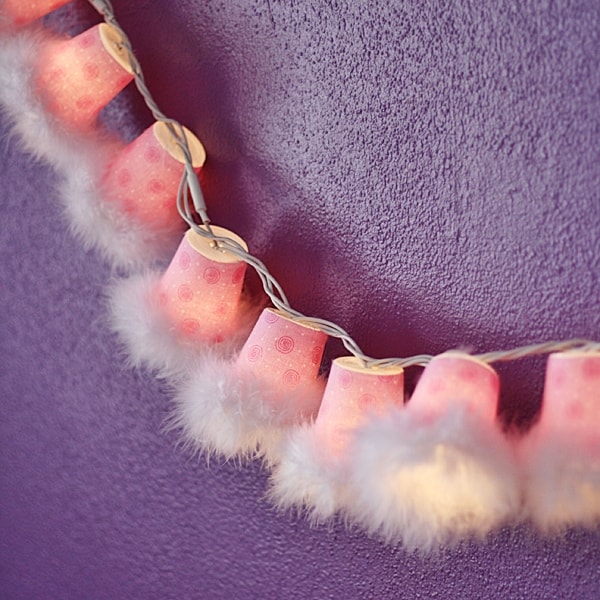
I’ve always wanted to make these, but each holiday keeps going by and I keep forgetting. Well I finally did it, and glammed them up a bit with a feather boa. Yep, it was messy, but that’s what being in the craft room is all about! These string lights can actually be changed out for different occasions or holidays simply by changing the paper or fabric. I’ll show you how I did it over at Spoonful.
Wouldn’t these be great for a slumber party or just for prettying up a little girl’s room? How about in the playroom?
I’ve attached the templates with tape so that if you want to change out the fabric or paper, you can do so easily. And I’ve used a string of LED lights so that the bulbs don’t get hot.
I think they came out so pretty! I actually have them hanging in my office right now.
NOTE: I chose to use fabric for this project. Fabric has a tendency to fray when you cut it, so if you use fabric be sure you are using good quality, sharp scissors. If you prefer to use scrapbook paper, use a light shade so that the light can shine through. Do not use card stock as it is too heavy for the light to penetrate. Tissue paper can also be used, but it difficult to work with because it is so delicate.
Sweetheart Plastic Cup String Lights
Supplies
- Set of white LED string lights
- Small plastic cups
- Fabric or scrapbook paper
- Scissors
- Clear shipping tape
- Piece of paper to make template
- Feather boa
- Hot glue gun
Instructions
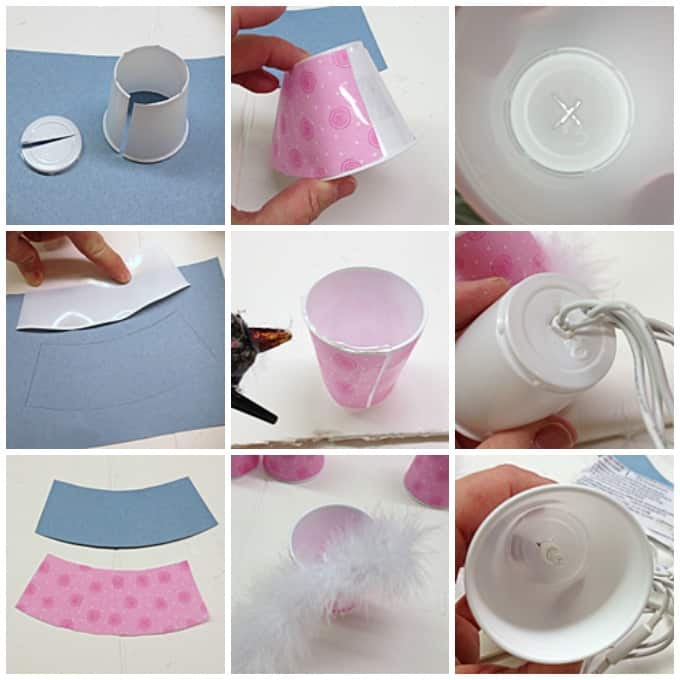
- You will need to sacrifice one cup in order to create your template. Carefully cut from the brim of the cup to the bottom of the cup then cut through the bottom. Cut the bottom out of the cup leaving only the sides.
- Lay the cup out flat onto a piece of paper and trace around it to create your template. Cut the template out and wrap it around a new cup to see if it fits.
- Use the template to cut your fabric or scrapbook paper.
- Tape your fabric cut-out to the cup.
- Wrap the fabric around the cup and tape it closed. Continue until all of your cups are covered.
- Take your feather boa and measure a piece out to see how much you will need to wrap around the brim of the cup. Cut enough boa pieces for all the cups. Line the brim halfway with hot glue and place the feather boa into the glue.
- Continue gluing around the cup until brim is covered.
- Use a craft knife to carefully cut a cross into the bottom of the cup.
- Insert the string light into the hole in the bottom of the cup.
- The entire bulb and bulb housing will go inside the cup. Continue this process for all the lights.
Expert Tips & FAQs
I originally made this project for Spoonful. Spoonful has since closed and the instructions were taken down. I am putting the instructions here until such time that Spoonful projects are redirected to a new home. At that time I will remove the instructions and link directly to the project on their site.
- Watercolor Luminaries - February 11, 2025
- Free Valentine Printables: Cards, toppers, and tags - February 4, 2025
- Valentine Hugs - January 31, 2025


becky says
I can’t find the directions on Spoonful. Could you provide a link?
Amanda Formaro says
Hi Becky. I’ve added the instructions to this post :)
Norene says
Thanks Amanda! I want to try these for a couple of my granddaughters rooms. They would love them!
Amanda Formaro says
Thanks Norene, hope you and they enjoy the project!
Erin says
These are darling! Perfect way to use up some scraps of quilting fabric too :)
Amanda Formaro says
Thanks Erin :)
Jerry E. Beuterbaugh says
I hope 2014 proves to be a good year for you and yours!
Amanda Formaro says
Thank you Jerry :)