

I learned how to do this several years ago. I’ve made pilgrim hats, leprechaun hats (will post those soon too), and these springtime hats. These springtime hats are the perfect craft for spring, Easter, and Mother’s Day. They are really fun to make and the kids love watching them bake. It’s like having Shrinky Dinks in the oven!
Most common question: Does it smell?
Not really. Maybe a slight scent to the sensitive nose, but I could never smell anything. :)
Styrofoam Cup Spring Hats
Note: The temperature and instructions in this craft are based off of a dark coated cookie sheet at 250 degrees F in an electric oven. You may want to experiment with different temps until you receive satisfactory results. I recommend baking one or two cups at the recommended temperature and time first. If they seem to melt too quickly or the ends curl up and under, try reducing the temperature and trying again.
NOTE: Below are two videos. The first one shows a successful shrinking of a cup at 250 F. The second video shows that at the same temperature another cup did not shrink all the way, even at almost 5 minutes. Out of 5 cups that I tried, 1 failed. I also show the successes at the end, and while watching a cup shrink in the oven is a little borning, I do talk during the video and try to give some explanations as to why it may or may not work for people. I hope these help!
VIDEO #1
VIDEO #2
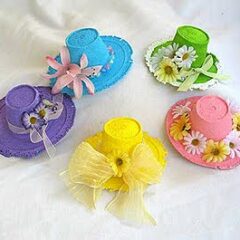
Styrofoam Cup Spring Bonnets
Supplies
- Styrofoam cups
- acrylic paint in pastel colors
- small silk flowers
- small beads
- pastel or sheer ribbons
- hot glue gun
- magnets optional
Instructions
- Preheat oven to 250 degrees F.
- Place Styrofoam cups upside down (open end of cup down) on a dark coated cookie sheet, placing them about 1-2" apart. Note: we experimented with both dark coated and silver cookie sheets, the cups did not melt properly on the silver sheets.
- Bake in the oven for approximately 3 minutes, don't walk away! It will take about one minute before you see any changes to the cups, then the heat will begin to melt and shrink them rather rapidly after that. It's lots of fun for the kids to watch, so be sure to turn the oven light on.
- Remove the cookie sheet from the oven and set aside to cool completely. DO NOT try to remove the cups from the cookie sheet until they are completely cooled. As they cool, the Styrofoam that is stuck to the sheet will relax and release its grip from the sheet, allowing you to remove them easily. Most cups will melt rather well, thought you may end up with one or two that look rather distorted or disfigured.
- Paint the "hats" with pastel colors, one coat is usually enough, and allow them to dry completely. Once they are dry you can embellish them with small silk flowers, pretty beads, and ribbons using a hot glue gun.
- If you like, you can hot glue a small round magnet to the bottom of the hat at the brim and hang on the refrigerator.
- DIY Mosquito Repellent Candles - July 10, 2026
- Mason Jar Solar Lights - July 3, 2026
- Patriotic Pinwheels - June 23, 2026


Judy R. says
Hi Amanda, I’ve done this project many years ago when they still sold true styrofoam cups. Will this still work on the “newer” hot / cold styrofoam cups?
Amanda Formaro says
I haven’t tested this in several years so I can’t be sure,
Barbara Whitman says
I keep trying but the cups didnt shrink down they kinda melted together how can i get them right
Patty Futch says
What size cup did you start with. I used 20 oz and 8.5. We are trying to make bonnet pins for a retirement home. Can you advise.
My email is [email protected]
Amanda Formaro says
Hi Patty, I used the 8-ounce size. :)
NIKKI JILES says
I will make them with K-cups & cardboard. Seems to be about the same size & will be less time consuming. I have no patience in waiting for the cups to melt. I make Christmas ornaments & will probably decorate them for ornaments but I also love the spring hat look.
Amanda Formaro says
Have fun :)
Leanie says
Hi, I assume ur K-cups we emptied and washed. Right. I would like to try that. Thanks for the tip
Margaret Johnson says
Melting Styrofoam Cups: How do you make the brim melt out like a Spring Hat or Picture Hat rather than a man’s or Leprechaun Hat? The ones I did don’t make the brims like you have pictured above which are so cute. Thanks for replying.
Amanda Formaro says
Hi Margaret. I’m afraid it’s just trial and error. It all depends on temperature, timing and can also depend on the brand of cup. There’s really no exact science that I have found, just luck of the draw. Sorry I can’t help more!
barb says
hi: my cups did not turn out – didn’t round at the top and didn’t provide a rim at the bottom – bummer. I tried roughly 6 of them and they looked more like something the cat in the hat would wear. I will be persistent though because they are adorable. can’t wait for one of the cups to do what’s right. thanks for sharing. barb
Amanda Formaro says
Try different temperatures too Barb, good luck with it!
Michele Schlapfer says
How do you secure them to your head?
Thanks. Michele
Amanda Formaro says
Hi Michele. These are miniature hats meant for table decorations.
Jenn says
I used to do these as a kid—37 years ago. Now that I have a 6 year old and a 3 year old. I am excited to do these again. Thanks for the instructional video. I love it!!!
Amanda says
You’re welcome, so glad it was helpful!
Mariah Randolph says
Greetings, Craft Goddess! Just wondering, if I pull them out of the oven a bit early, while they still look like top hats, do you think they will maintain their shape? Steampunk wedding are currently very popular, and I’ve been looking for something to do for each place setting. I think these would be great if I added a wig clip to the bottom so the guests could then wear them.
Amanda says
You can remove them whenever you like, just keep watching through the oven window. The heat hardens the styrofoam, so yes they should hold their shape. Just let them cool before handling :)
rita says
Very cute I will be making these. In purple and pink for relay for life
Amanda says
How fun!
Jean says
How do I turn them into place card holders?
Amanda Formaro says
Hi jean :) If were to use them as place card holders I think I would place the hat on top of a slip of paper with the person’s name, so as not to ruin the hat by attaching a name. I’m sure there are more ways, hope you think of something fun!
NIKKI JILES says
Cut a slit in the top of the hat and slip a name card in the slit.
Megan says
These are adorable! I’m going to make these with my girls so their AGD’s can have Easter bonnets. Too cute. Thanks for sharing!
lisa armour says
do you have to attach the decorations using a glue gun i would love to try this with my brownies but find they have problems with glue guns
admin says
No, you can Beacon’s 3-in-1 Advanced instant Grab Glue. it works a lot like hot glue but without the “hot” :) http://amzn.to/wxyafD
Amanda says
Hi Teresa
It's really pretty hit or miss. You have to test different temperatures as well as cookie sheets. Using a dark coated pan will yield different results than that of an insulated sheet, just like with cookies. One pan will heat faster that the other. I always try one at a time until I get it right. The ones pictured above, I probably made 15-20 cups, and ended up with 6 or 7 with perfect brims. You can see some others I did that ended up with curled brims here http://www.familycorner.com/family/kids/crafts/foam-cup-uncle-sam-hat-craft.shtml
Teresa says
Adorable. But how do you get the brim of the hats flat around the bottom. When I shrank the cups they just shrank in the same shape without a brim.
Thanks!
Jenn @ Delicious Ambiguity says
Those turned out great! I've never seen this done before so thanks for linking up on Tot Tuesdays last week. I hope you’ll join me this week for another party. Happy Easter!
Heather - Dollarstorecrafts.com says
Fun idea! :) I found your blog because you were on my Blogher ad feed. :)
Lori says
These are totally cute. Love them..
Thanks for joining Get Your Craft on Thurs. Please join me next week for another great party.
Lori
Amanda says
Thank you all so much! :) :)
Andy Porter says
Cute CUTE cute!
Rachelle says
Ugh! Look at you go! That looks great! I love them.
I also love the tie dye letters on your side bar. You've got some great ideas, I'm going to bookmark you! :)
Rachelle
Tiff @ Making The World Cuter says
How fun is that?!!
My kids would love that!
-Tiff
Laurie Turk says
Those are amazing and so creative!
Amanda says
Thank you all :)
NormaJean – you can use any size, they all melt, but I used coffee cup size, sorry, don't know the oz.
NormaJean says
How big are the styrofoam cups??
Heather@ My Frugal Family says
Those are really cute- a great Spring craft!
Thank you so much for linking up with the Talented Tuesday link party at My Frugal Family, which is hosted every Tuesday. Please feel free to stop back in every week and post your newest projects!
Lady Jane says
Those are beautiful I wish I had a working oven so I could make them.
Amy @ Simply Sugar & Gluten Free says
Precious, Amanda. I think they'd make perfect place card holders for a Ladies Tea. You've been SU'd. :)
artsy_momma says
I love them- can't wait to see the leprachaun hats! You are so good at explaining things- so easy to understand :)