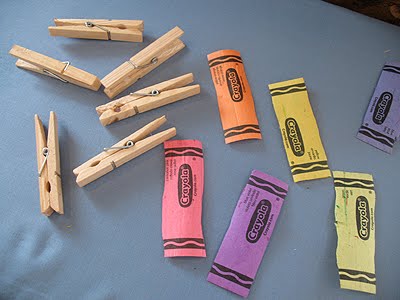
I had some clothespins, some crayon wrappers, and lots of coloring pages. This kid’s craft project is actually a great mommy and me craft, the kids can color the decorations while you do the harder parts. This idea was a little slow coming.

I knew immediately that I wanted to decoupage the crayon wrappers to the clothespins, but the rest is what took a while. A week ago I did the clothespins, glued them to the board, then it sat in a corner all week while I wracked my brain trying to figure out what to do next.
If you’re a Dr. Seuss fan, try using these Dr. Seuss coloring pages for this project!
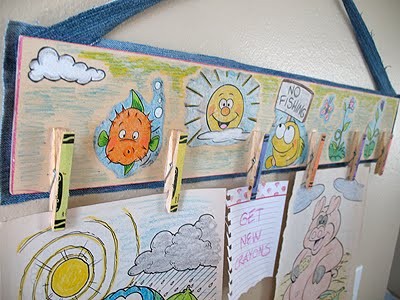
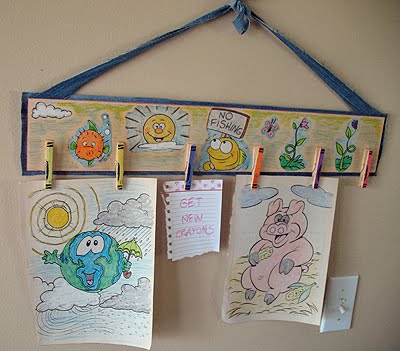
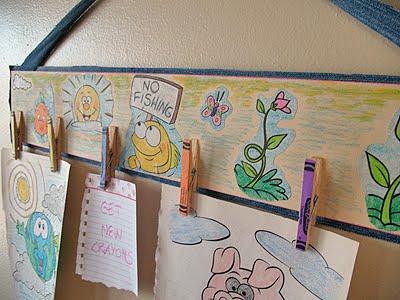
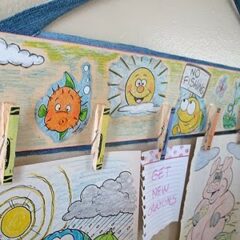
Today it hit me. Why not take pictures that your kids have colored to decorate the board? There’s no paint in this project, it’s all done with crayons. :) Dress it up with an old pair of jeans and you’re all set!
Also, while I usually use white craft glue for all my projects, I decided to try something different. Elmer’s came out with a new glue called “Glue-All”. Have you seen it yet? I decided to try it, and I am definitely impressed! The glue grabbed immediately and held way better than my standard white craft glue. This is the first project I’ve tried it on, so we’ll see how it performs on others, but so far I think it’s a winner!
April 6, Update: how fun is this? Yesterday, April of Modern-Mama commented on this post saying that she had just made something extremely similar to this. Oh how great minds think alike! Check out April’s Clothespin Art Display Hanger, I love her idea of using it to display photos as well! For those of us with stainless steel refrigerators (or OCD as April states it BAHAHA), this is a great alternative for hanging kid’s artwork, photos, or even reminder notes.
If you’d like to make a clothespin art center, here’s what you do:
Clothespin Art Center
designed by Amanda Formaro
PRINTABLE VERSION AT THE END OF THIS POST
You will need
6 wooden clothespins
24″ x 4″ wood slat
coloring pages
crayons
white glue
water
scissors
What you do
Remove the wrapper from 6 different colored crayons. I used a craft knife to cut along the seam and remove them. They will be very cylindrical, so you’ll need to flatten them. I ironed mine, but you could also press them in a heavy book overnight.
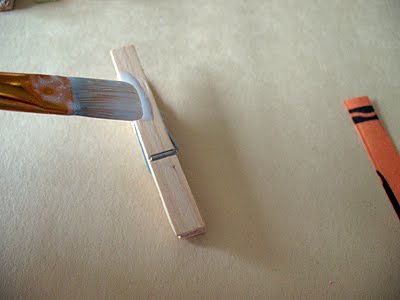
Place clothespin on top of the crayon wrapper, use a pencil to draw a faint line. Cut the crayon wrapper so that it’s just slightly smaller than the surface of the clothespin.
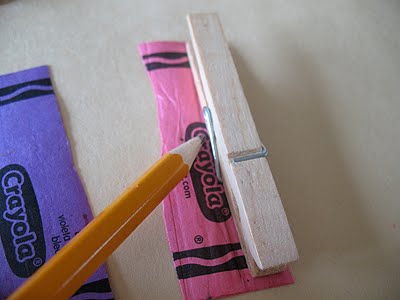
Mix some white glue and water together to make a decoupage mixture, then decoupage the wrapper to the clothespin.
Glue the clothespins to the wooden plank, you want about 2/3 of the clothespin on the plank, spacing them apart evenly.

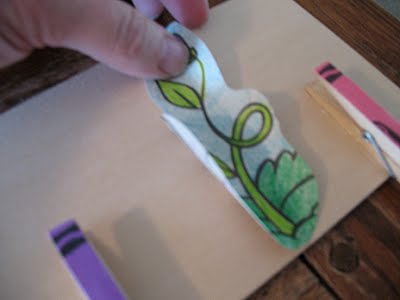
Have the kids color some printables or coloring book pages. Make sure they color the background too! Cut them out, decoupage them onto the plank, only painting the back of the colored decals at this point. Don’t decoupage over the tops just yet.
Use a crayon to shade in the background, use a secondary color as well, if you wish. I used blue with touches of yellow at the top since my pictures were related to water and nature. Choose another color (I used red) to outline the border of the plank. Decoupage over the top of everything, smooth any bubbles that may pop up on your “decals”.

Cut a piece of denim to create a border for the plank. Place the plank on top of it to get an idea for the size you need to cut, mark with a pencil, then cut. Cut two strips of denim, about an inch wide, lay them across the front of the plank. Once you have them where you want them, loosely tie a knot at the top.
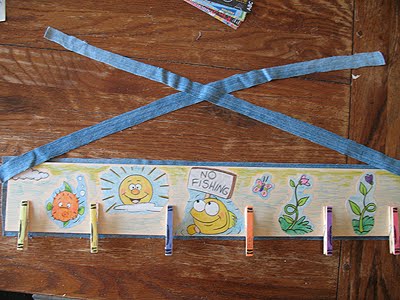
Place the ends of the strips under the plank. Once everything is positioned, trim anything that needs trimming, then cover the back of the plank with white glue. Press down onto the denim and let dry. Adjust the knot at the top, tie into a bow and trim ends.
Hang!
Clothespin Art Center
Supplies
- 6 wooden clothespins
- 24 " x 4" wood slat
- coloring pages
- crayons
- white glue
- water
- scissors
Instructions
- Remove the wrapper from 6 different colored crayons. I used a craft knife to cut along the seam and remove them. They will be very cylindrical, so you'll need to flatten them. I ironed mine, but you could also press them in a heavy book overnight.
- Place clothespin on top of the crayon wrapper, use a pencil to draw a faint line. Cut the crayon wrapper so that it's just slightly smaller than the surface of the clothespin.
- Mix some white glue and water together to make a decoupage mixture, then decoupage the wrapper to the clothespin.
- Glue the clothespins to the wooden plank, you want about 2/3 of the clothespin on the plank, spacing them apart evenly.
- Have the kids color some printables or coloring book pages. Make sure they color the background too! Cut them out, decoupage them onto the plank, only painting the back of the colored decals at this point. Don't decoupage over the tops just yet.
- Use a crayon to shade in the background, use a secondary color as well, if you wish. I used blue with touches of yellow at the top since my pictures were related to water and nature. Choose another color (I used red) to outline the border of the plank. Decoupage over the top of everything, smooth any bubbles that may pop up on your "decals".
- Cut a piece of denim to create a border for the plank. Place the plank on top of it to get an idea for the size you need to cut, mark with a pencil, then cut. Cut two strips of denim, about an inch wide, lay them across the front of the plank. Once you have them where you want them, loosely tie a knot at the top.
- Place the ends of the strips under the plank. Once everything is positioned, trim anything that needs trimming, then cover the back of the plank with white glue. Press down onto the denim and let dry. Adjust the knot at the top, tie into a bow and trim ends.
- Watercolor Luminaries - February 11, 2025
- Free Valentine Printables: Cards, toppers, and tags - February 4, 2025
- Valentine Hugs - January 31, 2025


Nicole says
Amanda, I found your craft site by searching the web, and I really like some of the crafts that you have on here. This one is so cute. I thought that it would be a great idea to add magnets to the other side of the clothespins that have the crayon wrappers on them. Just in case you don’t have space in your house for a art display like the one that you designed, you could at least display your children’s art on the fridge with some style. Please keep the awesome ideas coming, I really appreciate them. Have an awesome day.
Amanda says
Thanks Nicole! Glad you found me and like what you see here! Yes, clothespins with magnets are great for the fridge :)
Stasha Simon says
You should post some paired projects together to show maximum use of materials. For example, before Valentine's Day I made the recycled heart crayons, and stripped a ton of crayons of their papers…now I wish that I had saved some of them to put this together!! I love that it has multiple mediums to it. My kids are in their 20's , but I am still thinking of making this!
Beth@The Stories of A2Z says
Totally cute Amanda!
Debbie says
Very cute idea!
Anonymous says
Thank you, for this idea!Madalina,Romania
Amanda says
Thanks so much for the feature Helena!
Helena says
Thank you for your wonderful idea!
I posted a link to your note here
http://rukomir.ru/derzhatel-dlya-risunkov.html
Tanya says
Sweet idea!
Yanet @ 3 Sun Kissed Boys says
I love that you used the crayon papers to cover the pins. Very cute.
Valerie says
Ah! I've got to make one of these for my niece for her birthday. Thank you. This is brilliant!
sommerhowey says
So cute! I love this
Amanda says
Thanks so much everyone, and thanks for the features!!
Infarrantly Creative says
You've been featured…Squuueal!
Lori says
What a great idea…
Thanks for joining Get Your Craft on Thursday! Please join me this week for another great party!
Sorry, it's taken me a while to come and visit, but i was out last week!
Lanie says
I love this and I linked in my Friday Favorites this week. Stop by if you like…
http://www.laniejandco.com/2010/04/friday-favorites-4910.html
Lanie Ree says
I'm featuring this today over at Life in the Pitts. Thanks again for linking up!
http://lanieree.blogspot.com/2010/04/featuring-you_09.html
Debbie in Nashville says
This is so cute! I love the crayon wrappers on the clothespins!
Lanie Ree says
This is adorable!!
Thank you for linking this to A Little Craft Therapy with Life in the Pitts
Kristi Flanagan says
Thanks so much for planting your creative seed at Plant a Punkin Seed Party!!!! You know I love this project!!! =0) Come back on Friday and see "hoo" won the owl and, of course, plant another creative seed!
Kristi
Punkin Seed Productions
Fawnda says
That is too cute! I love that you used crayon paper for the clothes pins! Great job! :)
Shirley says
Really cute idea with the crayon papers.
Carolyn @ My Backyard Eden says
Cute! I love the crayon clothespin covers!
Thanks again for linking up to Make it Yours day!
Angie @ The Country Chic Cottage says
Love this idea!!
Allison Shops says
Too cute! The crayon coves are an excellent choice.
Be sure to visit AtticMag this week for our Giveaway!
Allison
Misty says
Visiting from Tip Junkie! This is too cute! I had to become a follower! Have a great day!!!
Quirky Decor says
Such a lovely idea! Thanks for putting it up. I'm sure going to do this with some modifications.
April: Modern-Mama says
I just saw this posted on Skip to my Lou Made by You Mondays. Too funny because I just made one very similar to it on Saturday! Mine was just painted solid black to match my son's room, but I love your idea of using the crayon wrappers and coloring sheets!
Jessica Hills says
This is such a great idea for kids! Thanks so much for posting this on Favorite Things Friday!
Sarah says
I loved it! Thanks for sharing!
I have a great interview with a savvy blogger on my blog right now with great tips on how to help your blog grow.
You can check it out at http://bloggerchixdesigns.blogspot.com/2010/04/aprils-featured-interview-april.html
Also a giveaway for a Trendy Diaper Changing Pad if your interested :-)
CC says
I'm visitine from Made By You Monday..this is just the cutest idea ever. I just love it.
Ruth H. says
What a great idea! I should make one of these, so that I can free up the front of my refrigerator!
The Activity Mom says
SO cute! love it
Sandra Powell says
Came over from Tatertots. This is really cute and creative.
Connie Weiss says
That is such a great idea!
Kristi Flanagan says
Cute – I love how you used the crayon papers to cover the clothes pins! I'd like to invite you to come "plant your creative seed" at my blog party "Plant a Punkin Seed at Punkin Seed Productions". It's a party that usually happens on Fridays but its open all this week as I'm having a give away! Come sign up!
Kristi
Punkin Seed Productions
Sarah says
I've actually been working on a very similar project!! With having a stainless steel fridge now, I have nowhere to display kiddo artwork. I love the Crayon Clothespins. Hadn't thought to do something like that! I'm going to try doing that. :) Thanks for sharing.
Blessings!
-Sarah
jennwa says
That is a terrific idea.
Thanks for linking!!!
Mary Beth @ Live. Laugh. Make Something says
delightful! I really like the crayon paper covering the clothespins. I hopped over from Fingerprints on the Fridge and am so happy that I did. Please accept my invitation to drop in at my place one day soon. Have a fun weekend! until later…
Rockin Momma says
I'm a new Friday Follower! Visit me at http://www.rockindeals4you.com/?p=1116 and sign up for my first giveaway!
Sue Sparks says
I love it, especially the "crayon" clothespins! So creative!
One Cheap B*tch says
So cute! Such a great idea! My boys would love this – thanks for sharing!
Jeanine
Polly@MakeMineBeautiful says
That's darling. I love that you made them look like crayons.
Rachelle says
LOVE that! It looks so cute with the crayon paper on it!
Minny says
Very Cute idea Amanda. The kids can also make a hat holder for Dad for Father's day using the same basic idea. Or you can get a yardstick & paint it the color of your choice. Most yardsticks already have a hole so you can hang it. Paint the clothespins a contrasting color. Glue the clothespins to the yard stick far enough apart so the hats don't get crowded.