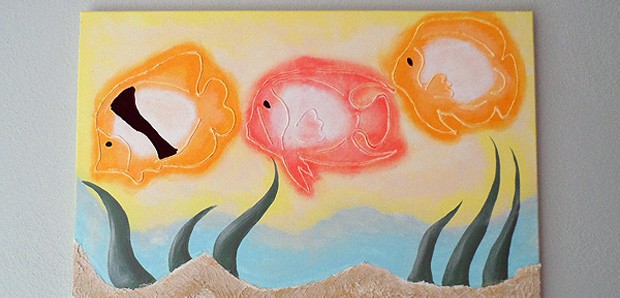

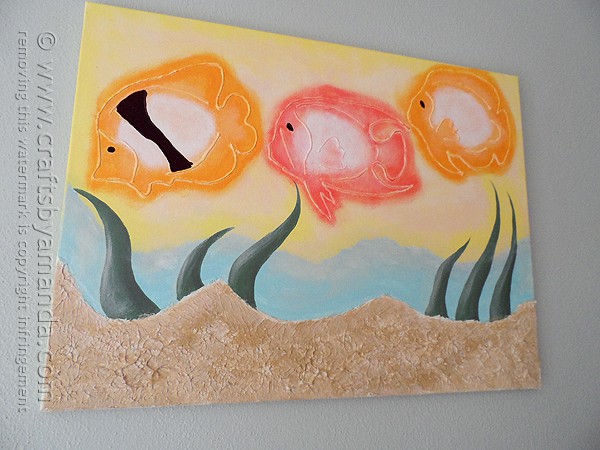
This tropical fish painting is near and dear to my heart. It was inspired by a large piece of wall art I saw while on vacation a couple of years ago in Florida. We stayed with my good friend Jodi and she had a large tropical painting hanging in her guest bathroom. I loved the textures and the three dimensional aspects of it, so it stuck with me for a long time before I finally decided to make my own version.
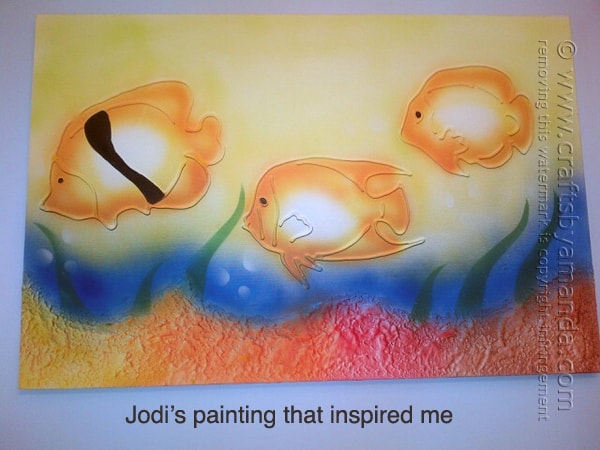
Pictured above is the painting from Jodi’s house. It was actually a lot bigger than mine. I don’t know what it measured, but I would guess it was close to 48-inches wide.
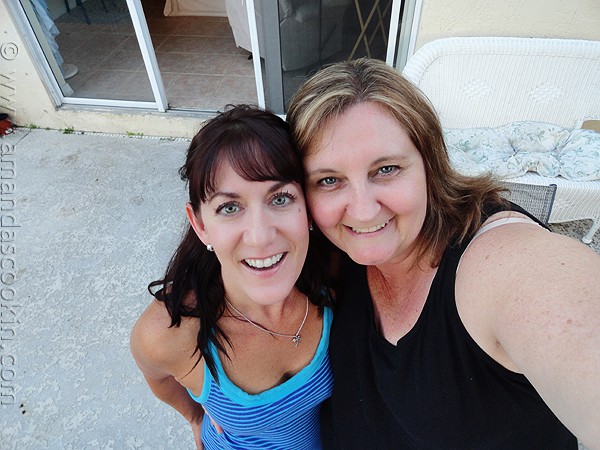
This is me and Jodi. I had worked with her online since 2007 and we became close friends. She is one of my best friends on earth and I am very grateful to have met such a funny, kind-hearted and generous person. The world needs more Jodis. :) Love you girlfriend. If you would like to see more pictures of our trip to Florida, and get a great recipe too, head over to this post on my food blog – Key West Grilled Chicken Salad.

In order for my painting to have a similar three dimensional affect, I used a couple of products. For the fish outlines I used a white Americana Writer![]() , and for the sea floor I used DecoArt’s paintable texture – Stucco
, and for the sea floor I used DecoArt’s paintable texture – Stucco![]() . Jodi’s painting had a lot more of the bright, vibrant tropical colors. My decor is a bit more beachy-muted. So I chose colors that would work with my room’s look.
. Jodi’s painting had a lot more of the bright, vibrant tropical colors. My decor is a bit more beachy-muted. So I chose colors that would work with my room’s look.
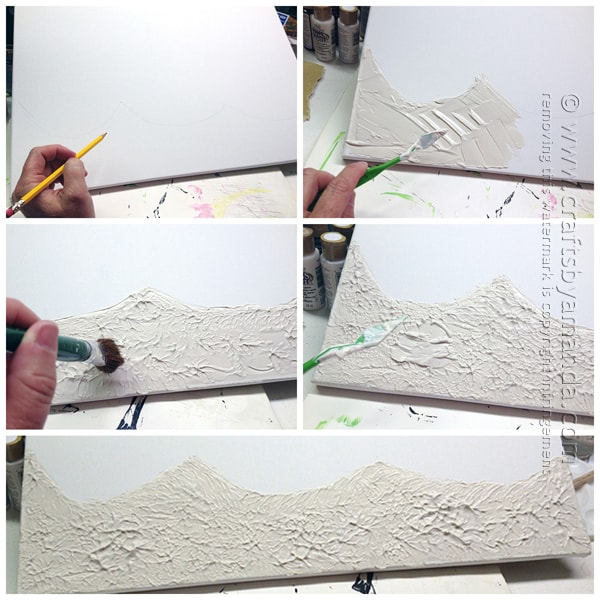
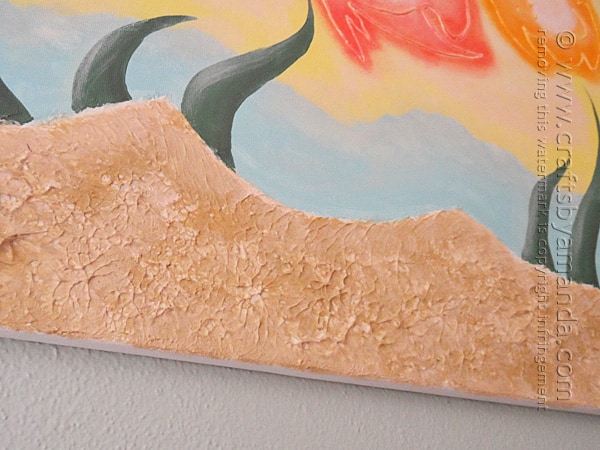
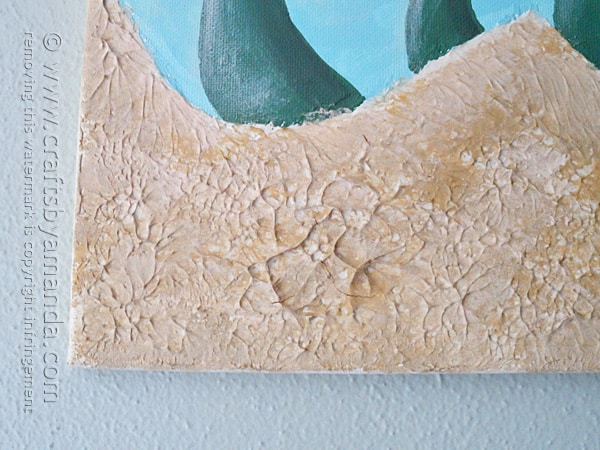
First I used pencil to draw the line for the sea floor onto the canvas. Next, I used a palette knife to add the Texture Stucco to the canvas. Using an old scruffy brush, I touched it to the stucco and then lifted straight up. When I was finished, I wanted it a bit thicker in a couple of spots, so I added just a bit more and texturized again. This had to dry for several hours.
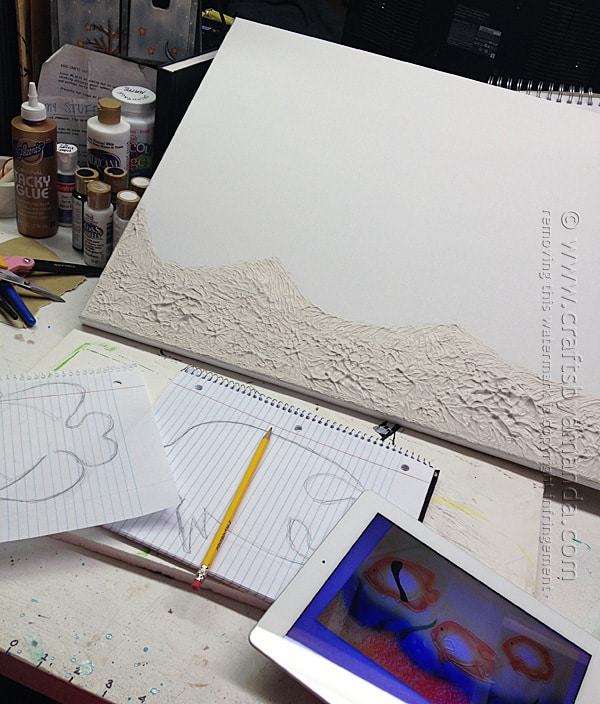
Using the photo of the painting that Jodi emailed to me, I drew the fish out on paper. I’ve included them as patterns in the printable instructions below if you want to paint this yourself.
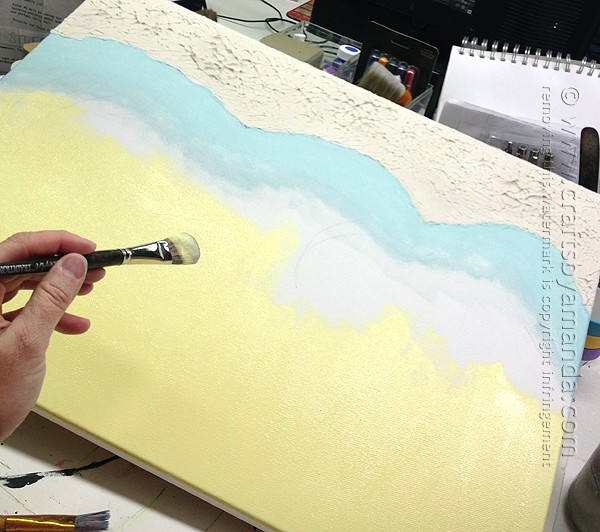
I found it easiest to turn the canvas upside down to paint the blue layer that sits above the sea floor. I used Spa Blue and painted a couple of inches above the sea floor section. Then I used Taffy Cream on the remainder of the background.
I used a dry brush method to blend the two layers together. Simply dip your brush in paint then run the bristles across a rag or paper towel to remove the excess. You want to get a lot of the paint off so that when you touch the canvas with the brush you have to really apply pressure for paint to show up.

I used pencil to draw on the seaweed and painted them with Green Mist. I also mixed a little Green Mist with black and with white for a little shading and highlighting. Next, I used a household sponge to add color to the sea floor. I dipped the sponge into the paint and dabbed off the excess onto a soft cloth. The first color I added was Desert Sand followed by touches of Natural Buff. For the background, I used Natural Buff over the Taffy Cream. To add more highlights, I used Light Buttermilk.
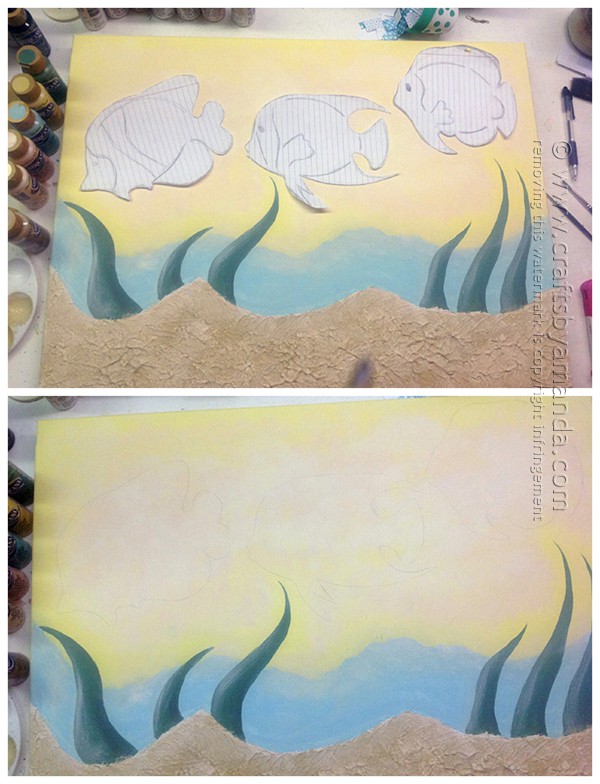
Now you’re going to need the patterns I’ve provided for the fish. I cut them out and traced around them with a pencil, then added in the few details. You could also use transfer paper for this step.
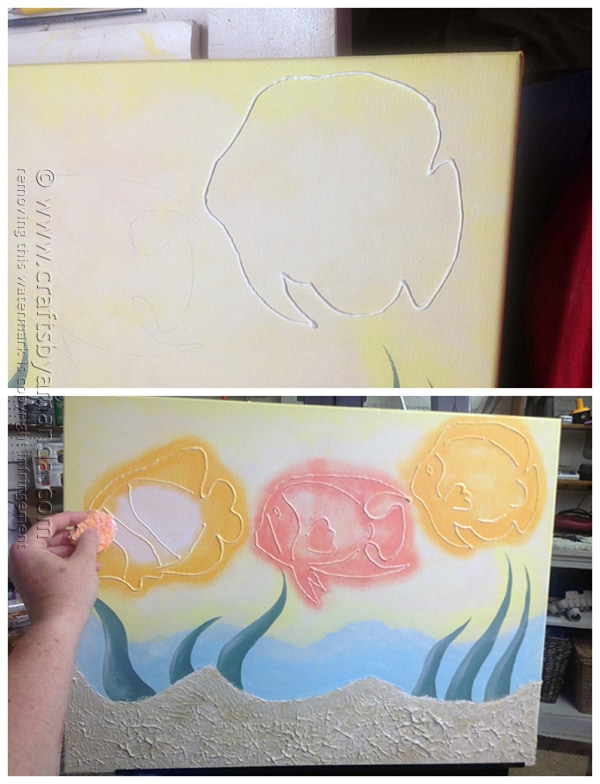
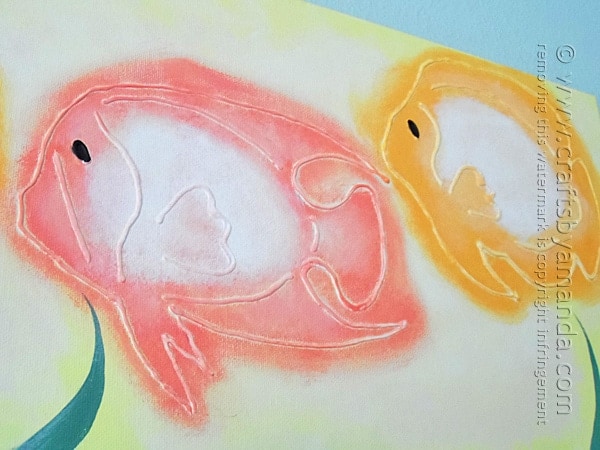
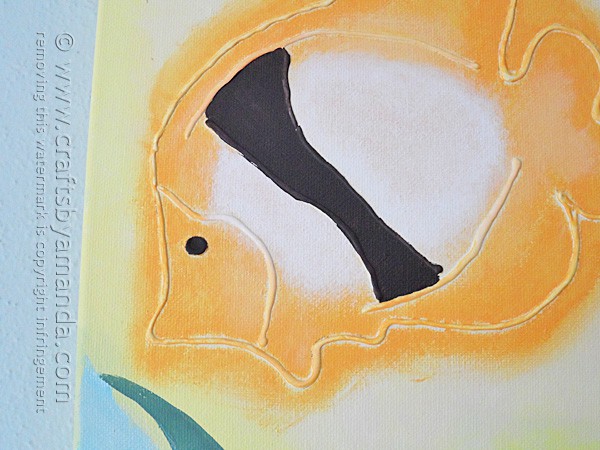
I used the Americana Writer to trace the pencil lines for the fish. This has to dry for a few hours. Once it was dry, I used the sponge to add Coral Blush to the center fish and Orange Twist to the two end fish. Dab all the way around the fish and a bit inside as well. To add the highlights in the center of the fish I used Light Buttermilk. Finally, I used Soft Black to add the eyes and the stripe on the fish on the left. Once everything was dry I gave it two coats of Americana Acrylic Sealer spray in matte finish.
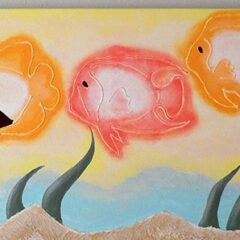
Here are some close ups so you can see the texture a little better.
I hope you enjoyed this project and it sparks a little inspiration for you!
3D Tropical Fish on Canvas
Supplies
Americana Paint:
- Desert Sand
- Natural Buff
- Taffy Cream
- Light Buttermilk
- Green Mist
- Spa Blue
- Coral Blush
- Orange Twist
Other supplies:
- Americana Writer - White
- DecoArt Texture Stucco
- Paintbrush
- Palette knife
- 18 x24 canvas
- Scruffy brush
- Household sponge
- Patterns fish 1 fish 2 fish 3
Instructions
- Use pencil to draw the line for the sea floor onto the canvas. Use a palette knife to add the Texture Stucco to the canvas. Using an old scruffy brush, touch it to the stucco and then lift straight up.
- Use Spa Blue and paint a couple of inches above the sea floor section. Then use Taffy Cream on the remainder of the background.
- Use a dry brush method to blend the two layers together. Simply dip your brush in paint then run the bristles across a rag or paper towel to remove the excess. You want to get a lot of the paint off so that when you touch the canvas with the brush you have to really apply pressure for paint to show up.
- Use pencil to draw on the seaweed and painted them with Green Mist. Mix a little Green Mist with black and with white for a little shading and highlighting. Next, use a household sponge to add color to the sea floor. Dip the sponge into the paint and dabb off the excess onto a soft cloth. The first color I added was Desert Sand followed by touches of Natural Buff. For the background, I used Natural Buff over the Taffy Cream. To add more highlights, I used Light Buttermilk.
- Cut out the fish patterns and trace around them with a pencil, then add in the few details. You could also use transfer paper for this step.
- Use the Americana Writer to trace the pencil lines for the fish. This has to dry for a few hours. Once it is dry, use the sponge to add Coral Blush to the center fish and Orange Twist to the two end fish. Dab all the way around the fish and a bit inside as well. To add the highlights in the center of the fish use Light Buttermilk. Finally, use Soft Black to add the eyes and the stripe on the fish on the left. Once everything is dry give it two coats of Americana Acrylic Sealer spray in matte finish.
- Swirling Twirling Ladybugs - July 21, 2026
- Drip Tie Dye Backpack - July 17, 2026
- Mini Coastal Clay Houses - July 14, 2026


Joy says
I love to use texture when I paint and this is awesome. I, like another commenter, will add sea shells to the sand. I also love the idea of using White American Writer for outlining! Thank you so much for sharing. :)
Amanda Formaro says
Glad you like it Joy and it brought you some inspiration, thanks!
Jodi says
Hey GF!!! Ok this made me cry!!!!! I miss you!!!! I soooo enjoyed our time and glad that you took a piece of my home, home to yours!!!!! Yay!!!!
Yours is so much better than the original. Very well done!!! Come back soon, and se the orange ceiling I added since you and family were with us!
Xoxoxoxoox
Jodi
Amanda Formaro says
I miss you too! I wish I could just fly out there every weekend so we could hang out. We will get together again, and I can’t wait to see the orange ceiling! :)
Freida says
Very good instruction for making fish beach plaque.
Amanda Formaro says
Thank you Freida :)
MYT CR8TiV says
Very cute !! You could take this painting up a notch by framing it into a shadow box frame and create a 3D effect by painting some more seaweed onto a very heavy cardstock and add more stucco sand onto the base of the frame and glue down some seashells and a starfish giving your shadow box frame a aquarium window effect.
Amanda Formaro says
Hi there :) Thanks for your suggestions. This is a painting and it’s too big to really do a shadowbox. If it were 8×10 or even 11×14 a shadowbox might work. But this is a large painting on canvas. :) A shadowbox isn’t really something I wanted, I was inspired by a piece of wall art and that’s what I was striving for.
Cathy Ayers says
May I share with you a pic I did kinda sorta following one of your pics?
Amanda Formaro says
HiCathy. Certainly, feel free to email me :)
Elaine says
Could I really do something like that. I am going to give it a try. I pinned it. Thanks for all the instructions. So pretty, I love it.
Amanda Formaro says
Thanks Elaine, I appreciate that!
Bonnie Banks says
This is beautiful! Saw it on your Facebook page and just had to come check it out! Reminds me of a similar kids craft I did with students MANY years ago. We used colored dry grits to “paint” our sand and fish. After seeing this I realize that kids could also use yarn to outline their fish too! Oh! We used paint brushes to spread our glue and then sprinkled on our grits….Loads of ideas….Would be blessed to see your version :) Thanks for the post and the memories!
Amanda Formaro says
Thanks Bonnie! How nice that it brought back some great memories for you too! :)
Laura / Pet Scribbles says
I love, love, LOVE this painting! Thanks for the helpful step-by-step tutorial. I haven’t used the texture stucco (yet) but am eager to try it since seeing your results!
Amanda Formaro says
Thank you Laura! The stucco is definitely fun, give it a try!
sofia says
how nice! Thanks for sharing such a detailed step by step :-)
sofia
Amanda Formaro says
Thanks Sofia :)