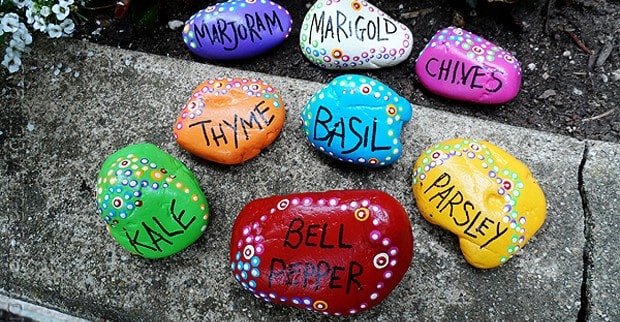
These rock garden markers are easy to make and look so beautiful in the garden! In fact, for me anyway, painting rocks for the garden is very relaxing! Use your rock garden markers to identify herbs, vegetables, and flowers.

Painted Rock Garden Markers
I have made several garden crafts over the years, and I’m especially fond of making garden markers. Several years ago, I made these garden markers from smooth stones for my Chicago Tribune column. I’m really happy with how they came out and love all the different colors, and as you can see further down in the post, they last!
These garden markers would be beautiful inside your DIY wooden planter box!

It’s kind of like planting forever flowers to add a splash of color to an all green herb garden. Learning how to paint rocks is easy, and I’m going to tell you my favorite paint for rocks below.
Related – check out a ton more ideas for painted rocks!

This is a bit picture-heavy as I wanted to show you each marker in its environment… There is a picture-free printable version at the very end of this post.

Just in case you are wondering, I didn’t paint the bottom of the rocks. Two reasons for that: 1) why bother ha ha, and 2) all of DecoArt’s paints are non-toxic, but just to be safe from anything leeching into the soil I didn’t paint them. They won’t be seen anyway.

I can’t wait to see how they do over the winter too.. (see next pic and description).
Painted Rocks vs. the Elements
Many have asked how these survived outside in the rain and snow and ice. This picture shows them after two winters outside. This is without me giving them any additional coats of clear or anything. They have held up beautifully considering. You can see that the purple one has a couple nicks, that’s from falling off the edge and onto my driveway I believe. That’s where I found it anyway! :-/
These garden markers have been outside since the first week of June (2013!) and have been subjected to daily watering and quite a few rainstorms. They still look just as good as they did when I first put them out there.
What you will need to make painted rock garden markers
Find the full printable instructions and materials list at the end of this post.

PAINT – I used Patio Paint for these, which is specifically formulated for outdoor projects as well as Patio Paint clear coat. These are one of the best paints for rocks, especially if they will remain outside.
MARKERS – I wrote the names with DecoArt glass paint markers. You can also use a Sharpie if preferred.
Other Materials Needed
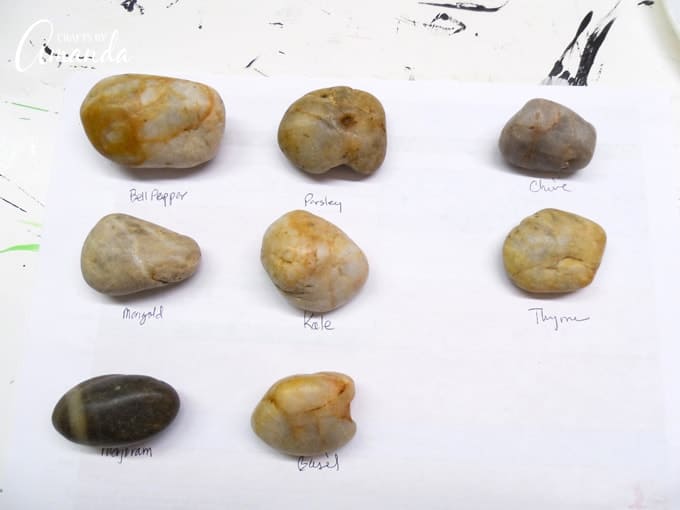
- Smooth rocks – To make these garden markers you will need some smooth stones. You can find them in your yard or garden, or you can buy a bag from the craft store.
- Paintbrushes
- Pencil or toothpick

I know that many people like to leave their markers out so they know where their perennials will come up each spring. As you can see from the update above, they survived great. I would definitely recommend sealing them each year though, for added protection.


How to make painted rock garden markers
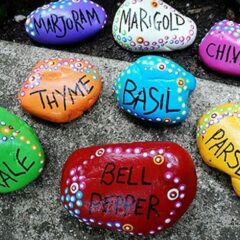
- I used a piece of paper to map out which rocks to use for each plant. Obviously, some plants will require a larger rock because of the number of letters in its name, so it’s a good idea to plan that ahead of time.

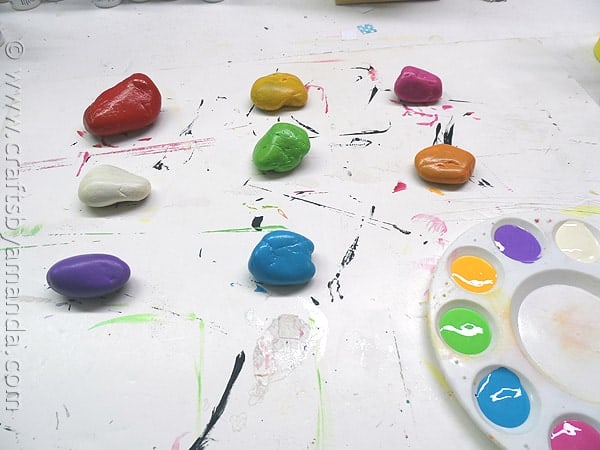
- Paint the top of each one with Patio Paint, let them dry, and paint a second coat. Don’t paint the bottoms as they will be touching the earth. Notice that I placed the painted rocks on the foam board in the same order that I had them on the paper I used to map them out.
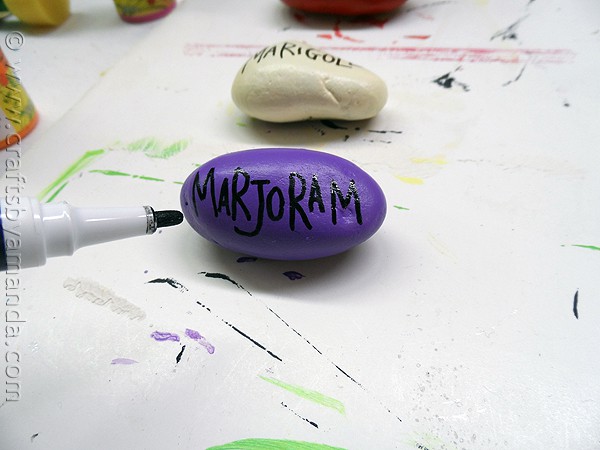
- To write the plant names on the rocks, I used DecoArt glass paint markers because they are my favorite, but you could also use a Sharpie. HOWEVER, if you use a Sharpie, please be sure to allow the Sharpie to dry for a good hour before adding the clear coat over the top. Sharpies are notorious for bleeding.
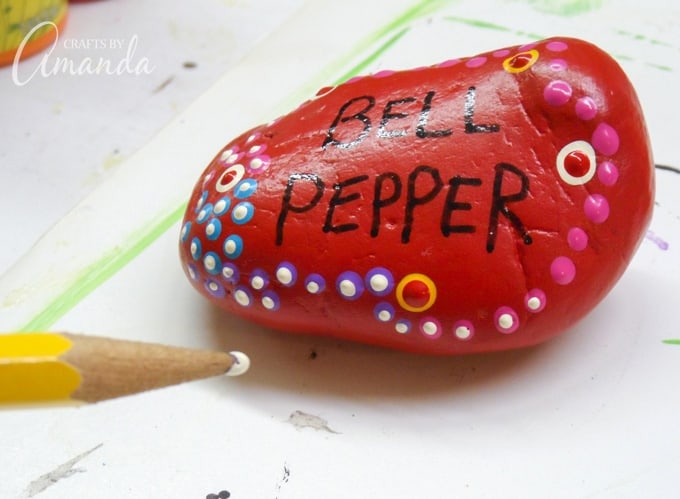
- To decorate, use the handle end of a large craft paintbrush to dot on various spots in different colors. Use a smaller paintbrush handle to add smaller spots.

- Finally, use the tip of a pencil or a toothpick to add tiny white dots to the center of the larger dots. Allow the rocks to dry for 2-3 hours. Apply Patio Paint clear coat and allow them to dry overnight.


More Garden Crafts
- Birdy Flower Markers
- Beaded Garden Sparkler
- Herb Garden Sign
- Recycled Key Plant Markers
- Make a Fairy House
- DIY Garden Stepping Stones
Painted Rock Garden Markers
Supplies
- Smooth rocks
- Patio Paint or outdoor craft paint in various colors
- Black paint marker or Sharpie
- Paintbrushes
- Pencil or toothpick
- Patio Paint clear coat or clear outdoor sealer
Instructions
- Wash the rocks and dry them thoroughly. It may be necessary to let them sit for an hour or so as rocks are porous and can absorb water.
- Which rocks you use with depend on what you have growing in your garden. For example, you will need a longer or larger rock for “marjoram” than you will for “kale” as there are more letters to fit on the rock. You can use a piece of paper to map out what rocks will get what names.
- Paint the rocks in desired colors. For the longest life of your plant markers, it’s important to allow adequate drying time; allow at least 1 hour between coats. Some colors may need more coats than others in order to cover.
- Once your rocks are painted and dry, use a black paint pen or Sharpie marker to write the names of your plants on each rock.
- To decorate, use the handle end of a large craft paintbrush to dot on various spots in different colors. Use a smaller paintbrush handle to add smaller spots.
- Finally, use the tip of a pencil or a toothpick to add tiny white dots to the center of the larger dots. Allow the rocks to dry for 2-3 hours.
- Apply a clear coat and allow them to dry overnight.
This post was originally published on this blog on July 27, 2013.
- Tie Dye Beach Towels - July 24, 2026
- Swirling Twirling Ladybugs - July 21, 2026
- Drip Tie Dye Backpack - July 17, 2026


Carftsareok says
Wow!
This is an amazing idea!
It was fun to do with my sister for my mom. We have a big herb/vegetable garden:
Sweet potato, tomato, spinach, chives, basil, mint, celery, rosemary and thyme.
It turned out well, except that the purple red and green didn’t really show the marker well. I had to strain my eyes to read it as the colour was to dark.
But otherwise, it’s and amazing craft!
Thank you so much!
Maryann Kraushar says
October 22 2020
you have some great ideas. hard to know where to start. I think I will start with the garden rocks. My son in law likes to garden so it will make a unique Christmas gift. Can I use acrylic paint?
Daniel says
Love this idea and made them for Mother’s Day. Came out awesome, right up until I clear coated them and the Sharpie bled! Just like she said it would. So mad at myself for not using a paint marker, but if you try these I strongly recommend against using a sharpie!
Thanks!
Amanda Formaro says
Aww, so sorry that happened! I’m glad you enjoyed the project though.
Debbie says
For outdoor use can you just use a normal outdoor varnish ? We’ve had one failed attempt where the paint has cracked , we think it was the paint we were using not sure .
Amanda Formaro says
I haven’t tried using a regular craft paint with an outdoor varnish. I used the Patio Paint and have had them outside for several years without a problem. I do touch them up every couple of years with the Patio Paint sealer.
Deborah says
I am enjoying myself with this project very much. Thank You for sending it.
Susan Davis says
Great project – when I was teaching some parents got together and we painted some rocks………….can also use
melted crayons too for designs on rocks.
The school where I taught was Painted Rock Elementary School
Amanda Formaro says
Great idea, Susan!
Lorna says
I’ve made some of these adorable rocks and I’d like to post pictures of them on my website. Kind of new to the copyright rules of the internet, so I’m not sure exactly what to do. I will post a link to your website with the photos and give you credit for the idea. Is that the proper way to acknowledge your inspiration? Thanks for your continued creativity and specific directions. I am not artistic and I had no trouble moving from start to finish on these treasures!
Amanda Formaro says
Hi Lorna :) Yes, that’s fine, but please don’t post the actual instructions and my step photos. Just a final photo as well as your own photos. Then a link to the post. Thanks so much!
Kelly B says
Made some! Love ’em! Can’t wait to put ’em in the garden so I remember where the heck I planted my bulbs! Thanks for the info!!
Amanda Formaro says
nice!
Susan says
In the fall just remove the rocks and put them in a shoe box or something like that so they don’t get trashed with the winter weather. Then “replant” in the spring.
Christine says
I loved these painted rocks so much I went out, got the paints, and painted up a whole bunch. Unfortunately, I was not able to get my hands on the Patio Paint clear coat and was directed to buy something that was not appropriate (not exterior and likely not food safe in anyway). Now I am scrambling to find something, anything, so I can finish these rocks up and get them in my garden. Do you have any ideas on what else I can use as a sealant? Michaels in Canada does not stock that clear coat for unknown reasons…
Amanda Formaro says
You could use any clear acrylic sealer. If you can’t find anything at the craft store try the hardware store. Ask for a clear coat for outdoors :)
Karen says
I bought the deco art marker and it says you need to bake after using, is this what you did?
Amanda Formaro says
I did not. But it should also say on there that it will cure on its own after so many days, usually 21.
Brenda says
Such a cute idea, Amanda, and thanks for the detailed instructions much appreciated for old folks like me!
dot says
Hello! This is a wonderful project. I made a number of these markers for an herb garden recently. I do have a question: I noticed you said these fared well over the winter. The rocks I made recently have just been rained on for the first time. I noticed they have developed a cloudy film. I used 2 coats of clear coat just to be safe snd let them dry for several days. I am hoping the cloudy finish disappears after they dry (?). Thanks
Amanda Formaro says
Sorry i didn’t see this right away. I never had that happen with mine. Did the cloudy film go away?
Gale Leach says
Amanda — you sparked some great ideas from my friends when I reposted your picture (it turned up on Facebook). Besides using the Patio Paint, which everyone loved, a friend suggested glow-in-the-dark paint for rocks to be used as markers along driveways, stepping stone decorations, and much more. You’ve been a tremendous inspiration!
Amanda Formaro says
That’s so fun Gale, and it’s totally my goal! So glad to see inspiration flying around :)
Gina G. says
So how did they last the winter?
Amanda Formaro says
Hi Gina! They actually held up great! They were a bit dirty, but all the paint was still in tact. It’s actually been two winters now and they are completely buried in frozen snow right now. So we will see how they faired. I didn’t add another coat of sealer last year, but if they are still in good shape when the snow melts I will.
lilylove says
These are great…just wanted to add I ended up gorilla gluing them to tent stakes, as my little ones kept moving them EVERYWHERE….lol It works great & so far held up. It’s been a nasty winter though, might need to re-glue this spring.
Amanda Formaro says
That’s a brilliant idea!
Jana Carlson says
I want to make these as paperweights for desks. Would you use all the same paints, markers, etc. or a different kind for indoor items?
Amanda Formaro says
Hi Jana! You could still use the Patio Paint, but if they won’t be outside, regular acrylic paints will be fine :)
Donna Charles says
Like your idea and plan on adding it to my hobby list.
Linda says
Thanks for the idea for the markers but I am going to make a memory garden for my love ones that are in heaven with their names on the rocks
Kathy says
This is my first time visiting your page; I am totally in love with your creativity! Thank you for the great idea on the garden stones! I can’t wait to check out your other projects.
Amanda Formaro says
Thanks Kathy, glad you found me! :) I hope you find some fun projects to make!
Heather Hale says
Super Cute!
I’m going to try this!
Thank you!
Amanda Formaro says
Thanks Heather, hope you have fun!
Susan says
Would like to know how the painted garden rocks held up over winter?
They are so fun, I would love to try them.
Thanks
Amanda Formaro says
Actually they did really well! They were outside the entire winter, buried in snow etc. I just wiped the dirt off of them in the spring and they are in my garden now :)
Kelly B says
Hey Amanda!
SOOOO cute! How did they do after Winter #2? I’m totally doing this today to mark where my bulbs will go. Thanks so much for this!
Kelly
Amanda Formaro says
Hi Kelly! They are great, I did add another coat of sealer each spring :)
Jennifer says
I want to do these for a VBS. But I’m wondering about how much time this took. I don’t want it to be a labor intensive project and I want the kids to be able to take it home 2 hours later.
Amanda Formaro says
Hi Jennifer. The main painting aspect doesn’t take that long, but adding the polka dots can be time consuming. I would suggest just skipping the dots if you have time constraints :)
susanne says
sharpie and Elmer’s acrylic paint pens bled once I sprayed them with the clear sealer. Ugh! I tried waiting overnight…didn’t matter…keeps bleeding. will try painting the sealer on.
Amanda Formaro says
:-( Sorry that happened to you Susanne! I’m not a fan of Sharpies and sealer together.
Denise Grant says
Amanda…I just started painting on rocks…read about letting the sharpie art dry completely before sealing to avoid bleeding…but what if we don’t totally paint the rocks with acrylic paints, how do you seal or make the naked rock shines? I did spray clear paint and even like black spray paint and it stays sticky and doesn’t seem to dry….I will also try those paints and markers made for out side….thanks hope to hear from you soon…..
Happy rock painting
Denise
Amanda Formaro says
Hi Denise! You could use an outdoor sealer with a gloss finish. Hope that helps!
cristine reid says
Amanda—can you contact me at [email removed for privacy purposes] regarding permission to use your rock plant labels in our publication? ASAP. Thanks.
Amanda Formaro says
Hi Cristine. I did email you but didn’t hear back so it may have gone to your spam folder. You can contact me at [email protected]
DM says
Nice idea ! I might try it !
Brenda @ a farmgirl's dabbles says
My kids would LOVE to make these, so fun!!
Lana @ Never Enough Thyme says
These are so cute, Amanda! You always have something that makes me want to try crafting again!
Kelly says
Super cute, Amanda! I love the pops of color too!! xo
Amanda Formaro says
Thanks Kelly! I’ll be making more again next year :)
Kristen Duke says
Great idea! I love the colorful dots :)
Amanda Formaro says
Thanks Kristen! One of my favorite parts of the project ;)
Shaina says
I adore this idea. So creative and colorful.
Amanda Formaro says
Thanks Shaina!
PrisCilla says
Just pinned this…..love it!
Amanda Formaro says
Thanks so much PrisCilla!
Connie says
You did it again, Amanda… yet another craft that makes me go “Ew, how cute!” I love your style and creativity, and really enjoy your work!
Amanda Formaro says
Thank you so much Connie, it’s comments like yours that keep me posting! :)
Kandi says
Absolutely LOVED the idea! You are soooo creative Amanda. Thanks so much for sharing all your creative projects. :)
Amanda Formaro says
Thank you very much Kandi! I really appreciate your kind comments :)
Linda Guenther says
I love this idea!! Not only will I make them for herbs…..but a perfect marker for my iris garden. I’m always forgetting which color is where!! This is great! Thank you so much!
Amanda Formaro says
Thanks Linda, so glad you like the idea, hope you enjoy making them :)
Heidi says
I made these this week – LOVE THEM!! Super helpful with the links to the actual product, makes it so much easier – THANKS!!
Amanda Formaro says
Yay, so glad you loved the project Heidi!