
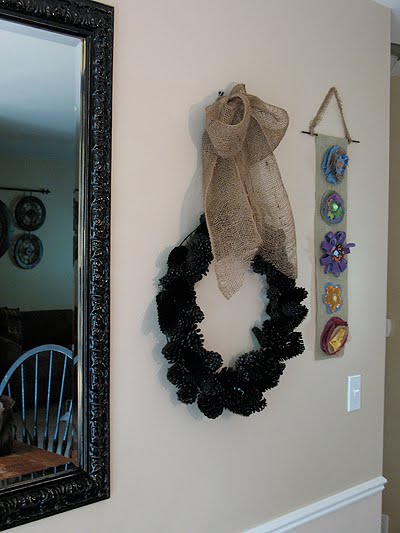
I wasn’t sure if the proper spelling was pine cone or pinecone, so I consulted the dictionary. Pine cone it is. At any rate, I’ve been meaning to make a pine cone wreath for quite a while. In fact I started on it a couple of weeks ago and was finally able to finish it yesterday. This pine cone wreath is actually part of a wall collage I’m doing in my dining room. I have a great big wonderful wall just begging for something to fill it. The wall collage includes my mirror redo and a wall hanging I made from my denim fabric flowers as well. I hope to reveal the whole thing soon, but I have a few more projects to complete first.
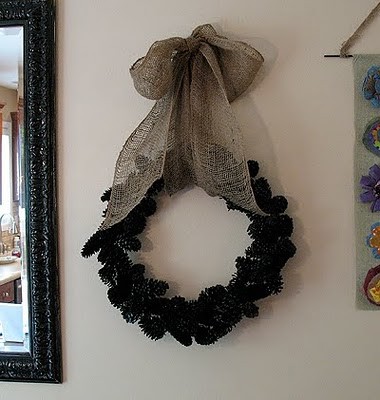
Meanwhile, here’s my black pine cone wreath. I bought this wonderful burlap banner roll a couple of months ago, and I think it worked perfectly with the wreath. It was a great additional to my DIY wall art. Hope you like it!
NOTE: I used several different sized pine cones. I had some that were long and slender, and some that were short and fat. When I didn’t have enough, I went outside and gathered some smaller ones from a pine tree to use as filler. I read that if you soaked the pine cones in water over night they would close up (which is true), so that you could insert them into the frame, eliminating the use of floral wire. While this did work, it was not a solution for filling the entire frame as the fatter pine cones wouldn’t fit into the frame using this method. After the wet pine cones are inserted into the frame, you allow them to dry for several days and they will open back up again, permanently holding them in the wreath frame.
Black Pine Cone Wreath
You will need
wire wreath
pine cones, assorted sizes
floral wire
hot glue gun
black satin spray paint
clear glaze spray
wide burlap
What you do
There are a couple of ways to attach the pine cones to the wreath frame. You can soak them so that they close up, then insert them in the frame, allow them to dry and they will open up again. This is time consuming, it took mine over a week to dry completely and open back up. You can also attach them with floral wire, which takes a lot less time.
The photo below (sorry, from my cell phone) shows the pine cones closed up after a good soaking in a bucket of water. I inserted them, butt end first, into the frame and left them to dry.

Well over a week later, they were finally dry and had opened back up, see picture below.

I cut lengths of floral wire, about 6-8″ long, depending on the size of the pine cone, and inserted the wire into the pine cone’s scales. I then gave the wire a twist or two to hold it in place on the pine cone. Then simply start adding pine cones to the frame, twisting the floral wire at the back of the frame to hold the pine cones in place.

I still had quite a few gaps by the time I ran out of pine cones, so I went outside and gathered some small ones to use as filler. You just keep adding pine cones until you are happy with the look.
use your hot glue gun to secure the pine cones to each other. Once it feels sturdy, take it outside and lay it on some newspaper, then spray paint it. I gave it about 2-3 coats of black and 2 coats of clear glaze.

To add the burlap hanger, lay the wreath on the ground and run the burlap banner through the opening in the wreath. You will need a considerable length in order to tie the large bow. I didn’t measure, but I would guess that length was a good 4-5 feet. Then just tie a large bow and trim the hanging ends as desired. Hang on the wall!


Black Pine Cone Wreath
Supplies
- wire wreath
- pine cones assorted sizes
- floral wire
- hot glue gun
- black satin spray paint
- clear glaze spray
- wide burlap
Instructions
- There are a couple of ways to attach the pine cones to the wreath frame. You can soak them so that they close up, then insert them in the frame, allow them to dry and they will open up again. This is time consuming, it took mine over a week to dry completely and open back up. You can also attach them with floral wire, which takes a lot less time.
- The photo below (sorry, from my cell phone) shows the pine cones closed up after a good soaking in a bucket of water. I inserted them, butt end first, into the frame and left them to dry.
- Well over a week later, they were finally dry and had opened back up, see picture below.
- I cut lengths of floral wire, about 6-8" long, depending on the size of the pine cone, and inserted the wire into the pine cone's scales. I then gave the wire a twist or two to hold it in place on the pine cone. Then simply start adding pine cones to the frame, twisting the floral wire at the back of the frame to hold the pine cones in place.
- I still had quite a few gaps by the time I ran out of pine cones, so I went outside and gathered some small ones to use as filler. You just keep adding pine cones until you are happy with the look.
- Use your hot glue gun to secure the pine cones to each other. Once it feels sturdy, take it outside and lay it on some newspaper, then spray paint it. I gave it about 2-3 coats of black and 2 coats of clear glaze.
- To add the burlap hanger, lay the wreath on the ground and run the burlap banner through the opening in the wreath. You will need a considerable length in order to tie the large bow. I didn't measure, but I would guess that length was a good 4-5 feet. Then just tie a large bow and trim the hanging ends as desired. Hang on the wall!
I’m participating in the following craft carnivals. To see some other awesome projects, be sure to visit them!
- Swirling Twirling Ladybugs - July 21, 2026
- Drip Tie Dye Backpack - July 17, 2026
- Mini Coastal Clay Houses - July 14, 2026


JILL S. says
This is so pretty! I love wreaths of all kinds and the burlap bow…a stroke of genius! You have wonderful ideas!
Erin The Apartment Homesteader says
Very nice! I'm following you now!
Kristi Flanagan says
Super cute! Thanks for planting your creative seeds at Plant a Punkin Seed Party!
Kristi
Punkin Seed Productions
Room to Inspire says
What a great wreath! I really love the color and the combo of the pine cones and the burlap. Thanks for linking up to Be Inspired last week.
Chelsea
Summer says
Thanks for linking up! I featured your idea! Come grab a featured button!
http://sumossweetstuff.blogspot.com/2010/05/showcase-saturday_22.html
Sumo
Lori says
Go job on your wreath..
Thanks for joining Get Your Craft on Thursday at Life As Lori. Please join me next week for another great party.
Lanie Ree says
Um, this is awesome. Thank you for linking this up to the Creative Therapy session, as well!
Fawnda says
That turned out so COOL! I love it! :)
creativejewishmom.com says
Thanks amanda, great step by step photos! I just love that bow!Can't wait to see what else you've been up to!
Katie says
Very clever!!
Judy says
I love it! My son has been collecting pine cones and I've been trying to figure out a fun way to use them.
Stopping in from Fireflies and Jelly Beans.
Cassie says
Love this painted black!!!!
Great project!!!
=)
Rory from Tools Are For Women Too! says
Doesn't Mother Nature supply us with the best craft supplies! Thanks for sharing and see you next week! Rory
Sandy@Life Began In A Garden says
I like it!The black looks so good with the burlap. And that was an interesting tidbit of information about soaking pine cones to close them, who knew?!
Amy @ Positively Splendid says
Gorgeous! I have one of those wreaths and tons of pinecones just outside my door. I see one of these in my future. :)
Amy says
I've been collecting pine cones and it looks like now I found a perfect project ! Thanks for sharing!
I gave you a blog award on my blog – stop by and pick it up! http://thingamajigetc.blogspot.com/
Have a great week!
Kathy says
I learned a lot. I definitely like the results! Stunning,
Kathy
Angie @ The Country Chic Cottage says
That turned out awesome!!
Shelia says
That's a lovely pine cone wreath. Thanks for sharing!
Be a sweetie,
Shelia ;)
Stephanie Lynn says
Love the black and the burlap. Very cute! Thanks so much for joining The Sunday Showcase Party. I greatly appreciate it! ~ Stephanie Lynn
michelle@somedaycrafts says
Love the spray paint on the pinecones! Very pretty!
[email protected] says
This is a really cute idea! The burlap goes great with the black pine cones. Stopping by from Sunday Showcase.
~Ela
http://www.lifeinmypjs.com
Melony Bradley says
Neat project. I am really looking forward to seeing the collage wall. The denim flower hanging looke very intriguing
Ann @ makethebestofthings says
This is cool! I wonder how it would look painted white for the holidays? Love the tip about soaking the cones, that is clever. So what else are you putting on your wall, you smart woman?
Heather says
Ive seen very similar project done in white and silver and it was absolutely beautiful!! Cut floral wire and add cones then fill in gaps with colored ball ornaments, light shimmery blue went perfectly with white and silver or pick just one. after content with wreath secure with hot glue gun then let dry and start spray painting then let dry and add ribbons and hang.
Amanda Formaro says
Sounds gorgeous!
Laura Ingalls Gunn says
Such a clever and creative girl. My heart is going pitty pat.
Melissa says
That turned out really cool – and I find the little tidbit about soaking them in water that you shared absolutely fascinating. I had no idea!!
Linda@Coastal Charm says
Coming by from SNS…luv your wreath…looks great!
Blessings,
Linda
Kim says
I'm stopping by from SNS. This is really cool. I like the black and the ribbon really "makes" it.
anne maskell says
love it! You have such great ideas!