• Home
  • About
    • About Crafts by Amanda
    • Visit Our Recipe Site
  • Work With Us
  • Join
    • Free Newsletters
    • Join our Facebook craft group
↑
  • Tutorials
    • Tutorial Index
    • Adult Crafts
    • Crafts for Kids
    • Crafts for Seniors
    • Recycled Crafts
    • Seasonal Crafts
    • Holiday Crafts
    • Free Printables
    • Craft Collections
  • Adult Crafts
    • Bath & Body
    • Beach Crafts
    • Clay Pot Crafts
    • Crafts for Seniors
    • Decoupage Crafts for Adults
    • DIY Gift ideas
    • Garden Crafts
    • Home Decor Projects
    • Kitchen Crafts
    • Light Bulb Crafts
    • Luminary Crafts
    • Mason Jar Crafts
    • Needlework
    • Photo Display Ideas
    • Recycled Crafts for Adults
    • Wearable Crafts for Adults
  • Crafts for Kids
    • Animal Crafts for Kids
    • Back to School Crafts
    • Beach Crafts for Kids
    • Camp Crafts
    • Cardboard Tube Crafts for Kids
    • Decoupage Crafts for Kids
    • Easy Crafts for Kids
    • Nature Crafts for Kids
    • Other Kid’s Crafts
    • Paper Plate Crafts for Kids
    • Recycled Crafts for Kids
    • Slimes, Doughs, & Clay
    • Wearable Crafts for Kids
  • Holiday Crafts
    • 4th of July Crafts
    • Christmas Crafts
    • DIY Gift ideas
    • Earth Day Crafts
    • Easter Crafts
    • Father’s Day Crafts
    • Halloween Crafts
    • Memorial Day Crafts
    • Mother’s Day Crafts
    • New Year’s
    • Other Holidays
    • Patriot Day Crafts
    • St. Patrick’s Day Crafts
    • Thanksgiving Crafts
    • Valentine’s Day Crafts
  • Seasonal Crafts
    • Winter Crafts
    • Spring Crafts
    • Summer Crafts
    • Fall Crafts
  • Skip to primary navigation
  • Skip to main content
  • Skip to primary sidebar
  • Skip to footer

Crafts by Amanda

crafts for adults and kid's crafts

  • Tutorials
    • Tutorial Index
    • Adult Crafts
    • Crafts for Kids
    • Crafts for Seniors
    • Recycled Crafts
    • Seasonal Crafts
    • Holiday Crafts
    • Free Printables
    • Craft Collections
  • Adult Crafts
    • Bath & Body
    • Beach Crafts
    • Clay Pot Crafts
    • Crafts for Seniors
    • Decoupage Crafts for Adults
    • DIY Gift ideas
    • Garden Crafts
    • Home Decor Projects
    • Kitchen Crafts
    • Light Bulb Crafts
    • Luminary Crafts
    • Mason Jar Crafts
    • Needlework
    • Photo Display Ideas
    • Recycled Crafts for Adults
    • Wearable Crafts for Adults
  • Crafts for Kids
    • Animal Crafts for Kids
    • Back to School Crafts
    • Beach Crafts for Kids
    • Camp Crafts
    • Cardboard Tube Crafts for Kids
    • Decoupage Crafts for Kids
    • Easy Crafts for Kids
    • Nature Crafts for Kids
    • Other Kid’s Crafts
    • Paper Plate Crafts for Kids
    • Recycled Crafts for Kids
    • Slimes, Doughs, & Clay
    • Wearable Crafts for Kids
  • Holiday Crafts
    • 4th of July Crafts
    • Christmas Crafts
    • DIY Gift ideas
    • Earth Day Crafts
    • Easter Crafts
    • Father’s Day Crafts
    • Halloween Crafts
    • Memorial Day Crafts
    • Mother’s Day Crafts
    • New Year’s
    • Other Holidays
    • Patriot Day Crafts
    • St. Patrick’s Day Crafts
    • Thanksgiving Crafts
    • Valentine’s Day Crafts
  • Seasonal Crafts
    • Winter Crafts
    • Spring Crafts
    • Summer Crafts
    • Fall Crafts
Craft Tutorials | Holiday Crafts | Halloween Crafts | Bleeding Place Cards for your Halloween Party

Bleeding Place Cards for your Halloween Party

Author by Amanda Davis on October 28, 2009 Updated on July 17, 2019

No ratings yet
Jump to Project
41 shares
  • Share
  • Tweet
  • Flipboard
  • Email


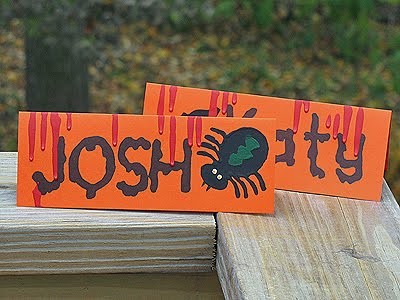
If you are hosting a Halloween party for kids, especially kids 5th grade and up, they are really going to love these place cards. They are quite simple, kids will just need a little patience to allow the paint to dry, so be sure to start very early in the day or even a day ahead. I’ve even included a couple of fun Halloween type fonts that you can choose from. If you have one on your own computer, by all means use that. :)

Bleeding Place Cards

you will need

foam stamps (spider, bat, etc)
5″x7″ card stock, one for each place card
acrylic craft paint: black, white, yellow, red
pencil or pen
2 black Sharpies, one fine and one medium point
Halloween letters

What you do

Fold the card stock in half lengthwise, crease neatly. Choose a foam stamp for your place card.

Coat it generously with black paint.

Press it, paint side down, onto one of the upper corners of your place card. To remove, lift straight up so that you don’t smear any paint. You will need to let this dry before moving on to the next step.

Print out these fonts, enlarge them on your printer if needed. You can either cut out the letters that you need, or just move the paper around as needed. I recommend cutting them out. Place the lettered paper over your place card and position them where you want them to appear on the card. Use a pen or pencil to trace around the letters.

This will create an indent in the card underneath. Now use your fine tip Sharpie to trace the indented lines. Use the medium point Sharpie to fill in the letters.

Now you will need to check the consistency of your paint. In my experience, most acrylic paints are at good consistency when new but will begin to thicken as they get older. To test your paint, put some in a paint palette and dip your paintbrush in. Pull the brush out and hold it up. Most paints will be thick enough that it will not drip off the brush. You want it a little thinner, as you do want it to drip, but not quickly. Thin the paint with a little water and keep testing until the paint slowly drips off the brush.

Stand the place card up on its ends and place a heavy drop of red paint at the crease, leaning toward the front of the card. If it doesn’t drip, just add a little bit more onto the first drop until it begins to drip down the front of the card. Repeat until you have the affect that you want.

When the drips are all dry, this will take several hours, you can use a toothpick to add eyes to you card’s creatures.

See? Easy peasy!

If you need a party idea, try my Pumpkin Painting Party!

Print Project
No ratings yet

Bleeding Place Cards for your Halloween Party

Author: Amanda Formaro

Supplies

  • foam stamps spider, bat, etc
  • 5 ″x7″ card stock one for each place card
  • acrylic craft paint: black white, yellow, red
  • pencil or pen
  • 2 black Sharpies one fine and one medium point
  • Halloween letters

Instructions

  • Fold the card stock in half lengthwise, crease neatly. Choose a foam stamp for your place card.
  • Coat it generously with black paint.
  • Press it, paint side down, onto one of the upper corners of your place card. To remove, lift straight up so that you don't smear any paint. You will need to let this dry before moving on to the next step.
  • Print out these fonts, enlarge them on your printer if needed. You can either cut out the letters that you need, or just move the paper around as needed. I recommend cutting them out. Place the lettered paper over your place card and position them where you want them to appear on the card. Use a pen or pencil to trace around the letters.
  • This will create an indent in the card underneath. Now use your fine tip Sharpie to trace the indented lines. Use the medium point Sharpie to fill in the letters.
  • Now you will need to check the consistency of your paint. In my experience, most acrylic paints are at good consistency when new but will begin to thicken as it gets older. To test your paint, put some in a paint palette and dip your paintbrush in. Pull the brush out and hold it up. most paints will be thick enough that it will not drip off the brush. You want it a little thinner, as you do want it to drip, but not quickly. Thin the paint with a little water and keep testing until the paint slowly drips off the brush.
  • Stand the place card up on its ends and place a heavy drop of red paint at the crease, leaning toward the front of the card. If it doesn't drip, just add a little bit more onto the first drop until it begins to drip down the front of the card. Repeat until you have the affect that you want.
  • When the drips are all dry, this will take several hours, you can use a toothpick to add eyes to you card's creatures.


  • Author
  • Recent Posts
Amanda Davis
Amanda Davis is the crafty, entrepreneurial mother of four children. She loves to bake, cook, make kid's crafts and create decorative items for her home. She is a crafting expert and guru in the kitchen and has appeared online and in print publications many times over the years.
Latest posts by Amanda Davis (see all)
  • Patriotic Pinwheels - June 20, 2025
  • Paper Plate Aquarium Craft - June 17, 2025
  • Patriotic Bandana Wreath - June 13, 2025
41 shares
  • Share
  • Tweet
  • Flipboard
  • Email

Filed Under: Halloween Crafts Tagged With: holidays, kid's crafts, party ideas

Reader Interactions

Free CraftsBy email every week

Latest crafts straight to your inbox!

Comments

  1. jessica brown says

    October 21, 2012 at 7:58 pm

    love your site!

    Reply
    • Amanda says

      October 24, 2012 at 11:39 am

      Thank you Jessica!

      Reply
  2. Craft Passion says

    October 30, 2009 at 2:19 am

    Oh, this is creepy!!!! I love it!!! just became one of your fans in FB :)

    Reply

Leave a Reply Cancel reply

Your email address will not be published. Required fields are marked *

Rate This Project


The maximum upload file size: 640 MB. You can upload: image, video. Links to YouTube, Facebook, Twitter and other services inserted in the comment text will be automatically embedded. Drop files here

Primary Sidebar

Hi! I’m Amanda and I’m the founder and head designer of Crafts by Amanda. I have spent over 25 years creating projects to share, but it’s not just me anymore! It’s turned into a complete family affair. Come and meet the Creative Team!

Free CraftsBy email every week

Latest crafts straight to your inbox!

All Time Favorites

Learn to make these adorable ladybug painted rocks. use special outdoor paint for this adorable garden craft so you can keep garden ladybugs all summer!

Ladybug Painted Rocks…

These colorful little ladybug painted rocks are the ... Go To project

snowy pinecone candle jar luminaries

Winter Luminaries: Snowy Pinecone…

Make pretty winter luminaries that appear to be covered ... Go To project

Make this wonderful deco mesh pumpkin wreath to hang on your door this fall!

Deco Mesh Pumpkin Wreath…

Adorn your door this fall with a pretty deco mesh ... Go To project

Reuse those empty prescription pill bottles in all sorts of ways. From organizing to making cookies. Yes, cookies! See how to use your empty pill bottles!

20 Uses for Prescription Pill…

You've been collecting prescription pill bottles for ... Go To project

Meet the Family

Amanda

Founder and Designer

Kristen

Editorial Manager

Lindsay

Social Media Manager

As seen on:

Footer

Favorites

  • Jar Photo Frames
  • No-Sew Roman Shade
  • Paper Flowers
  • How to Make a Scrunchie
  • Mermaid Slime

About

  • Home
  • Meet the Creative Team
  • Work with Us
  • Privacy Policy
  • Accessibility
  • Contact Us

Images/text copyright Amanda Formaro 2020. To feature a post from Crafts by Amanda, you may use one photo credited and linked back directly to the project post.

Free CraftsBy email every week

Latest crafts straight to your inbox!

Copyright ©2025, Crafts by Amanda. All Rights Reserved.
Design by Pixel Me Designs

Rate This Tutorial

Your vote:


To share a photo with your comment click here!

A rating is required
A name is required
An email is required