
I’ve seen some pretty cool looking frames around the blog world lately. Taking an old frame and turning it into something new is something I love to do, creating fun wall art. I have noticed that a lot of crafters are using vinyl lettering to dress up their projects. Those vinyl letters are truly awesome, but I didn’t have any… so I improvised. I used several items from around the house in order to make my own letters. Here’s how to make your own.
Be sure to check out all of my home decor projects.

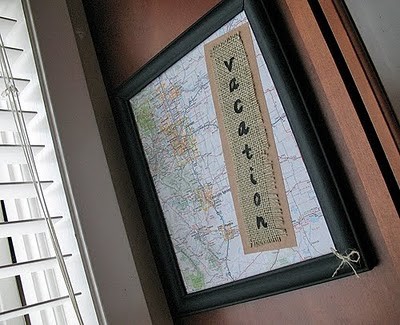
Decorative Framed Map
an old cheap 8×10 frame, missing the glass
page out of a road atlas
a strip of burlap
a brown paper grocery bag
thick piece of cardboard
scissors
craft knife
black paint

Measure the inside of the frame, then cut your cardboard just slightly smaller than that (by about a centimeter). Decide where you want your map positioned, then use a glue stick to attach the cardboard to the back of it.

Turn it over and smooth out any wrinkles or bubbles, making sure your map surface is nice and flat. Turn it back over and glue the excess map to the back of the cardboard.


When dry, spray it with an acrylic sealer, gloss or matte, whatever you prefer. You can even use a little bit of white glue mixed with water to add a coat of sealant.


Next, position it over the top of the black section of the bag and trace around the letters using a pen.

The indentations will carry through to the bag. Carefully cut the letters out, use a craft knife to get the center of the letters “a” and “o”.

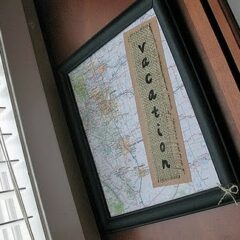
Decorative Framed Map
Supplies
- an old cheap 8x10 frame missing the glass
- page out of a road atlas
- a strip of burlap
- a brown paper grocery bag
- thick piece of cardboard
- scissors
- craft knife
- black paint
- ruler
- pen
- glue stick
- white craft glue
- font file or type your own letters in Word, I used the "Angelina" font
Instructions
- Measure the inside of the frame, then cut your cardboard just slightly smaller than that (by about a centimeter). Decide where you want your map positioned, then use a glue stick to attach the cardboard to the back of it. Turn it over and smooth out any wrinkles or bubbles, making sure your map surface is nice and flat. Turn it back over and glue the excess map to the back of the cardboard.
- Paint the frame with a coat or two of black acrylic craft paint and let it dry. When dry, spray it with an acrylic sealer, gloss or matte, whatever you prefer. You can even use a little bit of white glue mixed with water to add a coat of sealant.
- In order to make the letters, paint a section of the brown grocery bag with black paint. Print out the font file and use a black sharpie marker to trace around the letters, making them bigger. Next, position it over the top of the black section of the bag and trace around the letters using a pen. The indentations will carry through to the bag. Carefully cut the letters out, use a craft knife to get the center of the letters "a" and "o".
- Cut a 7"x2" strip of brown paper bag and a 6" x 2" strip of burlap. Trim the burlap to fit onto the bag strip, pull a bit of the threads out to tatter it a bit. Set at least one long burlap thread aside. Line the bag strip with white craft glue and smooth it with your finger. Attach the burlap to the bag strip. Spread white craft glue onto the back of the letter "v" and press onto the burlap. Repeat for all the letters. Attach the completed strip to the map with white craft glue.
- Insert the completed map into the frame. Tie one of the spare burlap threads into a small bow. Trim the ends and glue to the bottom right corner of the frame.
To see other great craft projects from this week, visit the following Craft Carnivals that I am participating in (see the McLinky below)!
- Tie Dye Beach Towels - July 24, 2026
- Swirling Twirling Ladybugs - July 21, 2026
- Drip Tie Dye Backpack - July 17, 2026


Anu@My Dream Canvas says
Lovely blog, hope to see you at My Dream Canvas!
Jessica Hills says
This gives me so many ideas! I love doing things with maps! Thanks so much for linking to Favorite Things Friday!
Laura says
This looks so great. I'd love to try it!
I'm featuring a necklace tutorial and giveaway. I'd love it if you stopped by my blog!
Anne says
That looks great! I love the idea of using maps to decorate.
Jenn Miyamoto says
Wow! What a great way to dress up that frame! I love the whole map idea!
Jenn
Amanda says
Thanks everyone!
Heather says
Very cute and creative, I love it! Thanks for sharing.
Andy Porter says
That's cute! I like the idea of having maps for decoration. I like the vacation embellishment!
Thanks for linking to CC!
Lori says
This turned out great!
Thanks for joining Get Your Craft on Thursday. Please join me next week for another great party. Don’t forget to stop by and enter my giveaway. I’ll announce the winner at next weeks party!
Carolyn @ My Backyard Eden says
You're so creative. I love the idea of preserving a vacation memory this way!
Thanks for linking up to Make it Yours day at My Backyard Eden!
Amanda says
Thank you CC! You are so sweet to say all of that ;) My friend adored those ornaments, and I loved making them!
Thanks to everyone for your wonderful comments! :)
fawnda says
I love this! We are thinking of doing a travel themed room… I will have to keep this in mind! :)
Lanie Ree says
This is so cute! My husband is a little bit obsessed with maps. I see this in our future…
Thank you for linking this to A Little Craft Therapy with Life in the Pitts.
FrouFrouBritches says
What a great idea! That is really cute! I don't have cricut so I don't have vinyl letters either. Great way to use what ya got!
Melissa says
The burlap label makes it!! Very cute…
Sherry says
What a neat idea! Love it.
Win Rachael Ray bake ware at my blog.
Thanks!
Creative Decor by Brooke says
I love how simple that is. You could do one for every vacation you go on and hang them in and office or somewhere. Love it!
Brooke
Stephanie Lynn says
What a fabulous idea! Love it!
Whimsical Creations says
What a cute idea!
Bonnie @ House of Grace says
Hi, following you from Frugal Family. Thanks for sharing. I am your newest follower. I can't wait to see what else you do.
Bonnie
http://creatingahouseofgrace.blogspot.com/
Alison says
What a great idea!!
Kim says
This is so cute – I love maps!
creative gal says
I love it!!
Deeba PAB says
Love it! Really do and as you say, yes indeed, the possibilities are immense!
Megan says
Very cool! I can imagine the possibility's
CC says
It's beautiful Amanda. I love it and I've been looking at some of your other craft ideas and older posts..great goodness!!! You are so talented. Everything you create is just as sweet and pretty as can be. In one of your older posts,I was looking at the North Woods Christmas ornaments you made for your friend. This is my dil's favorite look. She would love,love,love these. I thought of her when I saw them.
I didn't mean to write a novel to you..I just wanted you to know how much I'm liking your crafts and your pretty blog. Thanks for sharing with all of us.