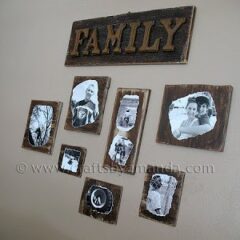
I’ve mentioned before that we moved back into this house in November. I’ve also mentioned my empty walls and how much it drives my husband batty. He keeps hounding me to hang some pictures, but I refuse to hang those cheap frames with cheesy school pictures that my kids hate anyway. I’ve had this idea for Mod Podge, photos and some rustic wood for quite some time. I finally spent the time to put this all together yesterday and have to say, I love the results!

First off I have to give two big shout outs. One to Kristen of Kristen Duke Photography. She was kind enough to take these photographs in their original color form and change them to black and white for me. I was able to do it myself in Photoshop, but I just wasn’t achieving the contrast that I wanted. So a big thank you to Kristen! The other goes to the fabulous Amy of Mod Podge Rocks. She answered several questions from me regarding Mod Podge and photos and provided some valuable Mod Podge tips as well. So thank you Amy, love ya!
Before I get to the tutorial, I do take custom orders. Pricing and samples of custom orders are available in my portfolio here.

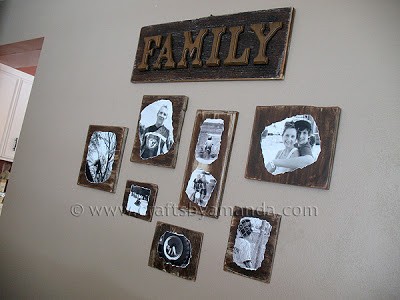
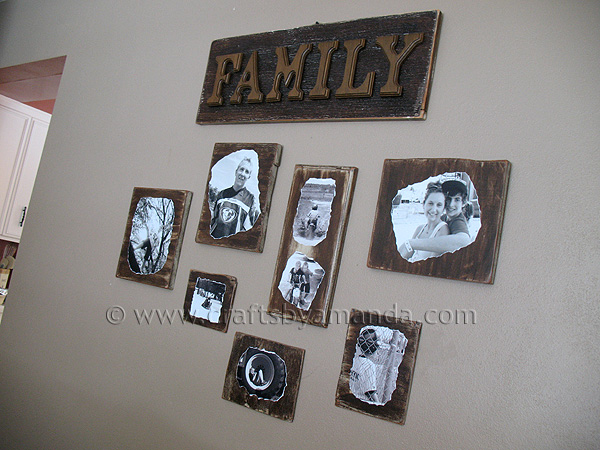
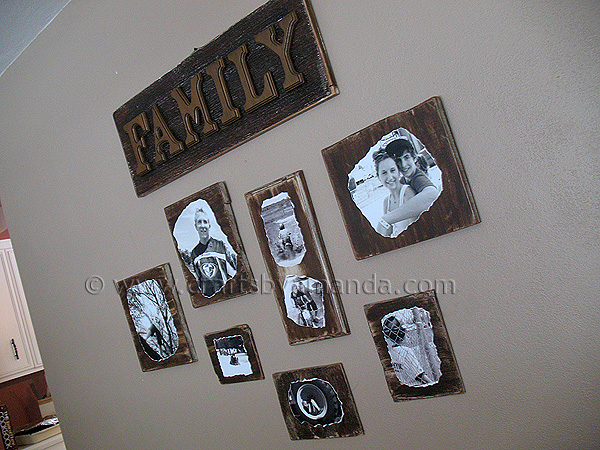
NOTE: See that “family sign” above the photos? You can find the tutorial for the Wooden Letter Family Sign here.
The first thing I did was figure out which photos I wanted to use and what sizes I wanted them to be. Some are 5×7 and some are 8×10, but 4×6 would be great as well. I did turn mine to black and white, but you could do sepia tones, keep them color, or even add fun effects in Photoshop if you are comfortable with that. I also used real photographs, not print outs from my printer. I went onto the Walgreens website and ordered the prints and picked them up an hour later.
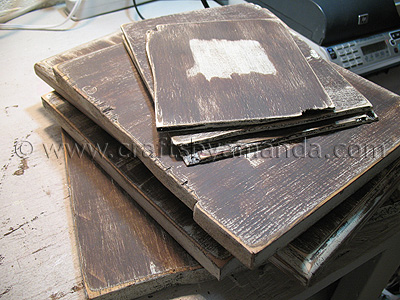
The wood that I used was just salvaged bits I’ve had saved. Some were shelves, some just wood scraps, and the really thin pieces were just from a scrap piece of plywood I saved. I cut them to the sized I wanted. I love that they aren’t evenly square or straight, you should have seen me fumbling with that saw! Ha! I sanded each piece, front, sides and corners.
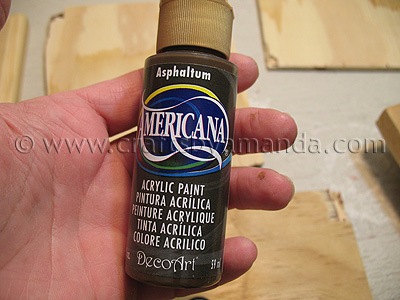
I started out by painting a nice dark brown, I used Asphaltum![]() from the Americana line.
from the Americana line.

After the brown coat dried, I added a coat of antique white![]() .
.
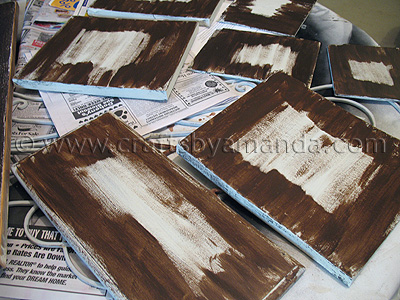
After the white dried, I painted Asphaltum brown over the top again, but didn’t use a whole lot of precision. In fact, I left the middles alone knowing the pictures would cover them up anyway.
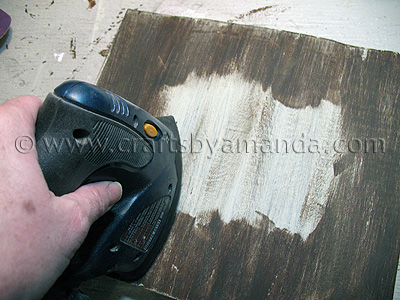
When the paint was dry, I used my sander![]() to distress the brown layer, showing some of the antique white beneath it.
to distress the brown layer, showing some of the antique white beneath it.
As you can see I sanded all the edges as well, being sure to remove the paint in the corners. Don’t forget the sides too! Make sure you dust off the boards well after sanding.
Now is a good time to add picture hangers![]() to the back of the wood plaques.
to the back of the wood plaques.
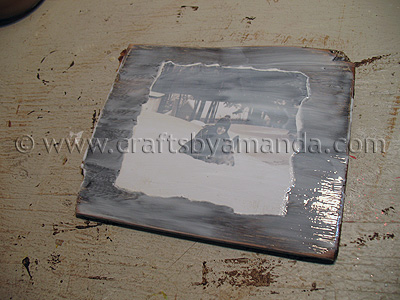
I wanted to keep the rustic feel, so I tore the edges all the way around the photographs. Now you paint on an even layer of Mod Podge![]() onto the back of the photo. Place the photo on to the plaque. While holding the photo in place with one hand, firmly but gently rub your other hand across the photo to be sure there are no air bubbles. Let this dry for about 20 minutes first – THEN add a coat of Mod Podge over the top of the entire surface. Use even strokes and it’s best to paint with the wood grain.
onto the back of the photo. Place the photo on to the plaque. While holding the photo in place with one hand, firmly but gently rub your other hand across the photo to be sure there are no air bubbles. Let this dry for about 20 minutes first – THEN add a coat of Mod Podge over the top of the entire surface. Use even strokes and it’s best to paint with the wood grain.
Let it dry completely before hanging!
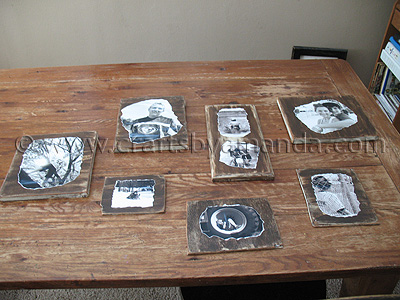
When I was ready to put my photo wall together, I laid everything out on the dining room table in the same fashion that I did when I made my plate wall. I was sure to take a picture so that I could refer back to the photo for placement on the wall.
Here are some close ups off all the plaques :) You’ll notice there are more pictures of my youngest son, Dominic, than anyone else. He’s the ham of the family and loves having his picture taken :)
 |
| My son Dominic standing on a huge limb in the tree of our old house. |
 |
| Dominic at one of his baseball games last year, next up to bat. |
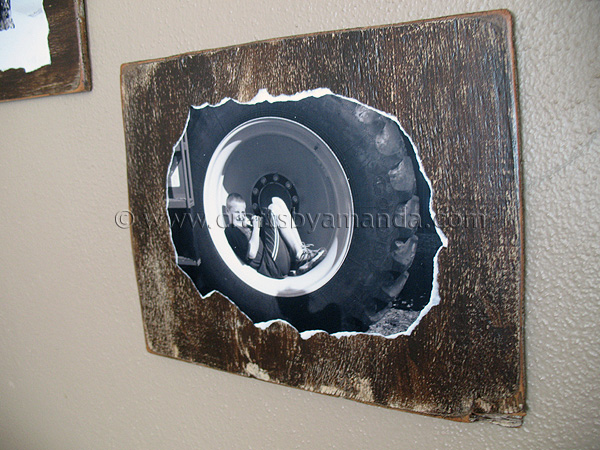 |
| Dominic sitting inside of the wheel well of a huge International Harvester at the Iowa State Fair. |
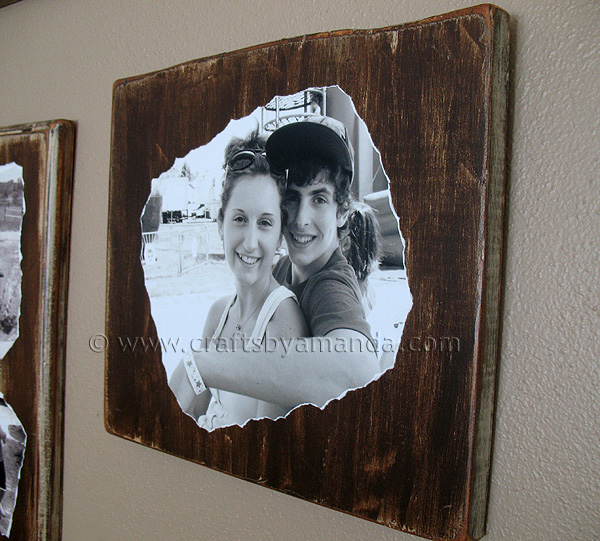 |
| My daughter Kristen and her boyfriend Nick |
 |
| Kristen with our German Shepherd, Angel, out in a 6 foot snow drift in the back yard. |
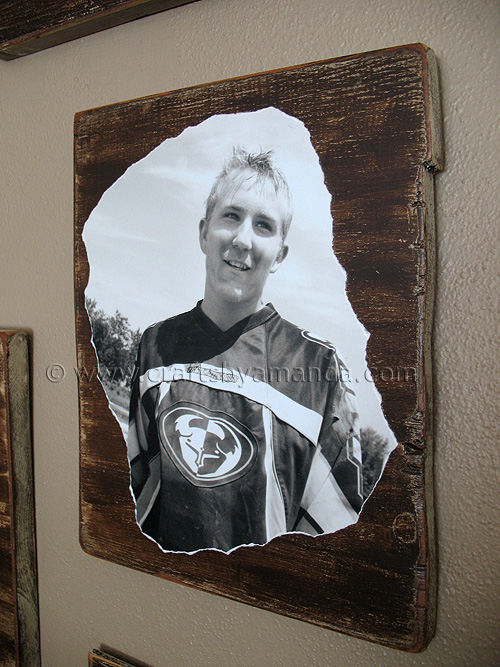 |
| My oldest son Tony after returning from a muddy ride on his dirt bike. |
 |
| Dirt bikes – Dominic at top, Dominic and my second oldest son, TJ, at bottom |
Decoupage Family Photo Plaques
Supplies
- photos
- salvaged woods
- saw
- sander
- picture hangers
- Mod Podge
Paint
- Americana’s Asphaltum
- Antique White
Instructions
- The first thing I did was figure out which photos I wanted to use and what sizes I wanted them to be.
- The wood that I used was just salvaged bits I’ve had saved. I cut them to the sized I wanted.
- I started out by painting a nice dark brown, I used Asphaltum from the Americana line.
- After the brown coat dried, I added a coat of antique white.
- After the white dried, I painted Asphaltum brown over the top again, but didn’t use a whole lot of precision. In fact, I left the middles alone knowing the pictures would cover them up anyway.
- When the paint was dry, I used my sander to distress the brown layer, showing some of the antique white beneath it.
- As you can see I sanded all the edges as well, being sure to remove the paint in the corners. Don’t forget the sides too! Make sure you dust off the boards well after sanding.
- Now is a good time to add picture hangers to the back of the wood plaques.
- I wanted to keep the rustic feel, so I tore the edges all the way around the photographs. Now you paint on an even layer of Mod Podge onto the back of the photo. Place the photo on to the plaque. While holding the photo in place with one hand, firmly but gently rub your other hand across the photo to be sure there are no air bubbles. Let this dry for about 20 minutes first – THEN add a coat of Mod Podge over the top of the entire surface. Use even strokes and it’s best to paint with the wood grain.
- Let it dry completely before hanging!
- Swirling Twirling Ladybugs - July 21, 2026
- Drip Tie Dye Backpack - July 17, 2026
- Mini Coastal Clay Houses - July 14, 2026


Nancy says
I am finding the wood in places after removing the white paper backing am I rubbing too hard, did not glue coverage, what am I doing wrong?
Amanda Formaro says
What white paper backing are you referring to?
Theresa says
I want to decoupage photos too. I had a 20×30 print ordered (on photo paper) and was planning on cutting it up to suit my needs. But, most websites recommend that the photos are printed to cellulose fiber paper before starting the project. I read that the photos can curl at the edges. Have you had any similar issues?
Amanda Formaro says
I did not, none of mine curled. I’ve honestly never seen the cellulose paper suggestion!
Catherine Root says
This is what I’ve been looking for so thank you for posting. I’m making a sign for my son and daughter in law ‘s wedding next weekend. Do you think I could do this over stain instead of paint? Also there are so many types of Mod Podge which kind did you use?
Amanda Formaro says
So sorry for the delay! Not sure if you already did this (probably, congratulations on the wedding!) – but if not, yes over stain is totally fine. I prefer Mod Podge matte finish.
Jennifer Perumal says
Hi Amanda, lovely photo frames, I would like to know if you used the actual photo and not laser prints.
Amanda Formaro says
On these yes I did use actual photos. I ordered them through Walgreens and picked them up an hour later :)
Kim says
How did you hang these? They look flat to the wall. Love the entire concept!
Amanda Formaro says
Hi, Kim. I used picture hangers that I attached to the back of the boards. Just like these ones http://amzn.to/2oFgItn . Thank you! :)
Kim says
Thanks so much!!
Michelle says
Considering this for a large paper map. Do you think it would work just as well? The Mod Podge won’t smear?
Amanda Formaro says
No it won’t smear :)
tyneshia says
Hi! Your pictures are beautiful!! Im making a photo collage on a wood letter for my sister. I painted the wood with 2 thin coats of valspar color samples i got from Lowe’s. The wood still has the original rough texture. I did my prints from home on HP marketsplash and brochure paper with HP photo creations. Its a little thick and very similar to photo paper. The picture quality came out really well. I havent mod podged them yet because im not sure if i need to sand the wood first since i painted it or is it ok? Please help!
Amanda Formaro says
Hi Tynesia :) The paint won’t be an issue, however the surface where the photo is going to go should be smooth. So if there are rough patches, you will want to sand those :) They sound awesome!
autumn says
Amanda,
I found your project on pinterest. I loved it and actually did one of my own! To be different I used sepia tones for the picture and I burned the edges. It turned out great! Thank you for the inspiration!
Amanda Formaro says
That’s awesome! I bet they turned out gorgeous! I did that (sepia and burnt edges) with a photo of a friend of mine holding her baby. The photo was taken in a cool old barn, so that affect was really fitting. Here it is here http://amandaformaro.com/custom-portrait-maria-and-caleb/ Thanks so much for the comment, so glad you enjoyed the project!
Shannon Bowen says
Hello,
I am wanting to make something similar to this. I just printed out a bunch of photos of me and my husband from Walgreens so they are actual photos. I want to use canvas and apply the pictures onto the canvas like a collage. How would you recommend that I do this? Should I glue them down on the canvas 1st? Then use the mod podge on top of the pictures after they have been glued down and are dry? After the process is complete I will be applying a decal. I would appreciate your suggestions. Thank you very much!
Sincerely,
Shannon
Amanda Formaro says
Hi Shannon. I haven’t done that myself yet, but there’s a tutorial on another blog that shows you how, here you go! http://www.sewcreativeblog.com/how-to-mount-a-photo-to-canvas-tutorial-5-00-gift/
David says
Charlotte fantastic idea, love em… Please email me privately and let me know how much you want to make this for me minus the pictures… I could do that part on my own… Thank you!!! David…
Amanda Formaro says
Hi David. I’m afraid with the holidays and writing a book, my schedule is crammed full and I am just not able to take on this project right now. :-( Terribly sorry!
Charlotte says
Thankyou, I am in uk so don’t think we have them stores, would it be printed on just normal paper like what you would print a letter on. Thanks
Amanda Formaro says
Hi Charlotte. If you do that, you’ll need to spray the print outs with an acrylic sealer first, but the images won’t be as sharp. It’s better to have them printed on photo paper. So where ever it is that you would order photo prints from, that’s what you want to do :)
Charlotte says
Hi I can’t wait to try this! Just unsure about the copying of the photo….. Does it have to be professionally copied? And on to normal say a4 paper? Thanks
Amanda Formaro says
Hi Charlotte. I had mine printed by Walgreens. You can order them online and pick them up at your local Walgreens :)
Shandie says
I was wanting to do something like this on a table. Would you suggest polyurethane on top? Can you brush the polyurethane or would you recommend pouring it on?
Amanda Formaro says
I would think that polyurethane would do the job. There’s some instructions for applying it here http://www.familyhandyman.com/woodworking/staining-wood/how-to-apply-polyurethane/view-all
Rob says
I do have one question, after you put on the 2nd coat of that brownish color paint and it drys, what grit of sandpaper would you recommend using?
These are awesome. The upstairs apartment of my parents house flooded and the frames and pictures are mostly destroyed. I think these would be perfect as replacements for some old family photo’s we had. I can have the water damaged ones copied into black and white. We have some old scrap wood at my grandfathers place and i’m sure my parents would love these.
Amanda says
Hi Rob :) Anywhere from 80-120 woud be fine. You want a fine to medium grit. Good luck, sounds like they will turn out wonderful, how nice of you to do them for your parents!
casey vansteenburg says
I just wanted to toss in an idea for you about the plaques, I make these myself and if you get a wood burner and bronze the edges of the picture after the first coat of mod pog then coat again you will have an amazing look that looks like the picture is literally made into the wood!
Amanda says
Awesome, thanks for the tips!
Kimberly Tracy says
Casey, this is EXACTLY what I am wanting to do with mine and my husband’s childhood photo. Can you give me step by step instructions so I know exactly how to do this?
Capturing Joy with Kristen Duke Photography says
These look great!!! I remember helping you with that a while back–fun!
Amanda says
I remember that too Kristen! :)
Carrie says
This was an idea I wanted to do with a project that I am working on. How much would you charge if I sent you some pics ?
Amanda says
Hi Carrie and thanks for asking :) i actually have the pricing detailed out here http://amandaformaro.com/sample/portfolio/ Please have a look and let me know if you are interested. Thanks!
Kathy says
Do you sell these?
Amanda says
Hi Kathy I have replied to you privately via email :)
DeAnna says
I really love how you put everything together. Just nice as can be!
Amanda says
Thanks so much DeAnna!
DawnNicoli says
I’m a photographer and would love to hire someone to do this for me.
I wold probably like to do larger sizes like 16 x 20.
What is the guarantee that the photos would be permanent?
How much would you charge if i just sent the images to you?
Does anyone know a company that already offers this?
Thanks,
Dawn
Amanda says
Hi Dawn, thanks for reaching out! I’ll email you privately :)
Tracy says
love love love this idea. I too would love to buy these if you ever sell them I would never get them finished if did my self,
Amanda says
Thank you Tracy!
Denise says
SUCH AN AMAZING IDEA!! I DO ALOT OF PYOGRAPHY (WOODBURNING) AND AM ALWAYS LOOKING FOR ANOTHER COOL PROJECT!
Jennifer Thompson says
I know this is a late post, but I was wondering if you had trouble decoupaging actual photos. I want to do something like this with family photos onto wood drawers, but I keep running into people telling me to photocopy photos onto paper first & not use real photos..please help if you can, thanks!!!
admin says
I have asked the Queen of ModPodge, Amy Anderson of Mod Podge Rocks to answer this question :) She should be posting shortly!
Mod Podge Amy says
Hi there! Yes, I always recommend photocopying. You *can” Mod Podge regular photos, but the plastic-y coating on photo paper makes it difficult and it often doesn’t work that well. I would photocopy them using a laserjet printer. The reason is because inkjet printer ink must be spray sealed first so that it doesn’t bleed. It’s kind of a pain, so I would definitely go the photocopying route. Get them copied on regular 20 lb. paper (you can go a bit thicker) as opposed to photo paper, or you are just going to have the same problem. Good luck!
admin says
Thanks so much Amy!
Jennifer Thompson says
Thank you so much!!
Sandy says
I would so buy these. Would be proud to do them myself but would it ever get done?? If you ever decide to do them for others let me know :)
admin says
Thanks Sandy, I will!
Nicki says
Thank you so much for sharing. I am wanting to decoupage some photos from my daughter’s outdoor ed trip onto wooden crosses for the school’s auction and your website provided perfect, concise instructions for a “how-to”. Best wishes with your businesses:)
Amanda Formaro says
Those will look awesome!
Stephanie Anderson says
Did one last night to see how it would come out and not sure if it was just the brand of photo paper I used but the picture came out blurry and the color started to bleed once i put the mod podge on( Any suggestions to help??? Thank you!!!
Amanda Formaro says
Hi Stephanie. If you printed these yourself on your own printer rather than getting them from a photo processing service (Walgreens, Shutterfly, Walmart, etc) then you will most likely need to prime the paper first. Use some matte finish acrylic sealer spray on the photo and let it dry for at least half an hour. That will protect the ink and it will not bleed once the Mod Podge is added. :)
Pat says
These are great! I have seen photos on flat canvas boards and stretched canvas AND now on wood! I thought about this as side and think you would do well as a side business. It would be a great holiday gift and could be too good an idea once it catches on. Thank you for the idea and instructions! Good luck with what ever you decide! ~pms
Victoria Nugent says
Time to gather some barn wood and dig through my photo's,I absolutely love this idea.
AmandaDawn says
This is gorgeous! I love that rustic look! Makes me want to go out and get some good pictures this summer and start this project right away!
Thanks for sharing! ♥
Miss Amanda
Lesley says
Fabulous! I mean it. You could sell them. And I am subscribing.
Lesley
Marianne says
That is a very cool idea and I am sure people would buy them if you offered them up for sale. Thank you for sharing.
Connie Wallace says
Love it!
Angie @ The Country Chic Cottage says
Great post!! I love it!! Stumbled you! :)
Dawn says
I love this idea. And so cost effective and you made it your self. A project to be proud of.
Love Dawn xx
June@I will craft says
Great family wall. It really shows off the personalities in your family.
Michelle says
I haven't seen this before–very cool! Thanks for sharing. Can't wait to see more!
Michelle
Kelly @cupofserenity says
Hi there! I just uploaded a thing on my blog for my likes this week and I added one of your projects with a link. check it out :)
http://www.cupofserenity.blogspot.com
Kelly says
Found you via Tatertots and Jello. That's a great alternative to just plain old frames for family photos. Love the rustic look. :)
[email protected] says
What a neat look Amanda, I love how these turned out! Thanks so much for sharing, I'll be spreading the word.
marla says
I think you can totally start a business with these photo plaques. They are a super fun way to display portraits.
Lynn says
I like this, Amanda! I also like the paint chip clock!
Cajun Chef Ryan says
Amanda,
This is a great project, love the distressed wood and the B&W photos are perfectly presented.
nena says
Great idea I really love it.Can I stole it?
MsJay says
Very nice. Loving that wall decor.
[email protected] says
amanda! I just got to this post in my reader. It's been a crazy day!
I love your photo wall!
great tute!
gail
Kristen Duke Photography says
i love a great step by step…looks awesome!
Blessed Beyond says
OH MY GOSH! They are awesome!!! I am love with them and am going to work on some!!! Thank you for sharing!!!!
ALessner says
These are so cool. What a great idea
Kristal says
I love this! Thanks for the tutorial & I am sure it would totally sell.
Michele {The Scrap Shoppe} says
Amanda, these are amazing! I love the rustic look and the style. If you do decide to sell these, I would suggest taking the tutorial down. But I'm sure you already knew that. ;)
grammy and papi says
Love the photos of your family, great idea.
Have a God Filled Day
Shirley