
This is a fun fall project that kids will love. It’s a great way to introduce sewing to young hands, and at the same time, create some pretty basket fillers for your Thanksgiving table. Kids will love the glitter too!
A small amount of parental supervision is recommended due to the use of a hot glue gun.
 I used DecoArt’s glitter paint, Craft Twinkles in fall colors.
 Paint the paper bag with the glitter paint, cut it into sections.
 Stack two pieces of painted paper together, wrong sides facing each other. Cut out leaf shapes. Use a toothpick to poke holes in one of the paper leaves for sewing the leaf veins.
 Thread child’s needle with yarn and sew the veins.
 Glue the leaves together, leaving some space to add the stuffing.
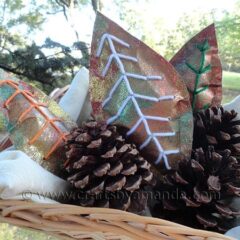
Glitter Paper Leaves
Supplies
Supplies
- Brown paper grocery bag
- Glitter paint in fall colors
- Yarn
- Child's sewing needle OR a hole punch and tape
- Cotton batting
Tools
- Paintbrush
- Scissors
- Toothpick
- Hot glue gun
Instructions
- First, cut one of the large panels off of a paper grocery bag. have your child paint the bag with as many different fall glitter colors as they like. Overlapping colors is encouraged and creates a pretty mosaic effect. Allow the paint to dry completely.
- Cut the painted bag in half lengthwise along the seam if there is one. You should have two long pieces. Stack them on top of each other and cut them into thirds. You should have 6 pieces total.
- Take two pieces and layer them back to back with glitter paint facing out on either side. Hold them together (or use a paper clip) and cut a simple leaf shape. Repeat for the other pieces, you should have 3 leaves.
- You will want to create holes for your child to "sew" through on one side of the leaf. To do this, place one of the leaf shapes onto a piece of Styrofoam or a cork bulletin board. Use a toothpick to create holes starting from about 3/4" from the bottom point of the leaf, then one inch apart up to the top of the leaf, again leaving about 3/4" space at the top. Make holes for the leaf's veins as well.
- Tie a knot in one end of the yarn and thread a child's safe sewing needle with the other end. Begin sewing at the bottom and work your way up to the top. Fo the veins last. Tie off the yarn in the back and cut off the excess.
- NOTE: instead of a sewing needle you can use a hole punch to create the holes and wrap the end of the yarn with tape to make it easier to thread through the holes. If you go this route you make need to make either A) less holes for sewing or B) make larger leaves.
- Next, parents should hot glue the top portion of the sewn leaf to the top portion of the matching leaf (make sure the glitter side is facing out). Glue half way down the sides, leaving enough room to add the stuffing.
- Have child ad small amounts of cotton batting until the leaf is stuffed. Parents should hot glue the leaf closed.
Latest posts by Amanda Davis (see all)
- Tie Dye Beach Towels - July 24, 2026
- Swirling Twirling Ladybugs - July 21, 2026
- Drip Tie Dye Backpack - July 17, 2026


jet says
this is lovely and sooo cool, thank you for sharing this cute project and for the great tute as well;-D
Terri says
These are gorgeous! I think I may make some of these myself!