• Home
  • About
    • About Crafts by Amanda
    • Visit Our Recipe Site
  • Work With Us
  • Join
    • Free Newsletters
    • Join our Facebook craft group
↑
  • Tutorials
    • Tutorial Index
    • Adult Crafts
    • Crafts for Kids
    • Crafts for Seniors
    • Recycled Crafts
    • Seasonal Crafts
    • Holiday Crafts
    • Free Printables
    • Craft Collections
  • Adult Crafts
    • Bath & Body
    • Beach Crafts
    • Clay Pot Crafts
    • Crafts for Seniors
    • Decoupage Crafts for Adults
    • DIY Gift ideas
    • Garden Crafts
    • Home Decor Projects
    • Kitchen Crafts
    • Light Bulb Crafts
    • Luminary Crafts
    • Mason Jar Crafts
    • Needlework
    • Photo Display Ideas
    • Recycled Crafts for Adults
    • Wearable Crafts for Adults
  • Crafts for Kids
    • Animal Crafts for Kids
    • Back to School Crafts
    • Beach Crafts for Kids
    • Camp Crafts
    • Cardboard Tube Crafts for Kids
    • Decoupage Crafts for Kids
    • Easy Crafts for Kids
    • Nature Crafts for Kids
    • Other Kid’s Crafts
    • Paper Plate Crafts for Kids
    • Recycled Crafts for Kids
    • Slimes, Doughs, & Clay
    • Wearable Crafts for Kids
  • Holiday Crafts
    • 4th of July Crafts
    • Christmas Crafts
    • DIY Gift ideas
    • Earth Day Crafts
    • Easter Crafts
    • Father’s Day Crafts
    • Halloween Crafts
    • Memorial Day Crafts
    • Mother’s Day Crafts
    • New Year’s
    • Other Holidays
    • Patriot Day Crafts
    • St. Patrick’s Day Crafts
    • Thanksgiving Crafts
    • Valentine’s Day Crafts
  • Seasonal Crafts
    • Winter Crafts
    • Spring Crafts
    • Summer Crafts
    • Fall Crafts
  • Skip to primary navigation
  • Skip to main content
  • Skip to primary sidebar
  • Skip to footer

Crafts by Amanda

crafts for adults and kid's crafts

  • Tutorials
    • Tutorial Index
    • Adult Crafts
    • Crafts for Kids
    • Crafts for Seniors
    • Recycled Crafts
    • Seasonal Crafts
    • Holiday Crafts
    • Free Printables
    • Craft Collections
  • Adult Crafts
    • Bath & Body
    • Beach Crafts
    • Clay Pot Crafts
    • Crafts for Seniors
    • Decoupage Crafts for Adults
    • DIY Gift ideas
    • Garden Crafts
    • Home Decor Projects
    • Kitchen Crafts
    • Light Bulb Crafts
    • Luminary Crafts
    • Mason Jar Crafts
    • Needlework
    • Photo Display Ideas
    • Recycled Crafts for Adults
    • Wearable Crafts for Adults
  • Crafts for Kids
    • Animal Crafts for Kids
    • Back to School Crafts
    • Beach Crafts for Kids
    • Camp Crafts
    • Cardboard Tube Crafts for Kids
    • Decoupage Crafts for Kids
    • Easy Crafts for Kids
    • Nature Crafts for Kids
    • Other Kid’s Crafts
    • Paper Plate Crafts for Kids
    • Recycled Crafts for Kids
    • Slimes, Doughs, & Clay
    • Wearable Crafts for Kids
  • Holiday Crafts
    • 4th of July Crafts
    • Christmas Crafts
    • DIY Gift ideas
    • Earth Day Crafts
    • Easter Crafts
    • Father’s Day Crafts
    • Halloween Crafts
    • Memorial Day Crafts
    • Mother’s Day Crafts
    • New Year’s
    • Other Holidays
    • Patriot Day Crafts
    • St. Patrick’s Day Crafts
    • Thanksgiving Crafts
    • Valentine’s Day Crafts
  • Seasonal Crafts
    • Winter Crafts
    • Spring Crafts
    • Summer Crafts
    • Fall Crafts
Craft Tutorials | Holiday Crafts | Halloween Crafts | Halloween Wine Glass Candle Holders
Halloween Crafts

Halloween Wine Glass Candle Holders

Author by Kristen Formaro on October 22, 2021 Updated on October 22, 2021

5 from 6 votes
These Halloween wine glass candles are perfect for DIY Halloween decor or for your Halloween party centerpiece. Grab your friends and make them together!
Jump to Project
14366 shares
  • Share
  • Tweet
  • Flipboard
  • Email
Halloween Wine Glass Candles

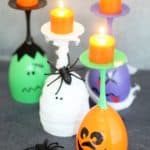
These Halloween wine glass candle holders are perfect for DIY Halloween decor or for your Halloween party centerpiece. They would be great for a Pumpkin Painting Party right on the food table!

Wine glasses painted like Frankenstein, a mummy, and a pumpkin with candles


Halloween wine glass candles

These Halloween wine glass candles are sure to get a few comments at your Halloween party, and they are so easy to make! Personalize the wine glass monsters however you like, or try new characters, such as a witch or a vampire.

If you need some treats to match the wine glasses, check out these zombie candy pops or Frankenstein chocolate bark.

Zombie painted wine glasses with red paint as blood

*To make all of the Halloween wine glass candle holders here, you’ll need green, black, orange, purple, red, and white acrylic enamel paints.

Prefer to buy? There are a few variations available from sellers on Etsy.

Halloween Wine Glass Candles painted like a zombie, Frankenstein, a mummy and a pumpkin.

First, dab alcohol on a cotton ball or cloth and wipe the entire wine glass to clean. Let dry completely.

Next, paint your wine glasses with the base coat of paint. Pour your paint onto a palette or paper plate. Brush the paint to cover the entire wine glass (the bottom of the wine glass, where the candle will perch, is optional).

I prefer to use foam brushes for best coverage. Set the wine glasses on a piece of wax paper to dry. You may need two to three coats of paint, letting the paint dry very well between coats, until the glasses are opaque.

For Frankenstein, paint the wine glass green and the stem and bottom black. For the mummy, paint the entire glass white. For the zombie, paint the entire glass purple. For the Jack O’Lantern, paint the wine glass orange and the stem and bottom green.

One coat painted wine glasses for Halloween

Third, flip the wine glasses upside down and add your designs.

For the mummy, cut strips of gauze and wrap around the glass, including along the stem, securing with dabs of hot glue. Use caution with the hot glue, as the gauze is thin enough that you will feel the hot glue through the material if you touch it.  Keep a space on the glass open between the gauze and paint two black dots for eyes. Let dry.

Hot gluing strips of gauze to your mummy wine glass

For the Frankenstein, cut out a circle of black felt about 3-inches in diameter. With scissors, snip a line to the center of the circle and cut a smaller circle, about 1/2-inch in diameter. Snip zigzags around the edges of the felt circle.

Wrap the felt circle around the base of the wine glass, securing with hot glue, for Frankenstein’s “hair.” Use a small paint brush to paint the eyes, mouth, and scar with black paint. Let dry.

Cutting felt for Frankensteins hair

For the Jack O’ Lantern, use black paint and a small paintbrush to paint any face you like.

Halloween wine glasses painted as Frankenstein and a pumpkin

For the zombie, paint an “X” and a dot for eyes. Paint a mouth. With red paint, add drops of blood. Cut a strip of gauze and wrap around the wine glass, carefully securing with hot glue.

Hot gluing fabric onto a zombie painted wine glass

Finally, top the wine glasses with candles. Use a dab of hot glue to secure, if desired.

Wine glasses painted as a zombie, Frankenstein, a mummy, and a pumpkin with candles on top!

I just love these silly, sort-of spooky Halloween wine glass candles. I’m already thinking of versions for Thanksgiving and Christmas!

More Halloween Crafts

  • If you’re planning a Halloween party, these fun Zombie Mason Jars make great treat holders! Or, take off the lid and place a candle in them for zombie luminaries.
  • See how easy it is to make these Mason Jar Lid Pumpkins! If you have a stash of jar lids, be sure to keep them for this adorable fall craft, or you can purchase them via the link in the post. Make a few with friends for the perfect fall decor!
  • And for one last Halloween decoration idea, these paper Halloween luminaries are cute by day and spooky by night!
Print Project
5 from 6 votes

Halloween Wine Glass Candles

These Halloween wine glass candles are perfect for DIY Halloween decor or for your Halloween party centerpiece. Grab your friends and make them together!
Age Group: Adult Crafts
Project Type: Halloween
Author: Meaghan Mountford

Supplies

  • Wine glasses
  • Rubbing alcohol
  • Acrylic enamel craft paint* green, black, orange, purple, red, and white acrylic enamel paints.
  • Gauze
  • Foam brushes
  • Black felt
  • Orange votive candles

Craft tools

  • Hot glue gun
  • paintbrushes

Instructions

  • Dab alcohol on a cotton ball or cloth and wipe the entire wine glass to clean. Let dry completely.
  • Paint your wine glasses with the base coat of paint. Pour your paint onto a palette or paper plate. Brush the paint to cover the entire wine glass (the bottom of the wine glass, where the candle will perch, is optional). Set the wine glasses on a piece of wax paper to dry. You may need two to three coats of paint, letting the paint dry very well between coats, until the glasses are opaque.
  • For Frankenstein, paint the wine glass green and the stem and bottom black. For the mummy, paint the entire glass white. For the zombie, paint the entire glass purple. For the Jack O'Lantern, paint the wine glass orange and the stem and bottom green.
  • Flip the wine glasses upside down and add your designs.
  • For the mummy, cut strips of gauze and wrap around the glass, including along the stem, securing with dabs of hot glue. Use caution with the hot glue, as the gauze is thin enough that you will feel the hot glue through the material if you touch it.  Keep a space on the glass open between the gauze and paint two black dots for eyes. Let dry.
  • For the Frankenstein, cut out a circle of black felt about 3-inches in diameter. With scissors, snip a line to the center of the circle and cut a smaller circle, about 1/2-inch in diameter. Snip zig zags around the edges of the felt circle. Wrap the felt circle around the base of the wine glass, securing with hot glue, for Frankenstein’s “hair.” Use a small paint brush to paint the eyes, mouth, and scar with black paint. Let dry.
  • For the Jack O’ Lantern, use black paint and a small paint brush to paint any face you like.
  • For the zombie, paint an “X” and a dot for eyes. Paint a mouth. With red paint, add drops of blood. Cut a strip of gauze and wrap around the wine glass, carefully securing with hot glue.
  • Finally, top the wine glasses with candles. Use a dab of hot glue to secure, if desired.

This post originally appeared here on Sept 5, 2018.

  • Author
  • Recent Posts
Kristen Formaro
Latest posts by Kristen Formaro (see all)
  • Photo Holder for Mom - April 25, 2025
  • 2024 Printable Calendar - January 2, 2024
  • Halloween Wine Glass Candle Holders - October 22, 2021
14366 shares
  • Share
  • Tweet
  • Flipboard
  • Email

Filed Under: Halloween Crafts Tagged With: frankenstein, halloween party, paint, wine glasses

Reader Interactions

Free CraftsBy email every week

Latest crafts straight to your inbox!

5 from 6 votes (6 ratings without comment)

Leave a Reply Cancel reply

Your email address will not be published. Required fields are marked *

Rate This Project


The maximum upload file size: 640 MB. You can upload: image, video. Links to YouTube, Facebook, Twitter and other services inserted in the comment text will be automatically embedded. Drop files here

Primary Sidebar

Hi! I’m Amanda and I’m the founder and head designer of Crafts by Amanda. I have spent over 25 years creating projects to share, but it’s not just me anymore! It’s turned into a complete family affair. Come and meet the Creative Team!

Free CraftsBy email every week

Latest crafts straight to your inbox!

All Time Favorites

snowy pinecone candle jar luminaries

Winter Luminaries: Snowy Pinecone…

Make pretty winter luminaries that appear to be covered ... Go To project

Make this wonderful deco mesh pumpkin wreath to hang on your door this fall!

Deco Mesh Pumpkin Wreath…

Adorn your door this fall with a pretty deco mesh ... Go To project

Learn to make these adorable ladybug painted rocks. use special outdoor paint for this adorable garden craft so you can keep garden ladybugs all summer!

Ladybug Painted Rocks…

I'm going to show you how to make these adorable ... Go To project

Reuse those empty prescription pill bottles in all sorts of ways. From organizing to making cookies. Yes, cookies! See how to use your empty pill bottles!

20 Uses for Prescription Pill…

You've been collecting prescription pill bottles for ... Go To project

Meet the Family

Amanda

Founder and Designer

Kristen

Editorial Manager

Lindsay

Social Media Manager

As seen on:

Footer

Favorites

  • Jar Photo Frames
  • No-Sew Roman Shade
  • Paper Flowers
  • How to Make a Scrunchie
  • Mermaid Slime

About

  • Home
  • Meet the Creative Team
  • Work with Us
  • Privacy Policy
  • Accessibility
  • Contact Us

Images/text copyright Amanda Formaro 2020. To feature a post from Crafts by Amanda, you may use one photo credited and linked back directly to the project post.

Free CraftsBy email every week

Latest crafts straight to your inbox!

Copyright ©2025, Crafts by Amanda. All Rights Reserved.
Design by Pixel Me Designs

Rate This Tutorial

Your vote:


To share a photo with your comment click here!

A rating is required
A name is required
An email is required

Recipe Ratings without Comment

Something went wrong. Please try again.