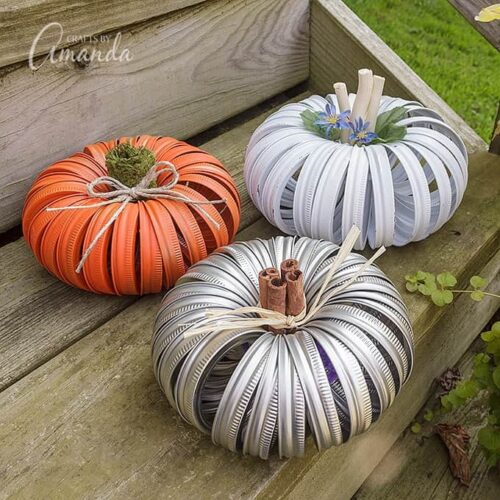
I know you’ve seen the adorable mason jar lid pumpkins that have been floating around the web for several years now. It’s a great way to add a little fall to your home decor and it’s perfect for recycling your used canning lids.

Mason Jar Lid Pumpkins
I’ll not only show you how to make a pumpkin from mason jar lids, I’ll share several different ideas for decorating them as well. These cute mason jar lid pumpkins are a touch of rustic with a whole lot of fall charm, plus, they’re really easy to make.
I buy a ton of mason jars, but not for canning like most people. I make a lot of luminaries, and projects like these fall mason jars, it’s just something I love to do. There’s something about the glow of a candle flickering through glass that I just love! But luminaries aren’t the only thing I’ve made from mason jars. I wanted something pretty for summer barbecues, so I created these painted mason jars too.

What You’ll Need to Make Canning Lid Pumpkins
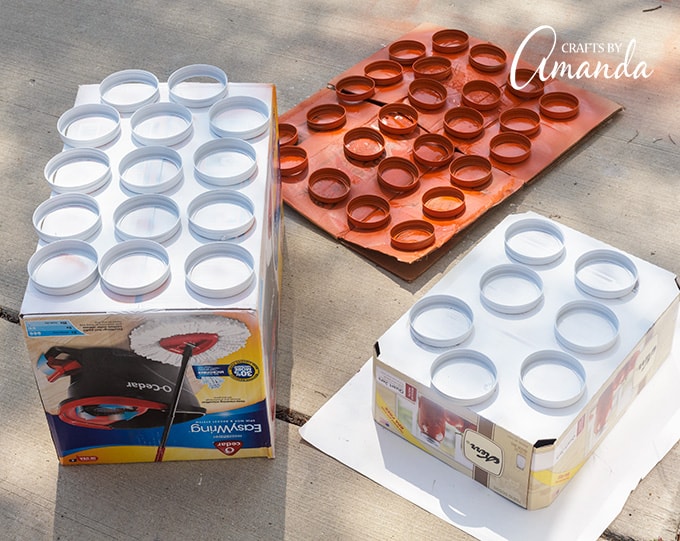
CANNING LIDS – Canning lids and bands can be purchased separately from mason jars. Depending on the size (wide mouth or regular) they will cost you less $10 for a box of 12. If you are familiar with canning you already know this because a lid can only be used once when canning food, but jars and bands can be used over and over. We suggest using your rusty or dented bands!
There are two different sizes: wide-mouth and regular. In my photos, you will see both of them being used. The wide-mouth bands are larger, that’s what the white pumpkin is made from. The larger pumpkin measures 8-inches while the smaller pumpkins measure a little under 7-inches.
PAINT – If you’d like to add color to your pumpkins, spray paint is probably the best choice. I used regular orange and white spray paint and topped with a matte finish spray.
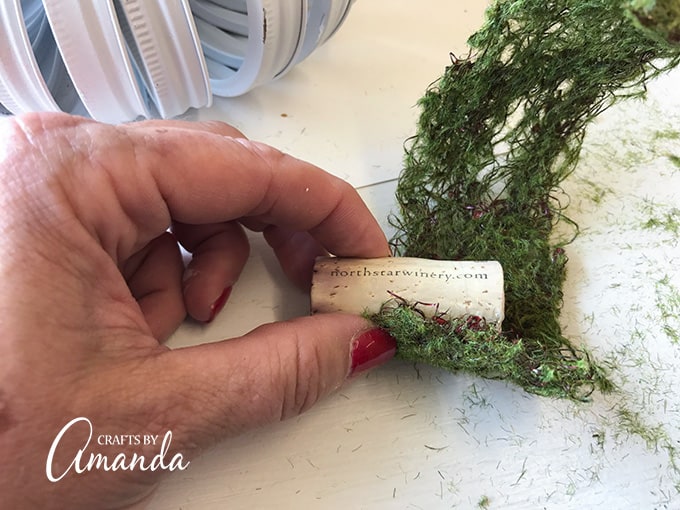
STEM – In my photos, you will see that I also used a wine cork wrapped in “moss roll”. I honestly don’t remember where I got it. But I did a search online and found something similar here.

How to make mason jar lid pumpkins
These step by step photos and instructions are here to help you visualize how to make this project. Please scroll down to simply print out the instructions!
- If you want your pumpkin painted, spray paint all the canning bands, applying two coats per side and allowing them to dry for 20 minutes between coats.

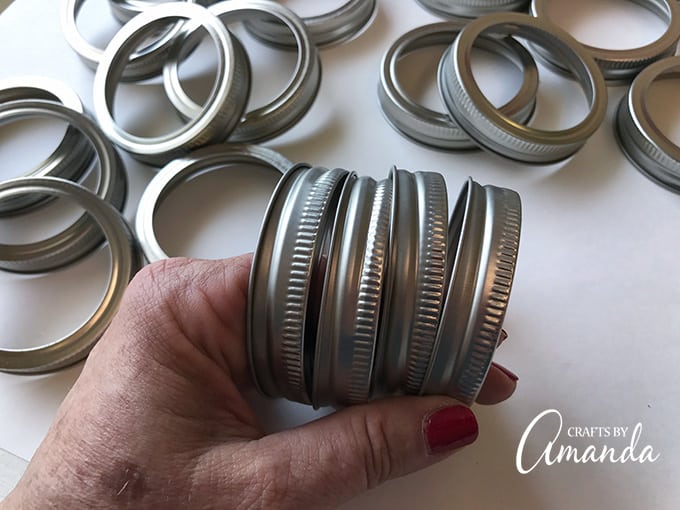
- Make sure all the bands are going in the same direction.

- Twist two pipe cleaners together to make one long pipe cleaner. Twist and secure it tightly.
- Run the pipe cleaner through the bands, connect all your bands together with the pipe cleaner, securing it as tightly as you can.

- Fan them out if needed, but you’ll be surprised by how your pumpkin will just naturally form when you place it on the table!
- Finally, hot glue two pairs of cinnamon sticks together to make the stem. Add some hot glue to the bottom of the cinnamon stick bundle and insert it into the center of the pumpkin.
TIP – If you want to add raffia, it’s easiest to tie that around the bundle before gluing it into the pumpkin.


Ideas for making the stem
- corks
- cinnamon sticks
- twigs
- tree bark
- rolled paper or scrapbook paper
Ideas for embellishing
- twine
- raffia
- ribbon
- jute
- baker’s twine
- silk or dried flowers
- tiny pinecones
- faux berries
- moss
- butterflies or birds
Decorating the pumpkin ideas
- Spray paint
- duct tape
- washi tape
- fabric tape
- ribbon
- book pages
- maps
- sheet music
- photos cut into strips
- polka dots (use the handle end of a paintbrush dipped in paint)
- scrapbook paper
- newspaper

Displaying Your Canning Lid Pumpkin
This seems like a no-brainer right? Put it on the table or shelf and you’re done. But you can also buy some of those battery operated string lights and put them inside your pumpkin. How beautiful would that be? Another idea is to use fewer bands so that there are more gaps between them when done, then insert some burlap or lace ribbon inside.

More Mason Jar Lid Craft Ideas
- Mason Jar Lid Snowman
- Canning Lid Snowman Ornament
- Gingerbread Man Canning Lid Ornament
- Cheese Grater Owl
- Minion Ornaments for Christmas
- Mason Jar Lid Coasters
I love to create and share my projects with you! I know it’s hard to remember to come back and search, so I’ve made it easy for you with my weekly newsletter! You can subscribe for free and I’ll send you fun crafts and delicious recipes every week right to your email.

Mason Jar Lid Pumpkins
Supplies
- 24-25 canning bands
- 2 pipe cleaners or yarn/string
- 4 cinnamon sticks
Optional supplies:
- Spray paint
- Raffia ribbon, twine or string
- Silk flowers berries, etc
Craft tools
Instructions
- If you want your pumpkin painted, spray paint all the canning bands , applying two coats per side and allowing them to dry 20 minutes between coats.
- Make sure all the bands are going in the same direction.
- Twist two pipe cleaners together to make one long pipe cleaner. Twist and secure it tightly.
- Run the pipe cleaner through the bands, connect all your bands together with the pipe cleaner, securing it as tight as you can.
- Fan them out if needed, but you'll be surprised by how your pumpkin will just naturally form when you place it on the table!
- Finally hot glue two pairs of cinnamon sticks together to make the stem. Add some hot glue to the bottom of the cinnamon stick bundle and insert it into the center of the pumpkin.
Video
Expert Tips & FAQs
- If you want to add raffia it’s easiest to tie that around the bundle before gluing it into the pumpkin.
- For the smaller pumpkin you can get away with using just one pipe cleaner. You will definitely need two for the larger size.
This post was originally published on this blog on Aug 18, 2017.
- Patriotic Pinwheels - June 23, 2026
- Fingerprint Daddy & Me Coffee Mug - June 12, 2026
- Patriotic Bandana Wreath - June 9, 2026


Kathleeb says
Truly love the finished craft.
Directions were simple to follow.
Thank you for the list of needed items and your guidance
Sue Gordon says
I found the easies thing to use to hold your rings together are 11″ cable ties. They’ll give you the tightest fit, and so easy to use..
Amanda Formaro says
Great tip!!
Ruthie says
Love it! Thank you!
Mary Hayden says
These are so pretty! Thanks for the detailed instructions!
Wendy phair says
Where do u buy the lids?
Amanda Formaro says
Hi Wendy, there’s a link in the post under “Supplies you need”, or you can get them here … http://amzn.to/2gHHP0F , hope that helps :)
Darlene Fisher says
That was so cute and clever and thanks for all of the tips
Sharon says
Mason jar lids (rings) can be used over and over just like the jar. It’s the flat disk seal that can only be used once. The rings can be removed as soon as the seal pops and used in another canning batch right away. FYI from someone who still cans.