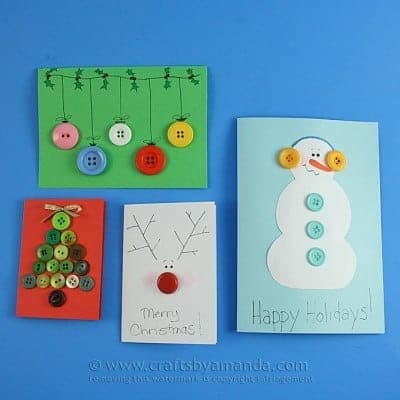
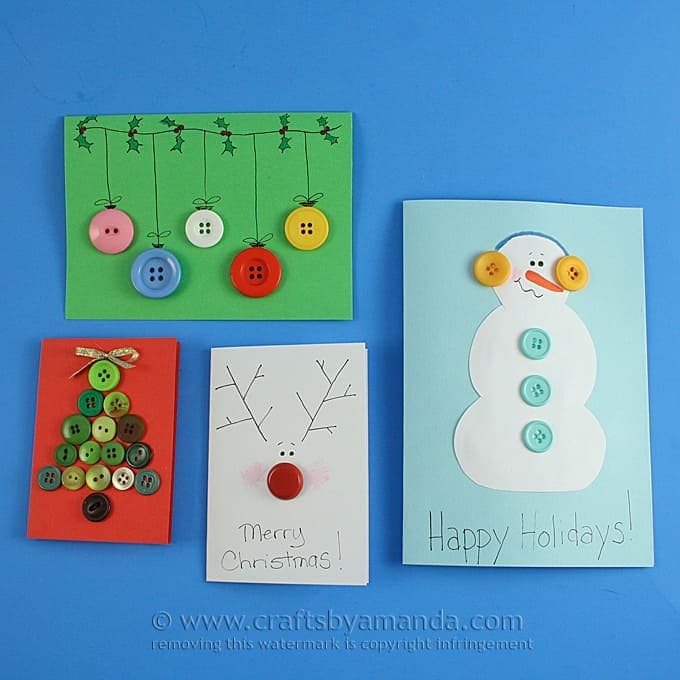
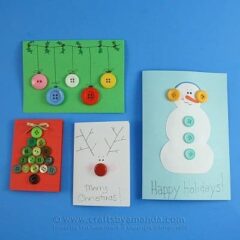
I recently put together some ideas for homemade Christmas cards using buttons, perfect for kids to make. With these cute button cards you can make a snowman, Rudolph the Red Nosed Reindeer, a Christmas tree and a garland of button ornaments! I’m sure there are others, but these were a fun way to get started. This is a fun and adorable Christmas craft for the kids.

Aren’t these sweet button cards too cute!? I think my favorite one is the reindeer, but I really do love them all. I also found these adorable snowman envelopes that you can make to put them in! What a fun way to say Merry Christmas or Happy Holidays to a friend, teacher, the mailman or anyone else your child might want to surprise. They’re easy to make too.
There are affiliate links in this post. That means if you buy something from that link, I will earn a small commission, but it won’t cost you anything additional.
You will need:
- Cardstock
 : light blue, red, green, white
 - Aleene’s Always Ready Clear Gel Tacky Glue
- Buttons in various colors
- Fine point black pen or marker
- Markers: orange, red, green
- Gold ribbon
- Pink crayon
- Scissors

If your card stock is square, trim it so that it’s a rectangle. Fold card stock in half to create the cards.
Snowman
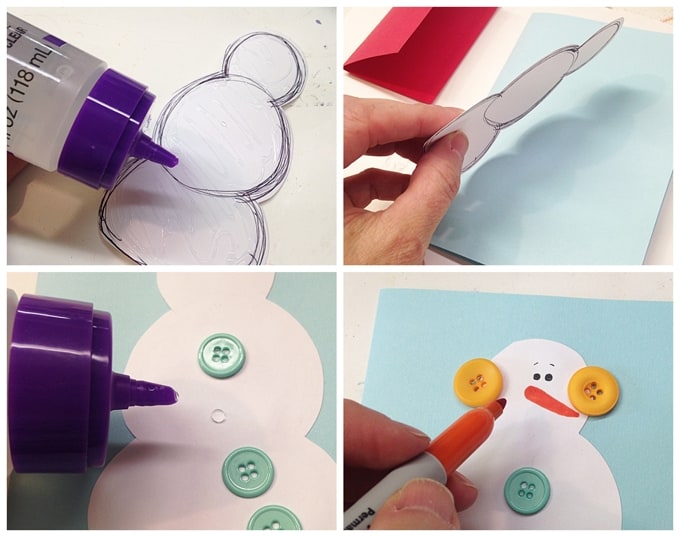
Draw a simple snowman shape onto white card stock. Doesn’t matter if it’s messy as the pen or pencil lines will not be seen. Cut out the snowman shape and cover the side with the pencil lines with glue and stick it to the front of the light blue card. Glue buttons onto the front of the snowman and two for earmuffs, one on either side of the head. Use markers to add an orange nose and black eyes. Use a blue marker to draw a line connecting the earmuffs across his head.
Christmas Tree
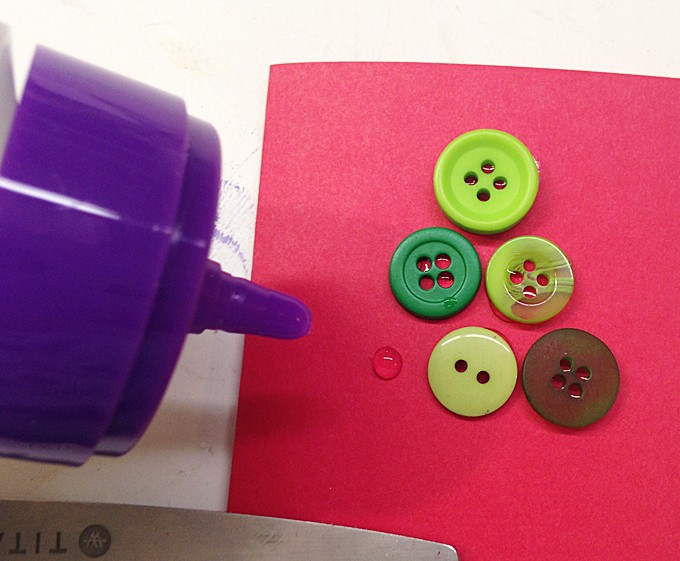
Glue green buttons in the shape of a pine tree onto the red card. Glue a brown button to the bottom for the trunk. Tie a piece of ribbon into a bow and trim the ends. Glue the bow to the top of the tree.
Ornaments
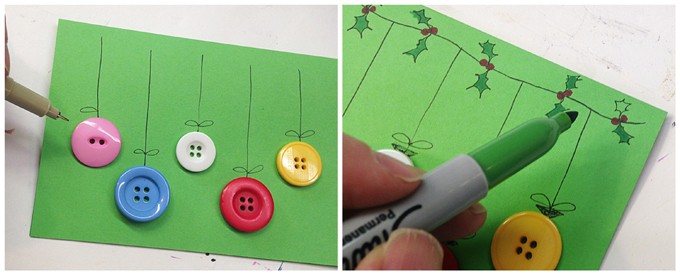
Glue colorful buttons to the green card to create ornaments. Draw a line from each button up to the top of the card, stop about 1/2” from the crease. Draw a little bow onto the “string” and draw a little square at the top of the button to complete the ornament. Draw a line across the top of the card for all the ornaments to hang from. You can also draw holly berries and leaves and color them in.
Rudolph
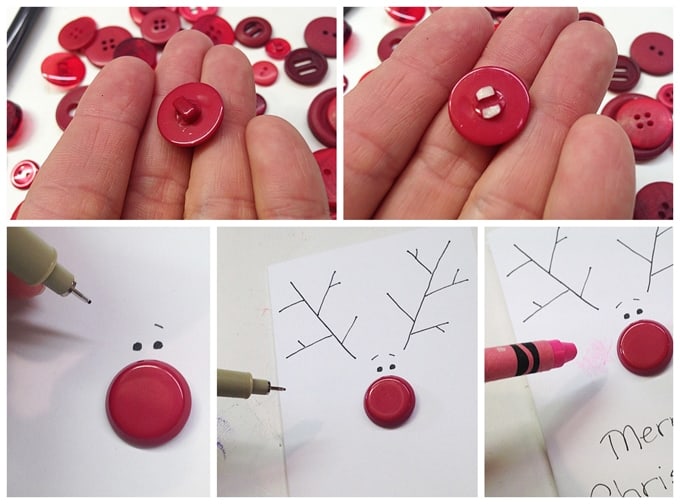
I used a red shank button for this card because I thought it was the cutest. You can use a regular 2 or 4 hole button instead if you like. First cut the shank off the button and then glue it to the white card. Use a black pen to add two dots for the eyes. Draw two lines above the eyes angled off to the left and the right. Draw on simple lines to finish the antlers. Finish off by adding rosy cheeks with a pink crayon.
You can write a greeting on the front or leave them as is. Let the cards dry completely before writing your message inside. And what about thank you cards? When Christmas is over, do your kids send out thank you’s? Here are some adorable and fun printable thank you cards that kids can send!
Homemade Button Cards for Christmas
Supplies
- Cardstock: light blue red, green, white
- Aleene’s Always Ready Clear Gel Tacky Glue
- Buttons in various colors
- Fine point black pen or marker
- Markers: orange red, green
- Gold ribbon
- Pink crayon
- Scissors
Instructions
- If your card stock is square, trim it so that it’s a rectangle. Fold card stock in half to create the cards.
SNOWMAN
- Draw a simple snowman shape onto white card stock. Doesn’t matter if it’s messy as the pen or pencil lines will not be seen. Cut out the snowman shape and cover the side with the pencil lines with glue and stick it to the front of the light blue card. Glue buttons onto the front of the snowman and two for earmuffs, one on either side of the head. Use markers to add an orange nose and black eyes. Use a blue marker to draw a line connecting the earmuffs across his head.
CHRISTMAS TREE
- Glue green buttons in the shape of a pine tree onto the red card. Glue a brown button to the bottom for the trunk. Tie a piece of ribbon into a bow and trim the ends. Glue the bow to the top of the tree.
ORNAMENTS
- Glue colorful buttons to the green card to create ornaments. Draw a line from each button up to the top of the card, stop about 1/2” from the crease. Draw a little bow onto the “string” and draw a little square at the top of the button to complete the ornament. Draw a line across the top of the card for all the ornaments to hang from. You can also draw holly berries and leaves and color them in.
RUDOLPH
- I used a red shank button for this card because I thought it was the cutest. You can use a regular 2 or 4 hole button instead if you like. First cut the shank off the button and then glue it to the white card. Use a black pen to add two dots for the eyes. Draw two lines above the eyes angled off to the left and the right. Draw on simple lines to finish the antlers. Finish off by adding rosy cheeks with a pink crayon.
- You can write a greeting on the front or leave them as is. Let the cards dry completely before writing your message inside.
- Patriotic Pinwheels - June 23, 2026
- Fingerprint Daddy & Me Coffee Mug - June 12, 2026
- Patriotic Bandana Wreath - June 9, 2026


Ducks n a Row says
Cutest ever! I love button crafts. I was thinking that the craft lady at my dad’s nursing home should do something like this with them. They love crafts and this is easy for hands that don’t always cooperate with the crafter. Pinned and shared!
Amanda Formaro says
That sounds fun!
Sarah says
These are so cute! Easy for the kids and use up those random buttons!
Amanda Formaro says
Thanks Sarah!
Amy [email protected] says
Super Cute and simple enough that my kids can make them!
Linda b. says
I just recently discovered your blog. I LOVE all your terrific ideas! Please keep ’em coming! :-)
Amanda Formaro says
Thanks Linda, so nice of you to say!
Laura says
Amanda, these are too cute & the ugly sweater ornaments from yesterday’s post were too. I don’t have any kids at home & haven’t been blessed with grands yet so I forward some of your kid friendly posts to a few friends who do have kids & they love them. Thanks for the wonderful ideas & Merry Christmas.
Amanda Formaro says
Thank you so much Laura! I hope you have a wonderful Christmas :)
Cookie17 says
Amanda can make about ant thing she picks up,great job!!!
Jackie says
These are adorable! I liked yesterday’s post with the ugly sweater ornaments too!