
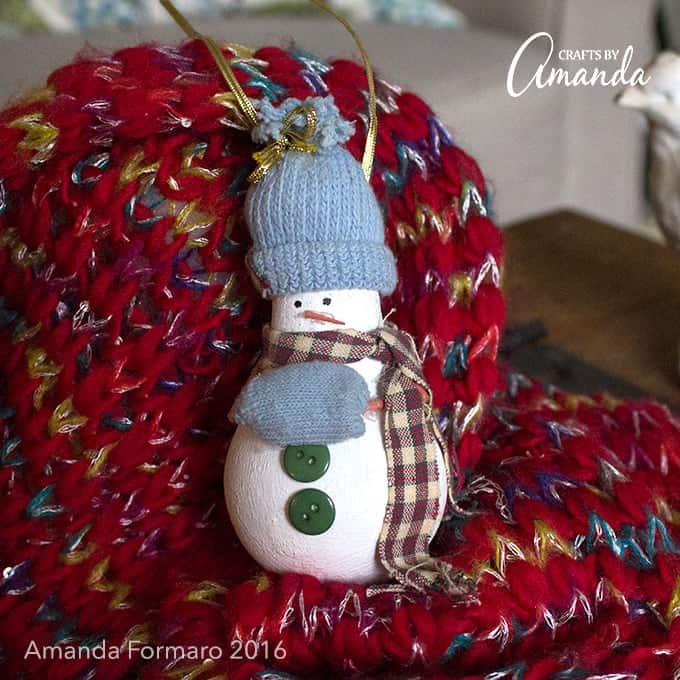
I’ve already posted my light bulb angel and my light bulb penguin, so here’s my light bulb snowman ornament to add to the group. I made this guy in 2000, 16 years and going strong! If you wrap them carefully, ornaments made from light bulbs will last a very long time. Keep in mind the age of this ornament when looking at this close up photo. He’s an old man now.

The photo on the left (see below) was taken right after I made it and the photo on the right was taken in 2009 when I hung it on my tree. The photo at the top was taken today (2016) but I’ll take a better one this year when I put my tree up.
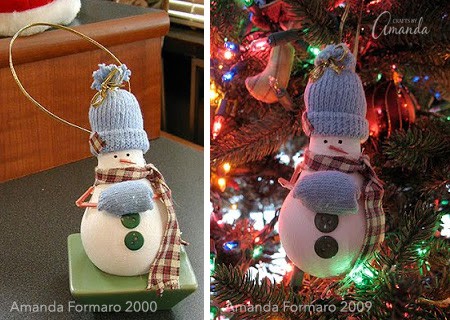
Light Bulb Snowman
You can make a light bulb snowman too using my tutorial. I find crafting relaxing, so little bits and pieces make me happy. If that makes you happy too, try this light bulb snowman for yourself or to give as a gift.
Psst – if you prefer to buy these, I don’t sell my projects but there are some cute ones here!
Supplies you will need:
- burnt out light bulb
- rubbing alcohol
- white acrylic paint
- gold cord or ribbon
- child’s sock
- scrap material
- two buttons
- 4 toothpicks
- Fiberfil cotton batting
- hot glue
- scissors
- black marker or Micron craft pen
To make your light bulb snowman:
HINT: PRINT THE INSTRUCTIONS AT THE END OF THIS POST
Wipe bulb down with rubbing alcohol, this will help the paint adhere to the bulb. Let dry. Paint entire light bulb with white acrylic paint and let dry. Apply a second coat. If finish appears streaked, you can use a large paint brush or a sponge to blot on a “stucco” look. It is not necessary to paint the socket. Allow bulb to dry completely.
While bulb is drying, cut off the ribbing from the child’s sock. Roll up a brim at one end and tie off the other end with gold ribbon or cord, tie in a bow. Leave about half an inch of sock above ribbon for the fluffy top, fringe ends. Add a bit of Fiberfil to the inside of the hat. Cut a tiny square of fabric and glue to the front brim of the hat.
From the remaining material on the sock, cut a rectangle, about 2 inches wide and 1 1/2 inches long. Place a small amount of Fiberfil in the center, roll up jelly roll style and glue together. Glue ends closed. Take one of the toothpicks and carefully cut/break in half. Insert pointed side of each toothpick into the muff on either side.
Once light bulb is dry, glue the muff to the belly of the bulb, below the neck and above the fattest part of the bulb. Glue the toothpicks to the bulb. Using another toothpick, cut into fourths. Using the sections that do not have pointed ends, glue to the toothpick arms that are already in place on the bulb. This will create the elbow to the shoulder. Glue to the elbow and to the bulb (see photo for guide).
Fit hat snugly over socket of light bulb and glue in place. To create the hanger, tie a long piece of ribbon into a loop. With the hanging ends, tie around the hat underneath the brim (roll it down out of your way). Loop tie should be positioned at the back of the hat. Tie ribbon tight and snip off extra ends. Roll brim back up to cover ribbon.
Fashion a scarf from scrap material and tie carefully around neck, glue in place. Fringe ends of scarf with scissors. Glue two buttons to belly area, tuck top button underneath muff halfway. With one of the remaining pointed toothpicks that you cut into fourths, glue on for nose. Carefully dot on eyes with black marker. Hang!
Special note: You may not use all the toothpicks that the instructions call for. They are easily split when broken or cut, so I allowed for that with extras.

Light Bulb Snowman Ornament
Supplies
- burnt out light bulb
- rubbing alcohol
- white acrylic paint
- gold cord or ribbon
- child's sock
- scrap material
- two buttons
- 4 to othpicks
- Fiberfil cotton batting
- hot glue
- scissors
- black marker or Micron craft pen
Instructions
- Wipe bulb down with rubbing alcohol, this will help the paint adhere to the bulb. Let dry. Paint entire light bulb with white acrylic paint and let dry. Apply a second coat. If finish appears streaked, you can use a large paint brush or a sponge to blot on a "stucco" look. It is not necessary to paint the socket. Allow bulb to dry completely.
- While bulb is drying, cut off the ribbing from the child's sock. Roll up a brim at one end and tie off the other end with gold ribbon or cord, tie in a bow. Leave about half an inch of sock above ribbon for the fluffy top, fringe ends. Add a bit of Fiberfil to the inside of the hat. Cut a tiny square of fabric and glue to the front brim of the hat.
- From the remaining material on the sock, cut a rectangle, about 2 inches wide and 1 1/2 inches long. Place a small amount of Fiberfil in the center, roll up jelly roll style and glue together. Glue ends closed. Take one of the toothpicks and carefully cut/break in half. Insert pointed side of each toothpick into the muff on either side.
- Once light bulb is dry, glue the muff to the belly of the bulb, below the neck and above the fattest part of the bulb. Glue the toothpicks to the bulb. Using another toothpick, cut into fourths. Using the sections that do not have pointed ends, glue to the toothpick arms that are already in place on the bulb. This will create the elbow to the shoulder. Glue to the elbow and to the bulb (see photo for guide).
- Fit hat snugly over socket of light bulb and glue in place. To create the hanger, tie a long piece of ribbon into a loop. With the hanging ends, tie around the hat underneath the brim (roll it down out of your way). Loop tie should be positioned at the back of the hat. Tie ribbon tight and snip off extra ends. Roll brim back up to cover ribbon.
- Fashion a scarf from scrap material and tie carefully around neck, glue in place. Fringe ends of scarf with scissors. Glue two buttons to belly area, tuck top button underneath muff halfway. With one of the remaining pointed toothpicks that you cut into fourths, glue on for nose. Carefully dot on eyes with black marker. Hang!
Originally published on this blog December 7, 2009
- Tie Dye Beach Towels - July 24, 2026
- Swirling Twirling Ladybugs - July 21, 2026
- Drip Tie Dye Backpack - July 17, 2026


Lea says
Hi Amanda, how adorable this snowman ornament is. Thank you. I have a thing for snowmen. I’ve pinned this.
Faye Harris-Blackwell says
Love this idea of making a light bulb into a snowman, going to do some for Christmas!
Amanda Formaro says
I hope they turn out great for you Faye! :)
Glenda Biersbach says
Want to make light bulb people for a Spring Boutique. Thought a lady with spring hat, Uncle Sam using styrofoam cups. How many ounces? I got 4 oz (but too wide) and 6 oz. Thanks
Amanda Formaro says
Hi Glenda. Are you saying you want to use the cup as is on a light bulb? or you want to shrink it like I do in my Spring Bonnet tutorial?
Pat Kinzie says
I went on pintrest a saw everything…WoW… I sent it to my cousin who is a 3rd grade teacher. I’m sure she will find things to make with her class. Great ideas. Love the Turkey lightbulb and what you did with the acorns. Oh, and the bread tags, too cute.
Amanda Formaro says
Thank you Pat! I’m so glad you like everything and it’s helpful! :)
Pat Kinzie says
I just found you on Creative Income, I love Snowmen too! I would like to see the Angel & Penguin. I’m sure they are just as cute. Thanks for the pattern info. Have a wonderful Holiday Season.
wilma hurley says
can use a pipe cleaner for arms ?
Amanda Formaro says
Of course!
Sharon says
This is the cutest light bulb ornament that I’ve ever seen!
Amanda Formaro says
Thank you so much Sharon! :)
Marlena Smith says
Hi there, I have one question that i have yet to have someone solve with regards to using light bulbs in a craft project. What makes this project safe?
Thanks,
Marlena
Amanda Formaro says
I’m not sure if I understand what you mean? Do you mean because the light bulb could break? If so, a round glass ornament could break too, so I don’t think it’s any different in that aspect :)
Barb Platt says
Did I miss the instructions on how to do the nose on the snowman lightbulb?
Amanda Formaro says
Hi Barb! It’s in the last paragraph, just above the “special note”. Here’s the instruction for that :)
With one of the remaining pointed toothpicks that you cut into fourths, glue on for nose.
joyvanna says
if u wount a very smoth serfos nail polish works great for the paint
Adam ochoa says
Tthanks helped me out for school
adam says
This helped be out for School thanks :)
mary maharg says
want to print this pattern, how?
Amanda says
There’s a link just above the list of supplies that says “printable version”. Click on that and you can print it from there :)
Shelby says
I didn’t, and still don’t, have any acrylic paints. And since I don’t have any, I am using oil paints. I mixed white and cerulean blue and used that as my base color, adding patches of pure white for detail. I am still in the process of making them but once they are finished I’ll see if there’s a way to post them as a comment here!
Amanda says
Awesome Shelby! You can always post the pictures on my Facebook fan page! Would love to see them :)
kashfelix says
This is really a gud thing n marvellous job thans for giving me this idea.
Melissa Varney says
I love this. I just finished my first one. Not sure how to sent you a picture.
Amanda Formaro says
You can upload it to my Facebook fan page or click the email icon on my blog to shoot me the picture via email! :)
Gina says
What size child’s sock is needed? Baby, toddler? I am going to make this with 4th, 5th, and 6th grade students.
Amanda Formaro says
Baby or toddler sized work best, yes :)
Janie says
I am anxious to try this Snowman. However, when I printed out the directions I receiver 5 pages I did not want [the comments]. It was not only unwanted but a waste of my ink! Please let me know if I can print without the “comments”. Thank you
Amanda Formaro says
Sorry about that Janie, that’s an older post and I haven’t added the printer friendly version yet. In a case like that, just highlight the area that you want and see if you print setting has a “print highlighted”,. If not, copy and paste it to a plain text editor and print from there :) I’m working on updating these and hope to get it done soon!
Lacy701 says
I use oven bulbs as they are stronger you can even drop them & they usually won’t break,I don’t know if the fridge bulbs are as strong,I may be the heat from the oven tempers them and they get stronger.
Amanda Formaro says
What a great tip, didn’t know that, thanks!
mary says
love snowmen. this one is great. I will definitely make them. thanks so much for your great ideas.
Karen Swank says
This project looks so adorable. I’m going to make a ton of them, in all different colors.
Kristen says
This snowman is my favorite of your bulb ornaments!! So cute :)
jennwa says
Cute cute cute !!!!!!
Amanda says
Thank you for the nice compliment Beth! :)
Beth@The Stories of A to Z says
I have seen lots of lightbulb ornaments but this guy is seriously the cutest!
Amanda says
Thanks Cathy! I'm a big snowman fan myself :)
Cathy (breadexperience) says
Oh! This is too cute! I love snowmen. I need to make this.
Amanda says
Thank you ladies!
Janice says
I see you have two blogs one for cooking and one for crafting – me too! So glad I found your blogs they are great.
Cheryl G. says
That is very CUTE!
Barbara Bakes says
I love this idea! So cute!