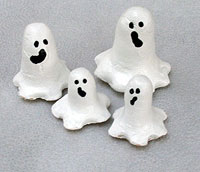
If you make a big batch of dough this salt dough ghost family be a great class project as you will get many ghosts from the dough. These make great windowsill decorations!
You will need
1 cup salt
2 cups all purpose flour
1 cup water
acrylic craft paint in black and white
paint brush
toothpick
black craft pen or marker
cookie sheet
acrylic sealer (optional)
IMPORTANT NOTE: This recipe for salt dough makes a lot of projects. If you only plan on making a few, cut this recipe into fourths or in half.
Preheat oven to 250 F. Mix together, salt, flour, and water until a dough is formed. Knead the dough on a floured surface until the mixture is elastic and smooth. If dough is too sticky, sprinkle with flour, continue to do so until stickiness is gone. BE CAREFUL. Do not add too much flour, this will dry out the dough and will cause it to crack before you get a chance to bake it.
THIS DOUGH IS NOT EDIBLE, though it won’t hurt you or your kids, it just won’t taste very good!
Roll dough in your hands, then roll out a short and fat tube, like a snake.
Stand up tube on cookie sheet and form a ghost with your fingers, making the head portion smaller than the rest of the body.
Use the tip of your finger to create the waves at the bottom of the ghost. To do this, point your finger straight down on the cookie sheet and gently tap into the salt dough to make dents.
Make different sized ghosts, some large for the adults and some small for the children. Use a toothpick to poke eye holes BEFORE placing in the oven.
Bake for approximately 2 – 2.5 hours. Check the bottom of your ghosts for wet spots, if wet, continue cooking in 20 minute increments until dry.
Remove from oven and allow to cool completely. For best results, allow to cool and dry overnight, or for at least 4 hours.
Paint ghosts with white paint. Repeat if needed. Use a toothpick dipped in black paint to add the eyes.
Use black marker to draw on mouths, then fill in with black paint using a paint brush.
Optional Step: You may choose to embellish your ghost family by fashioning bow ties out of scrap pieces of felt and adding a buttons to the front of them with colorful paint.
Let dry completely and spray with acrylic sealer.
Be sure to check out my Pumpkin Painting Party for a fun Halloween party idea!
Salt Dough Ghost Family
Supplies
- 1 cup salt
- 2 cups all purpose flour
- 1 cup water
- acrylic craft paint in black and white
- paint brush
- toothpick
- black craft pen or marker
- cookie sheet
- acrylic sealer optional
Instructions
- Preheat oven to 250 F.
- Mix together, salt, flour, and water until a dough is formed. Knead the dough on a floured surface until the mixture is elastic and smooth. If dough is too sticky, sprinkle with flour, continue to do so until stickiness is gone. BE CAREFUL. Do not add too much flour, this will dry out the dough and will cause it to crack before you get a chance to bake it.
- Roll dough in your hands, then roll out a short and fat tube, like a snake.
- Stand up tube on cookie sheet and form a ghost with your fingers, making the head portion smaller than the rest of the body.
- Use the tip of your finger to create the waves at the bottom of the ghost. To do this, point your finger straight down on the cookie sheet and gently tap into the salt dough to make dents.
- Make different sized ghosts, some large for the adults and some small for the children. Use a toothpick to poke eye holes BEFORE placing in the oven.
- Bake for approximately 2 – 2.5 hours. Check the bottom of your ghosts for wet spots, if wet, continue cooking in 20 minute increments until dry.
- Remove from oven and allow to cool completely. For best results, allow to cool and dry overnight, or for at least 4 hours.
- Paint ghosts with white paint. Repeat if needed. Use a toothpick dipped in black paint to add the eyes.
- Use black marker to draw on mouths, then fill in with black paint using a paint brush.
- Optional Step: You may choose to embellish your ghost family by fashioning bow ties out of scrap pieces of felt and adding a buttons to the front of them with colorful paint.
- Let dry completely and spray with acrylic sealer.
Expert Tips & FAQs
- Watercolor Luminaries - February 11, 2025
- Free Valentine Printables: Cards, toppers, and tags - February 4, 2025
- Valentine Hugs - January 31, 2025


Amanda says
Hi Sharon, there's a link in the post to the instructions, but basically it's 2.5-3 hours :)
Sharon says
how long do you bake these for thank you cute