• Home
  • About
    • About Crafts by Amanda
    • Visit Our Recipe Site
  • Work With Us
  • Join
    • Free Newsletters
    • Join our Facebook craft group
↑
  • Tutorials
    • Tutorial Index
    • Adult Crafts
    • Crafts for Kids
    • Crafts for Seniors
    • Recycled Crafts
    • Seasonal Crafts
    • Holiday Crafts
    • Free Printables
    • Craft Collections
  • Adult Crafts
    • Bath & Body
    • Beach Crafts
    • Clay Pot Crafts
    • Crafts for Seniors
    • Decoupage Crafts for Adults
    • DIY Gift ideas
    • Garden Crafts
    • Home Decor Projects
    • Kitchen Crafts
    • Light Bulb Crafts
    • Luminary Crafts
    • Mason Jar Crafts
    • Needlework
    • Photo Display Ideas
    • Recycled Crafts for Adults
    • Wearable Crafts for Adults
  • Crafts for Kids
    • Animal Crafts for Kids
    • Back to School Crafts
    • Beach Crafts for Kids
    • Camp Crafts
    • Cardboard Tube Crafts for Kids
    • Decoupage Crafts for Kids
    • Easy Crafts for Kids
    • Nature Crafts for Kids
    • Other Kid’s Crafts
    • Paper Plate Crafts for Kids
    • Recycled Crafts for Kids
    • Slimes, Doughs, & Clay
    • Wearable Crafts for Kids
  • Holiday Crafts
    • 4th of July Crafts
    • Christmas Crafts
    • DIY Gift ideas
    • Earth Day Crafts
    • Easter Crafts
    • Father’s Day Crafts
    • Halloween Crafts
    • Memorial Day Crafts
    • Mother’s Day Crafts
    • New Year’s
    • Other Holidays
    • Patriot Day Crafts
    • St. Patrick’s Day Crafts
    • Thanksgiving Crafts
    • Valentine’s Day Crafts
  • Seasonal Crafts
    • Winter Crafts
    • Spring Crafts
    • Summer Crafts
    • Fall Crafts
  • Home
  • About
    • About Crafts by Amanda
    • Visit Our Recipe Site
  • Work With Us
  • Join
    • Free Newsletters
    • Join our Facebook craft group
  • Skip to primary navigation
  • Skip to main content
  • Skip to primary sidebar
  • Skip to footer

Crafts by Amanda

crafts for adults and kid's crafts

  • Tutorials
    • Tutorial Index
    • Adult Crafts
    • Crafts for Kids
    • Crafts for Seniors
    • Recycled Crafts
    • Seasonal Crafts
    • Holiday Crafts
    • Free Printables
    • Craft Collections
  • Adult Crafts
    • Bath & Body
    • Beach Crafts
    • Clay Pot Crafts
    • Crafts for Seniors
    • Decoupage Crafts for Adults
    • DIY Gift ideas
    • Garden Crafts
    • Home Decor Projects
    • Kitchen Crafts
    • Light Bulb Crafts
    • Luminary Crafts
    • Mason Jar Crafts
    • Needlework
    • Photo Display Ideas
    • Recycled Crafts for Adults
    • Wearable Crafts for Adults
  • Crafts for Kids
    • Animal Crafts for Kids
    • Back to School Crafts
    • Beach Crafts for Kids
    • Camp Crafts
    • Cardboard Tube Crafts for Kids
    • Decoupage Crafts for Kids
    • Easy Crafts for Kids
    • Nature Crafts for Kids
    • Other Kid’s Crafts
    • Paper Plate Crafts for Kids
    • Recycled Crafts for Kids
    • Slimes, Doughs, & Clay
    • Wearable Crafts for Kids
  • Holiday Crafts
    • 4th of July Crafts
    • Christmas Crafts
    • DIY Gift ideas
    • Earth Day Crafts
    • Easter Crafts
    • Father’s Day Crafts
    • Halloween Crafts
    • Memorial Day Crafts
    • Mother’s Day Crafts
    • New Year’s
    • Other Holidays
    • Patriot Day Crafts
    • St. Patrick’s Day Crafts
    • Thanksgiving Crafts
    • Valentine’s Day Crafts
  • Seasonal Crafts
    • Winter Crafts
    • Spring Crafts
    • Summer Crafts
    • Fall Crafts
Craft Tutorials | Adult Crafts | Decoupage Crafts for Adults | Tie Dye Decoupage Monogram Frame

Tie Dye Decoupage Monogram Frame

Author by Amanda Davis on August 25, 2010 Updated on July 16, 2019

14 shares
  • Share
  • Tweet
  • Flipboard
  • Email


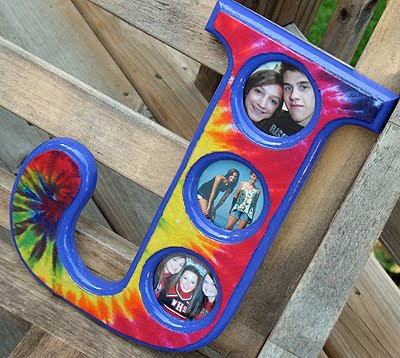
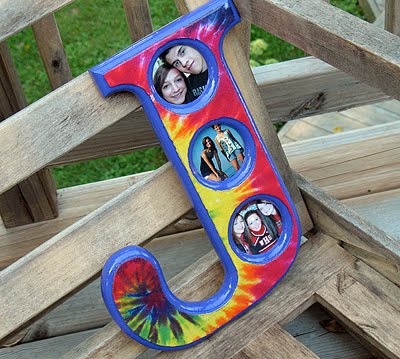
How fun is this letter frame? My daughter found it at the thrift store. There were 3 of them, J, F, and W. She bought the “J” frame as a gift for her friend Jordan, and the “F” for our last name, Formaro. Jordan’s birthday was last month and we made this stenciled frame for her. She’s also the one I made the Spiderman Cake for. A couple of years ago I made my daughter some tie dye wall letters, so Kristen wanted to use that idea for Jordan’s frame. it was the perfect wall art idea for her friend!

Here’s the before and after.

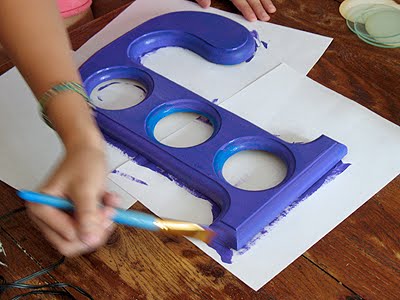
She chose a tie dye shirt she had in her closet and we went to work. First we removed the glass and then she sanded the frame a bit to rough it up and remove the shiny finish. Next she gave it a coat of purple paint.

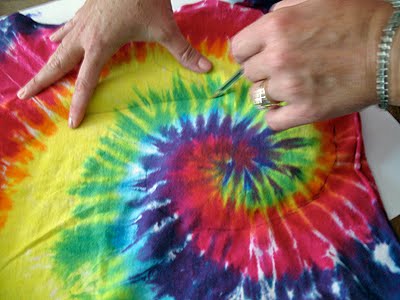
After the paint dried, we laid the shirt over the top, positioned the center swirl over the hook of the “J” and traced around the letter with a pen.

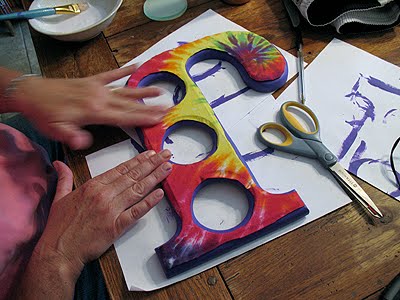
I cut out the letter from the shirt and laid it over the top of the frame. Then I cut openings where the pictures go.

Then I needed to refine it a bit more. So I just used a pen over the top of the shirt and using the frame underneath as a guide, I traced the outline of the frame, leaving a small overlap allowance.

I removed the fabric and painted on some decoupage mixture (white craft glue and water) then place the fabric on top of the frame. I smoothed the fabric with my fingers then painted on a layer of decoupage over the top of the fabric as well.

After allowing the fabric to dry, you stretch the ends of the overhanging fabric out and use a sharp craft knife or box cutter to trim off the excess.


As you can see, t-shirt material does not trim cooperatively. It came out quite jagged and I spent a considerable amount of time cussing refining the edges.

What ended up working in the end was the sand the edges of the fabric, which meant I of course sanded off some of the purple paint as well. So once I was done sanding I touched up the paint and added a coat of Americana’s Triple Thick Gloss Glaze since Kristen wanted it to have a shiny finish.

We let it dry overnight and it’s all ready for gift giving! :) Happy birthday Jordan!


  • Author
  • Recent Posts
Amanda Davis
Amanda Davis is the crafty, entrepreneurial mother of four children. She loves to bake, cook, make kid's crafts and create decorative items for her home. She is a crafting expert and guru in the kitchen and has appeared online and in print publications many times over the years.
Latest posts by Amanda Davis (see all)
  • How to Make a Pom Pom - January 20, 2026
  • Foam Cup Snowmen - January 16, 2026
  • Great Big Button Tree Art - January 14, 2026
14 shares
  • Share
  • Tweet
  • Flipboard
  • Email

Filed Under: Decoupage Crafts for Adults, Decoupage Crafts for Kids, Home Decor Projects, Photo Display Ideas Tagged With: adult, adult craft ideas, adult crafts, adults, crafts for adults, decor, decoupage, frame, home decor, kid's crafts, painting

Reader Interactions

Free CraftsBy email every week

Latest crafts straight to your inbox!

Comments

  1. Sara says

    October 19, 2011 at 4:45 pm

    If you coat the fabric with decoupage glue first it will prevent the fabric from fraying and let you cut smoother lines. I use this technique for anything I decoupage with fabric and it really helps!

    Reply
    • Amanda Formaro says

      October 19, 2011 at 9:24 pm

      Yes! Great tip, I actually always do this now. I didn’t know that back when i made this then Amy from Mod Podge Rocks told me about it :) Thanks!

      Reply
  2. Amanda says

    September 17, 2010 at 7:16 pm

    Haha Wendy! Maybe so, but then it wouldn't be as fun LOL

    Reply
  3. Wendy Piersall says

    September 17, 2010 at 1:54 pm

    I wonder if paper printed as tie dye would make you cuss a lot less. :)

    Reply
  4. Michele says

    September 1, 2010 at 2:13 am

    that turned out so well! i love gifts that are this personalized! great idea and good job!

    Reply
  5. Katie's Nesting Spot says

    August 29, 2010 at 2:58 am

    I love those letters, I've never seen ones with spaces for pictures. What a fantastic gift you daughter made.

    Reply
  6. Jami says

    August 29, 2010 at 1:52 am

    Love it! Very cool!
    smiles!

    Reply
  7. Megan says

    August 28, 2010 at 2:21 pm

    Love the the tie dye! What a great thrift store find!!

    Reply
  8. Michelle says

    August 28, 2010 at 2:34 am

    What a clever idea! I bet Jordan loves it.

    Reply
  9. Daily Freebies says

    August 27, 2010 at 11:48 pm

    That's awesome! Looks very unique! Great job!

    Reply
  10. Allison Shops says

    August 27, 2010 at 10:12 pm

    Cute – love the bright colors.

    I wanted to let you know about Atticmag's new linky party – Giveaway Friday! It's a convenient place for bloggers to link their giveaways each week. We've kicked it off with a fantastic giveaway of our own. Five lucky winners will win material to do a backsplash in their homes. Hope to see you there!

    Allison
    Atticmag

    Reply
  11. Amanda says

    August 27, 2010 at 7:51 pm

    Thanks ladies!

    Miri – Usually 2/3 glue 1/3 water, but just add water until it's a good painting consistency :) Thanks for the compliments!!

    Reply
  12. Miri says

    August 27, 2010 at 7:14 pm

    This is terrific! Cute and personal! Thanks for the recipe for decoupage mixture…I'm overseas and I just can't buy a ready mixture.
    How much water to glue-would half and half be about right?

    Reply
  13. KKL Primitives says

    August 27, 2010 at 2:54 pm

    How neat!! My grand daughter would love that!
    I wanted to stop by to say hello and to also thank you for featuring my glitter pears on 'Craft Gossip' – what a nice surprise!!!

    ~Neenee~
    The Krazy Kraft Lady

    Reply
  14. Quilting in My Pyjamas says

    August 27, 2010 at 1:30 pm

    This looks so cool, and is such an original idea.

    I thought I was the only person in Blogland that cussed and confessed. (I'm doubly glad I stopped by)

    Reply
  15. malia says

    August 26, 2010 at 5:45 pm

    Hi Amanda, Really good original idea! I bet she'll love it!

    Reply
  16. Angie @ The Country Chic Cottage says

    August 26, 2010 at 4:37 pm

    That letter is awesome!! My daughters would love that!! Thanks for sharing! Great idea to use the tshirt!

    Reply
  17. Ann Sheafer says

    August 25, 2010 at 7:49 pm

    Very very cute. Think I'll make one of these for my daughter's room.

    Reply

Leave a Reply Cancel reply

Your email address will not be published. Required fields are marked *

Rate This Project


The maximum upload file size: 640 MB. You can upload: image, video. Links to YouTube, Facebook, Twitter and other services inserted in the comment text will be automatically embedded. Drop files here

Primary Sidebar

Hi! I’m Amanda and I’m the founder and head designer of Crafts by Amanda. I have spent over 25 years creating projects to share, but it’s not just me anymore! It’s turned into a complete family affair. Come and meet the Creative Team!

Free CraftsBy email every week

Latest crafts straight to your inbox!

All Time Favorites

snowy pinecone candle jar luminaries

Winter Luminaries: Snowy Pinecone…

Make pretty winter luminaries that appear to be covered ... Go To project

Make this wonderful deco mesh pumpkin wreath to hang on your door this fall!

Deco Mesh Pumpkin Wreath…

Adorn your door this fall with a pretty deco mesh ... Go To project

Learn to make these adorable ladybug painted rocks. use special outdoor paint for this adorable garden craft so you can keep garden ladybugs all summer!

Ladybug Painted Rocks…

These colorful little ladybug painted rocks are the ... Go To project

Reuse those empty prescription pill bottles in all sorts of ways. From organizing to making cookies. Yes, cookies! See how to use your empty pill bottles!

20 Uses for Prescription Pill…

You've been collecting prescription pill bottles for ... Go To project

Meet the Family

Amanda

Founder and Designer

Kristen

Editorial Manager

Lindsay

Social Media Manager

As seen on:

Footer

Favorites

  • Jar Photo Frames
  • No-Sew Roman Shade
  • Paper Flowers
  • How to Make a Scrunchie
  • Mermaid Slime

About

  • Home
  • Meet the Creative Team
  • Work with Us
  • Privacy Policy
  • Accessibility
  • Contact Us

Images/text copyright Amanda Davis 2025. To feature a post from Crafts by Amanda, you may use one photo credited and linked back directly to the project post.

Free CraftsBy email every week

Latest crafts straight to your inbox!

Copyright ©2026, Crafts by Amanda. All Rights Reserved.
Design by Pixel Me Designs