• Home
  • About
    • About Crafts by Amanda
    • Visit Our Recipe Site
  • Work With Us
  • Join
    • Free Newsletters
    • Join our Facebook craft group
↑
  • Tutorials
    • Tutorial Index
    • Adult Crafts
    • Crafts for Kids
    • Crafts for Seniors
    • Recycled Crafts
    • Seasonal Crafts
    • Holiday Crafts
    • Free Printables
    • Craft Collections
  • Adult Crafts
    • Bath & Body
    • Beach Crafts
    • Clay Pot Crafts
    • Crafts for Seniors
    • Decoupage Crafts for Adults
    • DIY Gift ideas
    • Garden Crafts
    • Home Decor Projects
    • Kitchen Crafts
    • Light Bulb Crafts
    • Luminary Crafts
    • Mason Jar Crafts
    • Needlework
    • Photo Display Ideas
    • Recycled Crafts for Adults
    • Wearable Crafts for Adults
  • Crafts for Kids
    • Animal Crafts for Kids
    • Back to School Crafts
    • Beach Crafts for Kids
    • Camp Crafts
    • Cardboard Tube Crafts for Kids
    • Decoupage Crafts for Kids
    • Easy Crafts for Kids
    • Nature Crafts for Kids
    • Other Kid’s Crafts
    • Paper Plate Crafts for Kids
    • Recycled Crafts for Kids
    • Slimes, Doughs, & Clay
    • Wearable Crafts for Kids
  • Holiday Crafts
    • 4th of July Crafts
    • Christmas Crafts
    • DIY Gift ideas
    • Earth Day Crafts
    • Easter Crafts
    • Father’s Day Crafts
    • Halloween Crafts
    • Memorial Day Crafts
    • Mother’s Day Crafts
    • New Year’s
    • Other Holidays
    • Patriot Day Crafts
    • St. Patrick’s Day Crafts
    • Thanksgiving Crafts
    • Valentine’s Day Crafts
  • Seasonal Crafts
    • Winter Crafts
    • Spring Crafts
    • Summer Crafts
    • Fall Crafts
  • Skip to primary navigation
  • Skip to main content
  • Skip to primary sidebar
  • Skip to footer

Crafts by Amanda

crafts for adults and kid's crafts

  • Tutorials
    • Tutorial Index
    • Adult Crafts
    • Crafts for Kids
    • Crafts for Seniors
    • Recycled Crafts
    • Seasonal Crafts
    • Holiday Crafts
    • Free Printables
    • Craft Collections
  • Adult Crafts
    • Bath & Body
    • Beach Crafts
    • Clay Pot Crafts
    • Crafts for Seniors
    • Decoupage Crafts for Adults
    • DIY Gift ideas
    • Garden Crafts
    • Home Decor Projects
    • Kitchen Crafts
    • Light Bulb Crafts
    • Luminary Crafts
    • Mason Jar Crafts
    • Needlework
    • Photo Display Ideas
    • Recycled Crafts for Adults
    • Wearable Crafts for Adults
  • Crafts for Kids
    • Animal Crafts for Kids
    • Back to School Crafts
    • Beach Crafts for Kids
    • Camp Crafts
    • Cardboard Tube Crafts for Kids
    • Decoupage Crafts for Kids
    • Easy Crafts for Kids
    • Nature Crafts for Kids
    • Other Kid’s Crafts
    • Paper Plate Crafts for Kids
    • Recycled Crafts for Kids
    • Slimes, Doughs, & Clay
    • Wearable Crafts for Kids
  • Holiday Crafts
    • 4th of July Crafts
    • Christmas Crafts
    • DIY Gift ideas
    • Earth Day Crafts
    • Easter Crafts
    • Father’s Day Crafts
    • Halloween Crafts
    • Memorial Day Crafts
    • Mother’s Day Crafts
    • New Year’s
    • Other Holidays
    • Patriot Day Crafts
    • St. Patrick’s Day Crafts
    • Thanksgiving Crafts
    • Valentine’s Day Crafts
  • Seasonal Crafts
    • Winter Crafts
    • Spring Crafts
    • Summer Crafts
    • Fall Crafts
Craft Tutorials | Holiday Crafts | Halloween Crafts | Bullseye Costume
Halloween Crafts

Bullseye Costume

Author by Amanda Davis on October 10, 2018 Updated on August 13, 2019

5 from 4 votes
Use duct tape to create this funny bullseye Halloween costume kids will love. Step by step instructions for using duck tape to create arrow hat & bullseye.
Jump to Project
Use duct tape to create this funny bullseye Halloween costume kids will love. Step by step instructions for using duck tape to create arrow hat & bullseye.
223 shares
  • Share
  • Tweet
  • Flipboard
  • Email

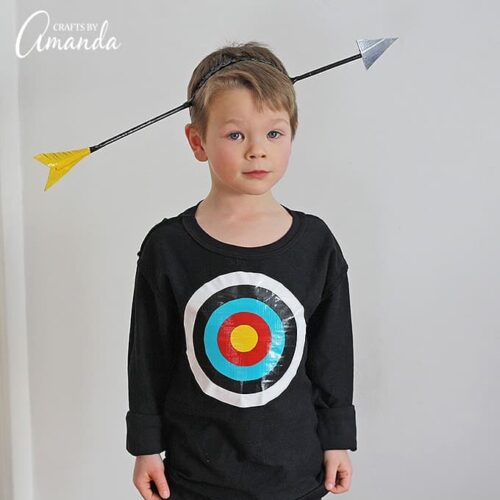
Need a last minute Halloween costume? Neighborhood kids will crack up when they see you coming in this homemade duct tape bullseye costume! Kids will love wearing the arrow on their head, and making the bullseye is much easier than you might think. Parchment paper allows you to create your own target sticker.

Duct Tape Bullseye Costume


Duct Tape Bullseye Costume

This bullseye costume project comes from my book, Duct Tape Mania, which was released a couple of years ago. There are about 50 different duct tape crafts that you can make and it would be the perfect holiday gift for a special child in your life!


This bullseye costume is especially fun for the silly-willy elementary school set. They’ll giggle and laugh about the goofy arrow headband!

Duct Tape Bullseye Costume

To Make this Bullseye Costume you need:

  • 30-inch piece of parchment paper
  • Duct tape: white, black, blue, red, yellow and silver
  • 2 pipe cleaners
  • 2 drinking straws
  • Headband
  • Recycled cardboard rectangle (approximately 3” x 4”)
  • Scissors
  • Cutting Mat
  • Craft knife
  • download the printable bullseye pattern here


FULL PRINTABLE INSTRUCTIONS AND SUPPLY LIST AT THE END

Here’s what you do:

How to make a duct tape bullseye costume

Place target pattern underneath the parchment paper.

Cutting duct tape

Measure and cut a strip of yellow tape long enough to cover the size of the center yellow circle and stick it to the parchment paper.

Measure and cut two strips of red tape long enough to cover the size of the red section of the target. Stick one strip to the parchment and lay the second strip slightly overlapping the first, creating a small sheet.

Cutting duct tape

Repeat this step for the remaining colors of the target, increasing each in size, ensuring your duct tape sheets are large enough to cover their corresponding target colors.

Take the pattern out from underneath the parchment paper. Roll a small piece of tape, sticky side out, and stick it to the back-center of the target.

Take your white sheet, leaving on the parchment paper backing, and stick the target to the white sheet. Using the target as your guide, cut around the white section of the target to cut out a circle from the white tape sheet.

Cutting out bullseye

Repeat this step for each color, working from the outside of the target inward (i.e. your next color will be black, then blue, and so on).

Cutting duct tape into circles

Now that all of your circles are cut out, be sure to leave the parchment backing on the white circle until you are ready to actually use the target on clothing.

Use duct tape to create this funny bullseye costume kids will love. Step by step instructions for using duck tape to create arrow hat & bullseye.

Remove the parchment backing from the black circle. Stick the black circle to the center of the white circle.

Remove the parchment backing from the blue circle and stick it to the center of the black circle.

Use duct tape to create this funny bullseye costume kids will love. Step by step instructions for using duck tape to create arrow hat & bullseye.

Remove parchment from the red circle and stick it to the blue circle.

Remove the parchment from the yellow circle and stick it to the red circle.

Remove the parchment from the back of the target and press it onto child’s shirt.

To make the arrow, wrap a pipe cleaner around one side of the headband, leaving a long end for the arrow tail. Repeat this process for the other side of the headband for the arrow tip, making this side a little shorter.

Creating a bullseye costume headband

Slide drinking straws onto each pipe cleaner, trimming the straws where needed. This will give the arrow some stability.

Cut an elongated triangle from the cardboard. Reserve the remaining pieces for the tail of the arrow.

Cover the triangle with silver duct tape.

Take the reserved cardboard and line up the straight sides together to form the feather tail. Cover the tail in yellow duct tape and cut small slits in the edges to look like a feather.

Cover each straw/pipe cleaner with black duct tape, attaching the tail and arrow with tape as well.

Duct tape bullseye costume

There you have it, the easiest bullseye costume ever!

Duct tape bullseye costume

If you like the idea of using duct tape to make a costume, check out my prisoner costume as well! Happy Halloween!

Use duct tape to create this funny bullseye Halloween costume kids will love. Step by step instructions for using duck tape to create arrow hat & bullseye.
Print Project
5 from 4 votes

Bullseye Costume

Use duct tape to create this funny bullseye Halloween costume kids will love. Step by step instructions for using duck tape to create arrow hat & bullseye.
Author: Amanda Formaro

Supplies

  • 30- inch piece of parchment paper
  • Duct tape: white black, blue, red, yellow and silver
  • 2 pipe cleaners
  • 2 drinking straws
  • Headband
  • Recycled cardboard rectangle approximately 3” x 4”
  • Scissors
  • Cutting mat
  • Craft knife

Instructions

  • Place target pattern underneath the parchment paper.
  • Measure and cut a strip of yellow tape long enough to cover the size of the center yellow circle and stick it to the parchment paper.
  • Measure and cut two strips of red tape long enough to cover the size of the red section of the target. Stick one strip to the parchment and lay the second strip slightly overlapping the first, creating a small sheet.
  • Repeat step 3 for the remaining colors of the target, increasing each in size, ensuring your duct tape sheets are large enough to cover their corresponding target colors.
  • Take the pattern out from underneath the parchment paper. Roll a small piece of tape, sticky side out, and stick it to the back-center of the target.
  • Take your white sheet, leaving on the parchment paper backing, and stick the target to the white sheet. Using the target as your guide, cut around the white section of the target to cut out a circle from the white tape sheet.
  • Repeat step 6 for each color, working from the outside of the target inward (i.e. your next color will be black, then blue, and so on).
  • Now that all of your circles are cut out, be sure to leave the parchment backing on the white circle until you are ready to actually use the target on clothing.
  • Remove the parchment backing from the black circle. Stick the black circle to the center of the white circle.
  • Remove the parchment backing from the blue circle and stick it to the center of the black circle.
  • Remove parchment from the red circle and stick it to the blue circle.
  • Remove the parchment from the yellow circle and stick it to the red circle.
  • Remove the parchment from the back of the target and press it onto child’s shirt.
  • To make the arrow, wrap a pipe cleaner around one side of the headband, leaving a long end for the arrow tail. Repeat this process for the other side of the headband for the arrow tip, making this side a little shorter.
  • Slide drinking straws onto each pipe cleaner, trimming the straws where needed. This will give the arrow some stability.
  • Cut an elongated triangle from the cardboard. Reserve the remaining pieces for the tail of the arrow.
  • Cover the triangle with silver duct tape.
  • Take the reserved cardboard and line up the straight sides together to form the feather tail. Cover the tail in yellow duct tape and cut small slits in the edges to look like a feather.
  • Cover each straw/pipe cleaner with black duct tape, attaching the tail and arrow with tape as well.
Duct Tape Bullseye Costume


  • Author
  • Recent Posts
Amanda Davis
Amanda Davis is the crafty, entrepreneurial mother of four children. She loves to bake, cook, make kid's crafts and create decorative items for her home. She is a crafting expert and guru in the kitchen and has appeared online and in print publications many times over the years.
Latest posts by Amanda Davis (see all)
  • Paper Plate Aquarium Craft - June 17, 2025
  • Patriotic Bandana Wreath - June 13, 2025
  • Ladybug Painted Rocks - June 10, 2025
223 shares
  • Share
  • Tweet
  • Flipboard
  • Email

Filed Under: Halloween Crafts Tagged With: costume, duck tape, duct tape, halloween, halloween costume, holidays

Reader Interactions

Free CraftsBy email every week

Latest crafts straight to your inbox!

5 from 4 votes (4 ratings without comment)

Leave a Reply Cancel reply

Your email address will not be published. Required fields are marked *

Rate This Project


The maximum upload file size: 640 MB. You can upload: image, video. Links to YouTube, Facebook, Twitter and other services inserted in the comment text will be automatically embedded. Drop files here

Primary Sidebar

Hi! I’m Amanda and I’m the founder and head designer of Crafts by Amanda. I have spent over 25 years creating projects to share, but it’s not just me anymore! It’s turned into a complete family affair. Come and meet the Creative Team!

Free CraftsBy email every week

Latest crafts straight to your inbox!

All Time Favorites

Learn to make these adorable ladybug painted rocks. use special outdoor paint for this adorable garden craft so you can keep garden ladybugs all summer!

Ladybug Painted Rocks…

These colorful little ladybug painted rocks are the ... Go To project

snowy pinecone candle jar luminaries

Winter Luminaries: Snowy Pinecone…

Make pretty winter luminaries that appear to be covered ... Go To project

Make this wonderful deco mesh pumpkin wreath to hang on your door this fall!

Deco Mesh Pumpkin Wreath…

Adorn your door this fall with a pretty deco mesh ... Go To project

Reuse those empty prescription pill bottles in all sorts of ways. From organizing to making cookies. Yes, cookies! See how to use your empty pill bottles!

20 Uses for Prescription Pill…

You've been collecting prescription pill bottles for ... Go To project

Meet the Family

Amanda

Founder and Designer

Kristen

Editorial Manager

Lindsay

Social Media Manager

As seen on:

Footer

Favorites

  • Jar Photo Frames
  • No-Sew Roman Shade
  • Paper Flowers
  • How to Make a Scrunchie
  • Mermaid Slime

About

  • Home
  • Meet the Creative Team
  • Work with Us
  • Privacy Policy
  • Accessibility
  • Contact Us

Images/text copyright Amanda Formaro 2020. To feature a post from Crafts by Amanda, you may use one photo credited and linked back directly to the project post.

Free CraftsBy email every week

Latest crafts straight to your inbox!

Copyright ©2025, Crafts by Amanda. All Rights Reserved.
Design by Pixel Me Designs

Rate This Tutorial

Your vote:


To share a photo with your comment click here!

A rating is required
A name is required
An email is required

Recipe Ratings without Comment

Something went wrong. Please try again.