
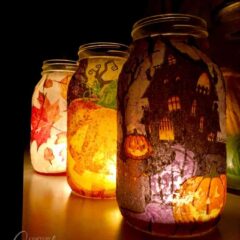
I’m all about luminaries and have made many different kinds over the years. These fall napkin luminaries make use of pretty fall and Halloween paper napkins that you can find at dollar stores, big box stores, and even the grocery store.

How to Make Fall Napkin Luminaries
If you’re looking for an easy project for girls’ night, need something seniors can make, or just want to add something to your home decor this fall, these Halloween and fall napkin luminaries are a great choice!

Mod Podge Tips
Before you get started, and especially if you didn’t watch the detailed video where I give tips, please be sure to read through these first:
- Don’t use white glue and water – while this solution does work, it can yellow over time. Mod Podge (and other decoupage mediums) is formulated to prevent yellowing. See our post on How To Choose The Best Glue for Your Craft Projects for more tips!
- Do “prime” your jar first by applying a thin layer of Mod Podge. This will make the glass tacky and will make it easier to apply the napkin.
- Separate double-ply napkins if you have them. The ones I used in this tutorial were sturdy one-ply napkins.
- Apply Mod Podge gently and with a light touch over the napkin to avoid ripping it. Remember, decoupage medium is a liquid and napkins are delicate. Using a heavy hand can cause damage to your pretty design!
- When applying the Mod Podge, use a generous amount but not so much that dripping occurs.
- Be sure to allow your finished project to dry completely (overnight is best) before adding a candle and displaying.
- Always store your Mod Podge with a tight-fitting lid and in a cool place out of reach of children.
- Placing your wet decoupage projects onto a wire cooling rack keeps them from sticking to your table!

How to make Halloween and fall napkin luminaries
Simply scroll to the end of this post for the full printable tutorial and supply list.
- Wash and dry your glass jar.
- Prepare your paper napkins by separating ply (if needed) and cutting out designs.
- Apply a thin coat of Mod Podge to the front of your jar.
- Lay jar on its side with the wet side facing up.
- Place napkin onto the jar, pressing gently from the center outward.
- Apply Mod Podge to the bottom, side edges and rim.
- Using a gentle hand, apply a coat of Mod Podge over the top of the entire napkin.
- Repeat steps on the back side of the jar.
- Allow everything to dry completely (overnight is best) before displaying and adding a candle.
- You can decorate the rim with burlap, ribbon or twine, but this step is completely optional.
Be sure to watch the video in this post for help with this project!

More Fall Craft Ideas
We have plenty of fall and Halloween craft projects on this blog, but here are some we handpicked for you!
- Fall Mason Jars
- Burlap Pumpkin Wreath
- Wood Slice Pumpkin Chalkboard
- Mason Jar Lid Pumpkins
- Decomesh Pumpkin Wreath
- Pumpkin Grapevine Wreath
- Stacked Plastic Pumpkins
And be sure to check out this large collection of homemade Halloween decorating ideas!

I love to create and share my projects with you! I know it’s hard to remember to come back and search, so I’ve made it easy for you with my weekly newsletter! You can subscribe for free and I’ll send you fun crafts and delicious recipes every week right to your email.
Fall Napkin Luminaries
Supplies
- Paper napkins
- Mod Podge
- Glass jar
Craft tools
- Large paintbrush
Instructions
- Wash and dry your glass jar.
- Prepare your paper napkins by separating ply (if needed) and cutting out designs.
- Apply a thin coat of Mod Podge to the front of your jar.
- Lay jar on its side with the wet side facing up.
- Place napkin onto the jar, pressing gently from the center outward.
- Apply Mod Podge to the bottom, side edges and rim.
- Using a gentle hand, apply a coat of Mod Podge over the top of the entire napkin.
- Repeat steps on the back side of the jar.
- Allow everything to dry completely (overnight is best) before displaying and adding a candle.
- You can decorate the rim with burlap, ribbon or twine, but this step is completely optional.
Video
Expert Tips & FAQs
- Don’t use white glue and water – while this solution does work, it can yellow over time. Mod Podge (and other decoupage mediums) is formulated to prevent yellowing. See our post on How To Choose The Best Glue for Your Craft Projects for more tips!
- Do “prime” your jar first by applying a thin layer of Mod Podge. This will make the glass tacky and will make it easier to apply the napkin.
- Separate double ply napkins if you have them. The ones I used in this tutorial were sturdy one-ply napkins.
- Apply Mod Podge gently and with a light touch over the napkin to avoid ripping it. Remember, decoupage medium is a liquid and napkins are delicate. Using a heavy hand can cause damage to your pretty design!
- When applying the Mod Podge, use a generous amount but not so much that dripping occurs.
- Be sure to allow your finished project to dry completely (overnight is best) before adding a candle and displaying.
- Always store your Mod Podge with a tight-fitting lid and in a cool place out of reach of children.
- Placing your wet decoupage projects onto a wire cooling rack keeps them from sticking to your table!
This post originally appeared here on Oct 2, 2018.
- Swirling Twirling Ladybugs - July 21, 2026
- Drip Tie Dye Backpack - July 17, 2026
- Mini Coastal Clay Houses - July 14, 2026


Sharon says
Would work with any holiday napkin too. Love these.
Carrie says
Very nice!
Melissa says
I have a question. I have some Halloween window clings that are plastic. Can I use those instead of the napkins? That would be so much easier to work with than a paper napkin. I love this idea though and thank you for the video.
Lisa says
Would this work with plastic mason jars?
Thank you
Lisa says
These turned out great. Found a haunted house napkin, very similar to example. Made one with fall leaves. Looks like stained glass. Planning to make some for Christmas, as a girls night craft.
Sue says
These look absolutely lovely and very atmospheric. I am having trouble applying napkins on glass like this. It appears that if air is under the napkin… then white paper splodges appear when dry. I dont mind creases so much but the bottles look rubbish with these dry/air bubble patches. I have ripped napkins off four bottles so far after spending ages on them. Is it that my modge podge is too thick or thin? Should I let the primer layer dry or not? Or maybe the napkins aren’t good enough? Or am I too stingy with the modge podge? I have tried with a primer layer and without. The napkins seem to stretch so that I either let them crease or risk ripping to try to get them smooth to prevent the air bubbles. Any advice for this novice?
Melissa says
Hi- so cute! we are going to try these today- would glossy or matte modge Podge be best for this?
Amanda Formaro says
I think matte looks better!
Tami says
What size jar works bezt? Also which ModPodge to use I see they have one to paper would that work better?
Amanda Formaro says
You an use the paper mod podge, but regular mod podge works just fine! I used a 32-oz jar, but as long as the napkin fits the jar it doesn’t matter!
Theresa Sutton says
Hi Amanda. Where did you find your jars? I’ve been finding the embossed ones, but not clear ones.
Amanda Formaro says
I think I just bought them at Walmart. I think they were Ball jars, which were embossed, but only on one side.
Nancy Davis says
Love these luminaries! Can’t wait to go shop for napkins!
Thanks Amanda
Amanda Formaro says
Thanks Nancy!
Martha J Darbonne says
Have you ever had to lightly wash any Mod Podge luminary if the outside has gotten dirty? Please advise; thanks!
Amanda Formaro says
Yes! I just use a damp cloth making sure the cloth is not saturated, but completely wrung out.
Cindy says
What do you use for the light?
Thanks
Cindy
Amanda Formaro says
Hi Cindy! I used regular tea light candles (flame) but you can use battery operated tea lights or string lights!
Cindy says
Hi Amanda. Could this be done to drinking glasses? Im thinking some glasses..
Amanda Formaro says
Yes, but if you plan to use them for actually drinking out of I would leave about an inch at the top of the glass without any napkin or decoupage. Also, Mod Podge makes a dishwasher formula!
Olivia Free says
Hi Amanda, this idea is absolutely amazing. I’m actually planning to make one (but not of a Halloween design) It’s for my surprise anniversary date with my husband. I found something similar on escorts awesome London date ideas but it didn’t really explain how to make it. Thank you for being the missing link! You’re awesome.
Amanda Formaro says
How fun, so glad it was helpful!!
Charissa Blackburn says
Just found your site and I am very happy I did!! Thank you!!! Can you use Modge Podge over salt dough imprints for a glossy shine? I will be staying tuned to your sight. Thanks again!!! ;0
Amanda Formaro says
Yes I believe that would work! A gloss clear paint or clear sealer would work too! Glad you like the site, thank you!!
Barbara says
AWESOME ??. ???????
Amanda Formaro says
:):)
Darlene Traskie says
Love the jar idea but I was wondering can you use a votive candle inside ??
Amanda Formaro says
Yes! However a votive candle will spill wax over the side as it melts down, causing the candle to get stuck in the bottom of the jar. So you may want to place the votive inside a votive holder first. Another thing you could do is pour about an inch of epsom salt or sand in the bottom of the jar first. That way the wax won’t stick to the bottom of the jar ;)
Pamela says
Hi, I was wondering if these could be used outdoor? Thank you they are beautiful!
Amanda Formaro says
There is a Mod Podge outdoor formula that should work for this! Here’s a link to that – https://amzn.to/2Ozjgpl
Amanda Formaro says
And thank you! :)