• Home
  • About
    • About Crafts by Amanda
    • Visit Our Recipe Site
  • Work With Us
  • Join
    • Free Newsletters
    • Join our Facebook craft group
↑
  • Tutorials
    • Tutorial Index
    • Adult Crafts
    • Crafts for Kids
    • Crafts for Seniors
    • Recycled Crafts
    • Seasonal Crafts
    • Holiday Crafts
    • Free Printables
    • Craft Collections
  • Adult Crafts
    • Bath & Body
    • Beach Crafts
    • Clay Pot Crafts
    • Crafts for Seniors
    • Decoupage Crafts for Adults
    • DIY Gift ideas
    • Garden Crafts
    • Home Decor Projects
    • Kitchen Crafts
    • Light Bulb Crafts
    • Luminary Crafts
    • Mason Jar Crafts
    • Needlework
    • Photo Display Ideas
    • Recycled Crafts for Adults
    • Wearable Crafts for Adults
  • Crafts for Kids
    • Animal Crafts for Kids
    • Back to School Crafts
    • Beach Crafts for Kids
    • Camp Crafts
    • Cardboard Tube Crafts for Kids
    • Decoupage Crafts for Kids
    • Easy Crafts for Kids
    • Nature Crafts for Kids
    • Other Kid’s Crafts
    • Paper Plate Crafts for Kids
    • Recycled Crafts for Kids
    • Slimes, Doughs, & Clay
    • Wearable Crafts for Kids
  • Holiday Crafts
    • 4th of July Crafts
    • Christmas Crafts
    • DIY Gift ideas
    • Earth Day Crafts
    • Easter Crafts
    • Father’s Day Crafts
    • Halloween Crafts
    • Memorial Day Crafts
    • Mother’s Day Crafts
    • New Year’s
    • Other Holidays
    • Patriot Day Crafts
    • St. Patrick’s Day Crafts
    • Thanksgiving Crafts
    • Valentine’s Day Crafts
  • Seasonal Crafts
    • Winter Crafts
    • Spring Crafts
    • Summer Crafts
    • Fall Crafts
  • Skip to primary navigation
  • Skip to main content
  • Skip to primary sidebar
  • Skip to footer

Crafts by Amanda

crafts for adults and kid's crafts

  • Tutorials
    • Tutorial Index
    • Adult Crafts
    • Crafts for Kids
    • Crafts for Seniors
    • Recycled Crafts
    • Seasonal Crafts
    • Holiday Crafts
    • Free Printables
    • Craft Collections
  • Adult Crafts
    • Bath & Body
    • Beach Crafts
    • Clay Pot Crafts
    • Crafts for Seniors
    • Decoupage Crafts for Adults
    • DIY Gift ideas
    • Garden Crafts
    • Home Decor Projects
    • Kitchen Crafts
    • Light Bulb Crafts
    • Luminary Crafts
    • Mason Jar Crafts
    • Needlework
    • Photo Display Ideas
    • Recycled Crafts for Adults
    • Wearable Crafts for Adults
  • Crafts for Kids
    • Animal Crafts for Kids
    • Back to School Crafts
    • Beach Crafts for Kids
    • Camp Crafts
    • Cardboard Tube Crafts for Kids
    • Decoupage Crafts for Kids
    • Easy Crafts for Kids
    • Nature Crafts for Kids
    • Other Kid’s Crafts
    • Paper Plate Crafts for Kids
    • Recycled Crafts for Kids
    • Slimes, Doughs, & Clay
    • Wearable Crafts for Kids
  • Holiday Crafts
    • 4th of July Crafts
    • Christmas Crafts
    • DIY Gift ideas
    • Earth Day Crafts
    • Easter Crafts
    • Father’s Day Crafts
    • Halloween Crafts
    • Memorial Day Crafts
    • Mother’s Day Crafts
    • New Year’s
    • Other Holidays
    • Patriot Day Crafts
    • St. Patrick’s Day Crafts
    • Thanksgiving Crafts
    • Valentine’s Day Crafts
  • Seasonal Crafts
    • Winter Crafts
    • Spring Crafts
    • Summer Crafts
    • Fall Crafts
Craft Tutorials | Adult Crafts | Needlework | Crochet Headbands: Woodland Animal Ears
Needlework

Crochet Headbands: Woodland Animal Ears

Author by Bethany Dearden on June 16, 2017 Updated on December 31, 2021

8632 shares
  • Share
  • Tweet
  • Flipboard
  • Email

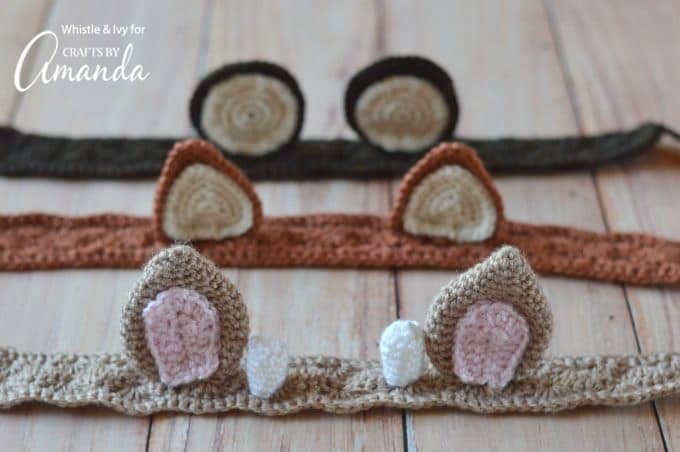
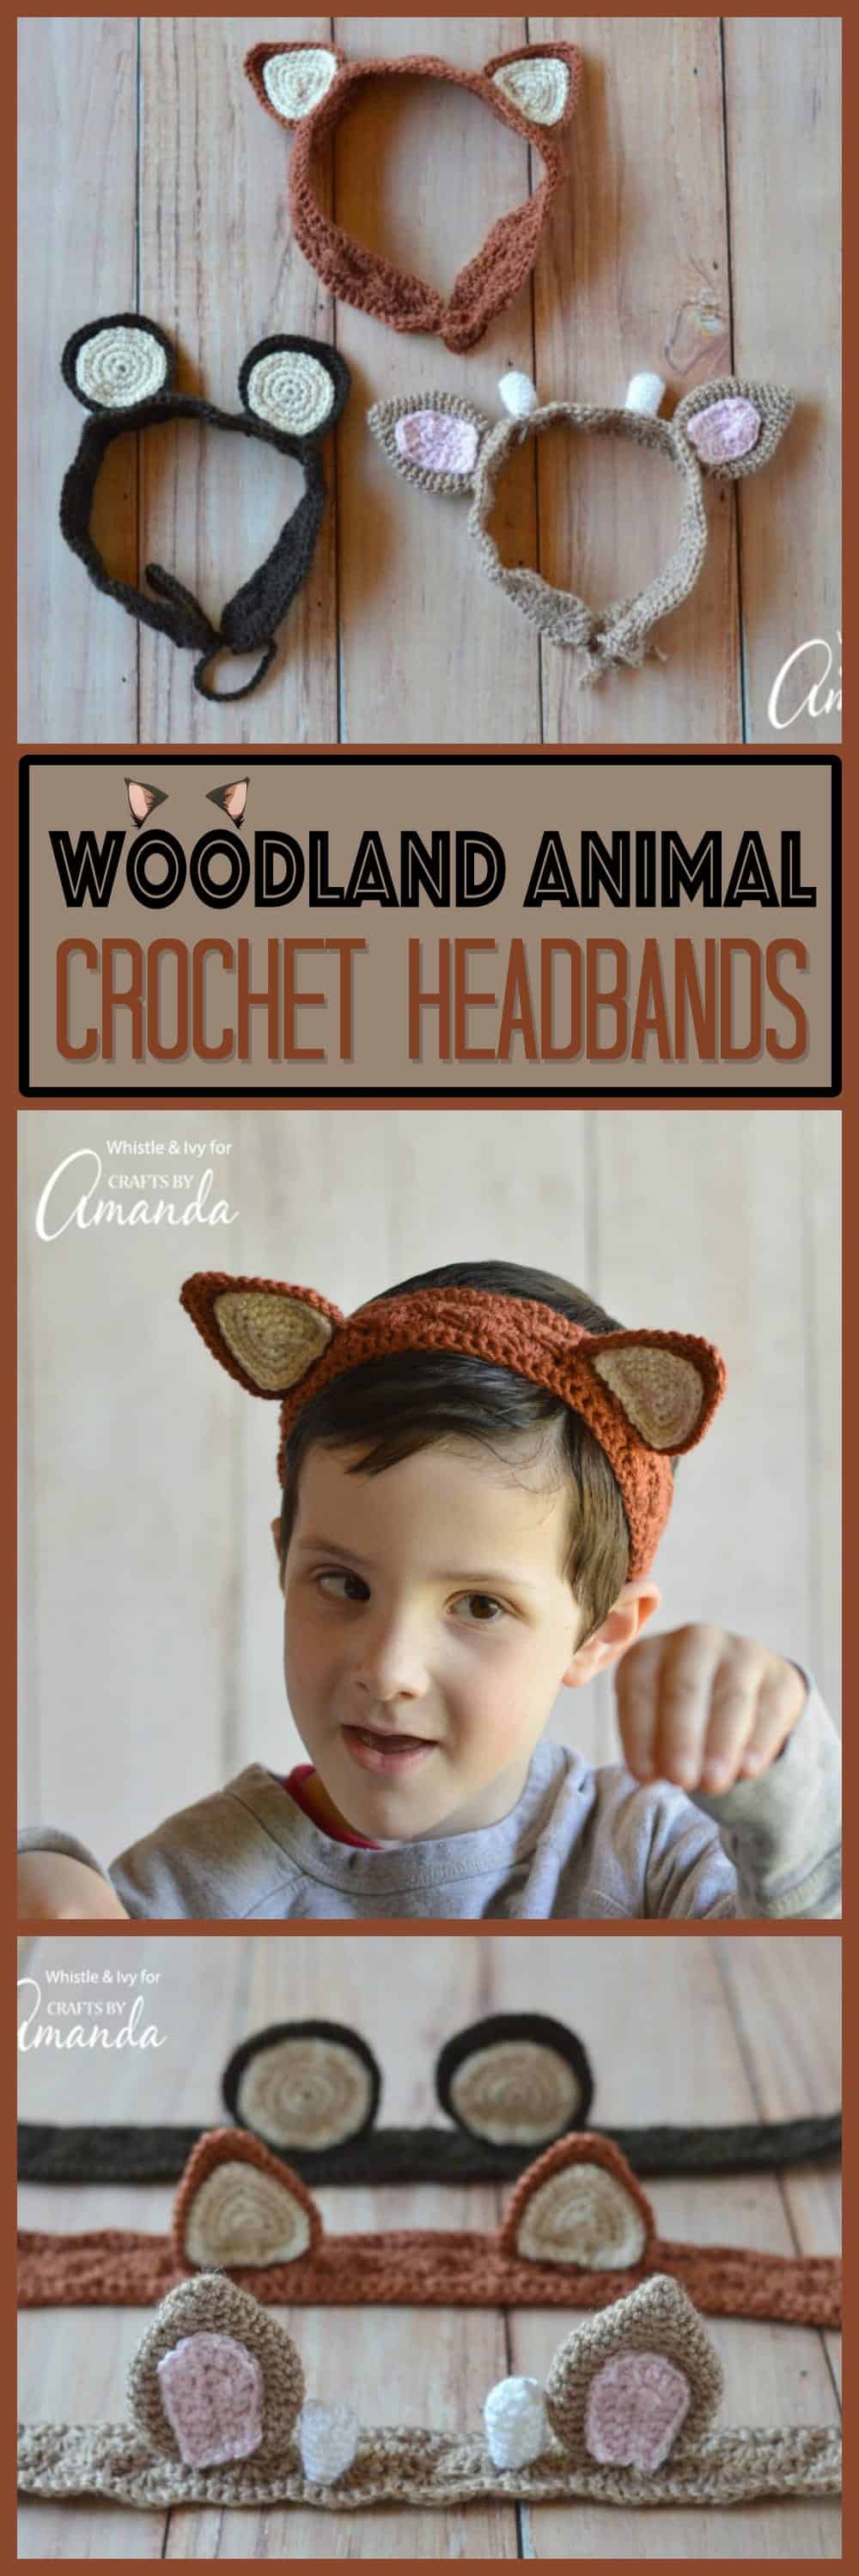
These adorable little woodland animal ear crochet headbands are cute to pair with a summer outfit, but also perfect for make-believe and creative play! The post includes a free crochet headband pattern for a bear (which could also be made into a mouse), a fox and a deer. Did you miss last months Crochet Aviator Sunglasses Sleep Mask? Don’t forget to stop by to make yourself AND your children an adorable crochet craft!

Woodland Animal Ears Crochet Headbands


Crochet Headbands: Woodland Animal Ears

I am pretty sure we skipped right over spring and went straight to summer! We are spending our afternoons indoors doing activities around the table because once the morning sun heats up, we have to wait for a bit of shade to fill the backyard before going back outside. These woodland animal ear crochet headbands are fun for girls and boys to make-believe a fun animal game. I will have to add a puppy because my kids love pretending to be puppies (they both have quite a repertoire of “tricks”).

Plus these crochet headbands are simply adorable.

FREE Crochet Pattern: Woodland Animal Ear Crochet Headbands | Perfect for dress-up make believe play! The pattern includes bear, fox and deer instructions.
Want more FREE crochet? See me at Whistle and Ivy or follow me on Facebook.

Adorable kids imaginative play crochet headbands!

GRAB THE PRINTABLE PATTERN HERE

What you need for crochet headbands:

  • Worsted Yarn in woodland colors
  • G hook
  • Darning Needle


Abbreviations: US Terms

St – Stich
Ch – Chain
Sl st – Slip Stitch
Sc – Single crochet
Sc2tog – Single Crochet Decrease
Hdc – Half Double Crochet 
Dc – Double Crochet 
Sk – Skip

How to Crochet a Headband: (Child and Toddler)

(Should be approx. 16″ long)

Start with a 24″ tail.
Work a Sc foundation  of 78 stitches (multiples of 5 +3 )
1. Dc 5 in 3rd st from hook. *Sk 2 sts. Sc. Sk 2 sts. Dc 5 in next st*. work 12 times. Sk 2 sts. Sc in last st. Turn.
2. Ch 1. Dc 3 in same st. *Sc in the 3rd dc of next shell. Dc 5 in sc from previous round (in between the shells)* work 12 times. Sc in the top of next shell. Dc 3 in last st. Turn.
3. Ch 1. Sc in same st. *Dc 5 in next sc. Sc in the 3rd dc of next shell* work 13 times. Sc in last st. Turn.
4. Ch 1. Sc in each st across.
Continuing where you left off, sl st down the short side 3 times. Ch 30. Tie off.
Repeat for the other side, using the beginning tail. Tie off.
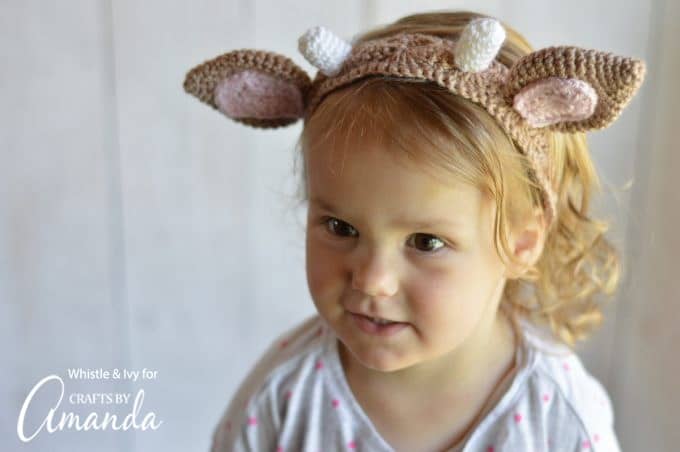
Deer Headband:

Ear Back: (make 2)

Magic Ring
1. Sc 6 into ring
2. Ch 1. Sc in each st around (6 sts)
3. Ch 1. *Sc. 2 sc in next st* work 3 times. (9 sts)
4. Ch 1. *Sc 2. 2 sc in next st* work 3 times. (12 sts)
5. Ch 1. Sc in each st around. (12 sts)
6. Ch 1. *Sc. 2 sc in next st* work 6 times. (18 sts)
7. Ch 1. Sc in each st around. (18 sts)
8. Ch 1. *Sc 2. 2 sc in next st* work 6 times. (24 sts)
9. – 13. Ch 1. Sc in each st around. (24 sts)
14. Ch 1. *Sc 2. Sc2tog* work 6 times. (18 sts)
15. Ch 1. Sc in each st around. (18 sts)
16. Ch 1. Sc. Sc2tog* work 6 times. (12 sts)
Leave a long tail.

Ear Inside: (make 2)
Ch 6
1. Sc in 2nd ch from hook. Sc 3. Hdc 5 in last ch. (working across other side of chain) Sc 4. Turn. (13 sts)
2. Ch 1. Hdc 4. 2 hdc in next 2 sts. Ch 1. 3 dc in next st. Ch 1. 2 hdc in next 2 sts. Hdc 4.  (21 sts)
Leave a long tail.

Antler Spikes: (make 2)
Magic Ring
1. Ch 1. Sc 8 into ring. Join with a sl st. (8 sts)
2. – 6. Ch 1. Sc in each st around. Join with a sl st. (8 sts)
Tie off. Leave a long tail.

Construction: Using the tail of the ear insides, sew it in place to the ear back. Be sure to only catch the front layer. Once it’s sews in place, clip ends and flatten the ear. Place it perpendicular to the headband. Sew all around the ear firmly. Attach the antler spikes to the side and slightly forward on the band from the ears. Use the tails to sew them in place. You can stuff them with small bits of leftover yarn or a small tuft of Polyfil.

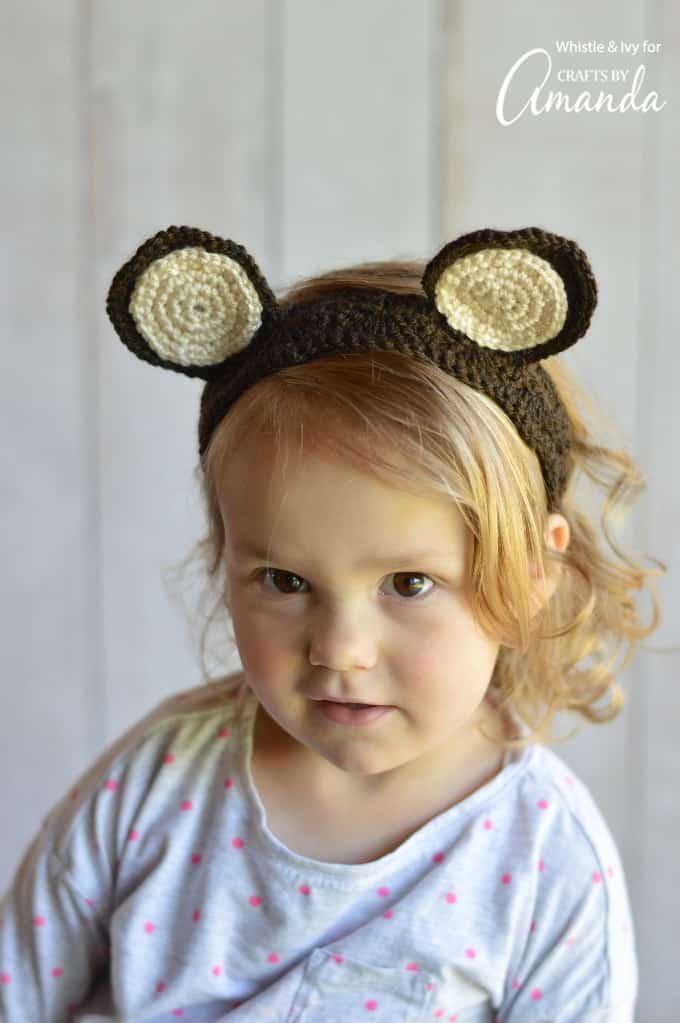
Bear Headband: (could be made in pink and gray for a mouse)

Ear Outside: (make 2)
Magic Ring
1. Ch 1. Sc 10 into the ring. Join with a sl st. (10 sts)
2. Ch 1. 2 sc in each st around. Join with a sl st.  (20 sts)
3. Ch 1. *Sc. 2 sc in next st* repeat all around. Join with a sl st.  (30 sts)
4. Ch 1. *Sc 2. 2 sc in next st, all around. (40 st)
5. Ch 1. Sc in each st around. (40 sts)
Leave a long tail.

Ear Inside: (make 2)
Magic Ring
1. Ch 1. Sc 8 into ring. Join with a sl st.  (8 sts)
2. Ch 1.  2 sc in each st around. Join with a sl st.  (16 sts)
3. Ch 1. *Sc. 2 sc in next st* repeat all around. Join with a sl st. (24 sts)
4. Ch 1. *Sc 2. 2 sc in next st* repeat all around. Join with a sl st. (32 st)
Leave a long tail.

Construction: Using the tail of the the inside piece, sew the inside piece to the outside piece, lining it up with the top of the last stitch of the round, using a simple running stitch. Weave in ends and tie off. Using the tail of the outside piece, sew the ears to the band. Place the ears perpendicular to the band. Bend the sides of the ears slightly forward so the ears stay upright. Sew in place firmly. Weave in ends.
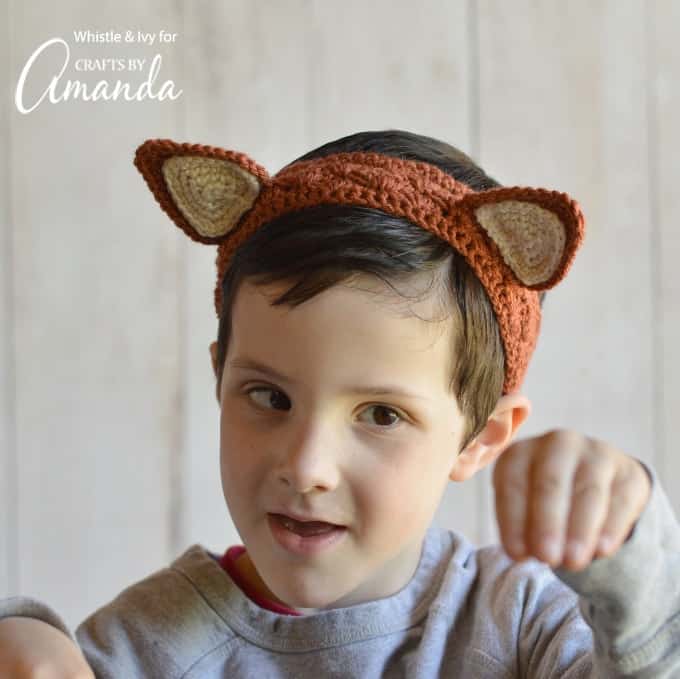
Fox Headband:

Ear Outside: (make two)

Magic Ring
1. Sc 9 into ring. Join with sl st.
2. Ch 1. Sc. *3 sc in next st. Sc 2.* work twice. 3 sc in next st. Sc in last st. (15 sts)
3. Ch 1. Sc 2. *3 sc in next st. Sc 4.* work twice. 3 sc in next st. Sc 2. (21 sts)
4. Ch 1. Sc 3. *3 sc in next st. Sc 6* work twice. 3 sc in next st. Sc 3. (27 sts)
5. Ch 1. Sc 4. *3 sc in next st. Sc 7. Hdc. 3 dc in next st. Hdc. Sc 7. 3 sc in next st.
Leave a long tail.


Ear Inside:  (make two)

Magic Ring
1. Sc 9 into ring. Join with sl st.
2. Ch 1. Sc. *3 sc in next st. Sc 2.* work twice. 3 sc in next st. Sc in last st. (15 sts)
3. Ch 1. Sc 2. *3 sc in next st. Sc 4.* work twice. 3 sc in next st. Sc 2. (21 sts)
4. Ch 1. Sc 3. *3 sc in next st. Sc 6* work twice. 3 sc in next st. Sc 3. (27 sts)
Leave a long tail.

Construction: Using the tail of the inside piece, place it on top of the outside of the ear, lining up the bottoms. Sew it in place. Weave in the tail and clip ends. Using the tail of the outside piece, sew it to the headband. Holding it perpendicular to the band, bend the bottom corners slightly forward on the band so it causes the ears to stay up. Sew firmly in place. Weave in ends.

Woodland Animals Crochet Headband Pattern

Crochet Headband Pattern
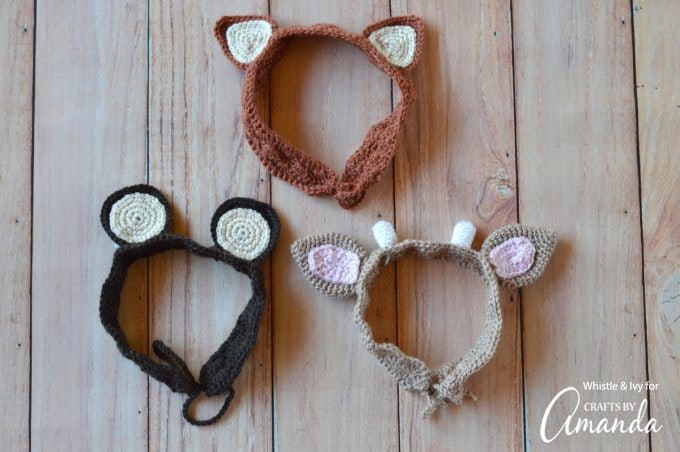
I hope you enjoyed these cute woodland animal ear crochet headbands. The children are having a super time playing with them, so I am sure yours will as well.

More Crochet Project Ideas

  • Infinity Scarf Crochet Pattern
  • Crochet Baby Loafers Pattern
  • Crochet Sandals
  • Crochet Pizza Coasters
FREE Crochet Pattern: Woodland Animal Ear Crochet Headbands | Perfect for dress-up make believe play! The pattern includes bear, fox and deer instructions.
  • Author
  • Recent Posts
Follow along
Bethany Dearden
Blogger at Whistle & Ivy
I’m Bethany, a blogger, a crocheter, a writer, a wife, a mama, and I am a Mormon.I’m married to a stud who flies an emergency helicopter, a mama to an energetic three-year-old and a sweet baby girl.
Follow along
Latest posts by Bethany Dearden (see all)
  • Crochet Pizza Coasters - March 18, 2025
  • Infinity Scarf Crochet Pattern - December 31, 2021
  • Crochet Sandals - August 7, 2020
8632 shares
  • Share
  • Tweet
  • Flipboard
  • Email

Filed Under: Animal Crafts for Kids, Nature Crafts for Kids, Needlework Tagged With: animal ears, crochet headbands, crochet pattern, headband crochet pattern

Reader Interactions

Free CraftsBy email every week

Latest crafts straight to your inbox!

Comments

  1. Jackie says

    June 26, 2018 at 8:38 am

    I have been working on a headband for my 9 year old granddaughter. She likes zebras. I have been having a bit of difficulty revering the black and white, any advice?

    Reply
    • Catrena says

      April 19, 2020 at 10:50 pm

      You could try the black and white variegated yarn. It might not be perfect stripes, but it might give you that Zebra feel.

      Reply
  2. DebbieW says

    November 24, 2017 at 3:44 pm

    Are the directions for the deer ear back correct? I’ve tried it a few times and it ends up a circle – not like the picture looks at all, and not like the ear inside seems to be (haven’t actually tried making it yet). The fox and bear/mouse have turned out super cute, my almost 3 year old niece will LOVE them!

    Reply
  3. Lisa says

    June 28, 2017 at 8:49 am

    These are so cute! I’m useless at crochet but my Mum is a pro so I’ll have to pass this on to her.

    Reply
  4. Jayne says

    June 18, 2017 at 10:40 pm

    Just wondering where I can download the free PDF. These arradorable!

    Reply
    • Amanda Formaro says

      June 21, 2017 at 8:57 am

      Hi Jane :) The PDF is $2.00 and available here http://rstyle.me/n/cpm8qecbmdf

      Reply

Leave a Reply Cancel reply

Your email address will not be published. Required fields are marked *

Rate This Project


The maximum upload file size: 640 MB. You can upload: image, video. Links to YouTube, Facebook, Twitter and other services inserted in the comment text will be automatically embedded. Drop files here

Primary Sidebar

Hi! I’m Amanda and I’m the founder and head designer of Crafts by Amanda. I have spent over 25 years creating projects to share, but it’s not just me anymore! It’s turned into a complete family affair. Come and meet the Creative Team!

Free CraftsBy email every week

Latest crafts straight to your inbox!

All Time Favorites

snowy pinecone candle jar luminaries

Winter Luminaries: Snowy Pinecone…

Make pretty winter luminaries that appear to be covered ... Go To project

Make this wonderful deco mesh pumpkin wreath to hang on your door this fall!

Deco Mesh Pumpkin Wreath…

Adorn your door this fall with a pretty deco mesh ... Go To project

Learn to make these adorable ladybug painted rocks. use special outdoor paint for this adorable garden craft so you can keep garden ladybugs all summer!

Ladybug Painted Rocks…

I'm going to show you how to make these adorable ... Go To project

Reuse those empty prescription pill bottles in all sorts of ways. From organizing to making cookies. Yes, cookies! See how to use your empty pill bottles!

20 Uses for Prescription Pill…

You've been collecting prescription pill bottles for ... Go To project

Meet the Family

Amanda

Founder and Designer

Kristen

Editorial Manager

Lindsay

Social Media Manager

As seen on:

Footer

Favorites

  • Jar Photo Frames
  • No-Sew Roman Shade
  • Paper Flowers
  • How to Make a Scrunchie
  • Mermaid Slime

About

  • Home
  • Meet the Creative Team
  • Work with Us
  • Privacy Policy
  • Accessibility
  • Contact Us

Images/text copyright Amanda Formaro 2020. To feature a post from Crafts by Amanda, you may use one photo credited and linked back directly to the project post.

Free CraftsBy email every week

Latest crafts straight to your inbox!

Copyright ©2025, Crafts by Amanda. All Rights Reserved.
Design by Pixel Me Designs