

In the fall of 2010 I was a contestant in Round Two of Crafting with the Stars. The theme for the second round was “paint” and we could pretty much do whatever we wanted! My first thought was to redo this bookshelf that I have, but it wasn’t really floatin’ my boat, if you know what I mean. Then I suggested to Amy, my fabulous star partner from Mod Podge Rocks, that I use some of the totally cool glitter paint she sent me. She liked the idea, but thought it better to leave that for a different day. I think that was a good choice! ;)
UPDATE: Many people have offered to buy this sign, but I’ve never wanted to sell it. I decided instead to give it away to someone special. You can read about that here – Giving is Better Than Selling.

Pier 1 coat hook rack – taken on cell phone, sorry it’s so crappy
So I showed Amy a picture I snapped on my cell phone about a week ago of the HOME sign you see above. I was at Michael’s with my daughter picking up a few craft supplies. Right next door there’s a Pier 1 Imports. They had all their Christmas ornaments on display so we decided to go in and have a look. Last year I did the same thing and was inspired to make this Santa’s Belly Ornament. They had one for sale there last year, so I made my own instead.
Anyway, Kristen and I were walking around checking out the ornaments and I was snapping pictures of the ones that I liked and thought I could duplicate. It was then that I noticed the employees watching me. Ha ha. Maybe they thought I was with the competition or something! So we kept strolling through the store and I saw this cool, weathered looking rustic sign that spelled out “home”. Each letter had a key, the “O” had a keyhole. I loved it and knew I could replicate it.

When I told Amy that I thought an “EAT” sign for my kitchen with a similar design would be fun, she completely agreed! So that was it, we were all set. Almost. I haven’t painted anything rustic in several years. I used to paint a lot when I had my store, but that was several years ago. Here you can see my rustic paintings and some shots of my store.
I was a bit nervous to say the least. All I had to go by was this cruddy cell phone picture, but then I remembered seeing this great post by Donna on how to make old, rustic signs over at Funky Junk Interiors. I decided to follow her lead. I actually used 3 different colors for each of the letters, only duplicating one color along the way. That meant 7 different colors for this bad boy, so I made sure I took notes and sketched it out ahead of time.

Now that I had my idea, I needed a canvas. I wanted something really rustic. I live in a rural community, so it wasn’t hard to gather some wood from a farmer friend of mine. I chose that big mombo one, and man was it heavy! After brushing off all the dirt and crusty hay (yes, it was in an old hay wagon) I brought it inside and drew lines with a ruler where I wanted my letters to go. In order to get the right size, I used my Silhouette machine![]() to cut out the letters on black vinyl first, then I measured one inch on either side of each letter.
to cut out the letters on black vinyl first, then I measured one inch on either side of each letter.

Finally I was ready to actually start painting! :) Because hubby wasn’t home yet to cut this for me, I just went ahead and started painting. Figured we could just cut it later.
The colors I used were:
E = Turner’s Yellow![]() , Aspen Green
, Aspen Green![]() , Vintage White
, Vintage White![]()
A = True Burgundy![]() , Vintage White
, Vintage White![]() , Coffee Bean
, Coffee Bean![]()
T = Aqua![]() , Terra Cotta
, Terra Cotta![]() , Vintage White
, Vintage White
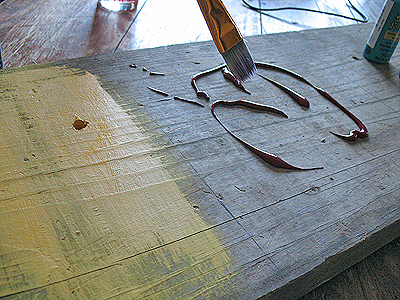
The beauty of painting something distressed is you can make mistakes and no one will ever know :) So the first step was to put on my first layer for each section. No perfection required here, just squeeze some paint out of the tube and spread it on with a paintbrush.
Next was the second coat, which needs to be a contrasting color. Because I wanted my sign to end up as light, dark, light, I also had to start that way. Therefore, the second layer was dark, light, dark, from left to right. Just dry brush it on, leaving some parts uncovered or not covered as heavily.
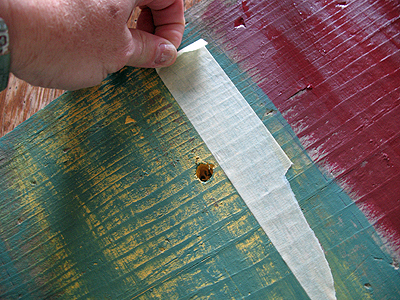
A cool distressing technique I learned from Donna’s post on creating old signs (above) was to use masking tape![]() on the paint before it’s fully cured.
on the paint before it’s fully cured.
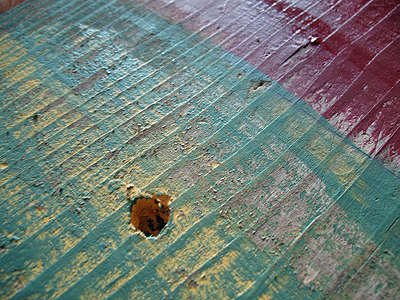
This will lift some of the paint, and in some cases, go all the way to the wood. Cool indeed. Don’t you love that hole in the wood too? Neato. :)

Now that there are two layers on each section, you will want to let it dry a bit so you can sand it. See, I didn’t actually do that. Duh. No, instead I went ahead and put my vinyl letters on and realized afterward that I should have sanded first. So needless to say my vinyl letters had lost a lot of stickiness by the time it came to painting over them. Ha! In case you are wondering why I used a reversed stencil technique here, it’s because I wanted to preserve the colors you see above in the actual letters, just like in the Pier 1 sign.
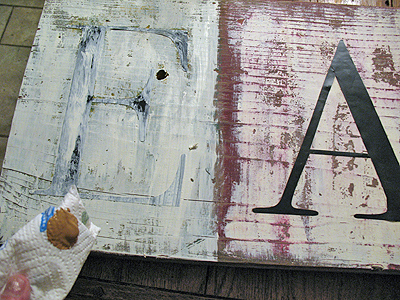
Now it’s time for the final coat on each section. I decided to use a piece of folded paper towel to apply the last coat. I wanted a dry application and all my brushes were wet. :-P I carefully went over each vinyl letter, being careful not to let them lift anywhere since I screwed up their sticky backing by removing them to sand. *sigh*
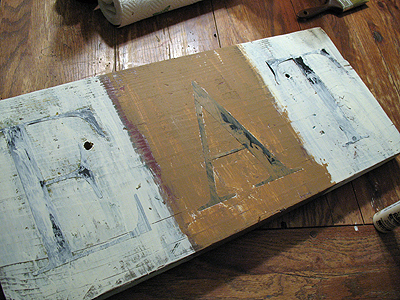
After getting all the top coats on I let it dry for a bit.
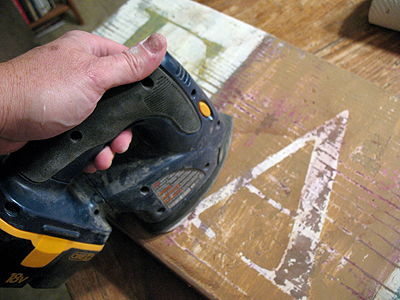
I removed the vinyl lettering and used a sander![]() with a fine grit sandpaper
with a fine grit sandpaper![]() to go over everything, pushing harder in some areas more than others. I also sanded all the edges and corners. I used a soft brush to get all the dust off.
to go over everything, pushing harder in some areas more than others. I also sanded all the edges and corners. I used a soft brush to get all the dust off.

Then I gave it a couple of coats of Krylon Matte Finish sealer![]() .
.

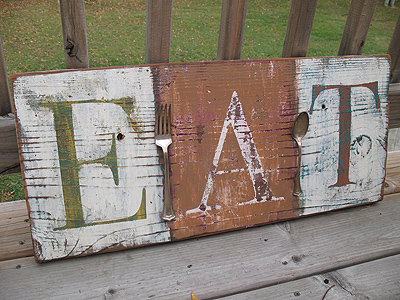
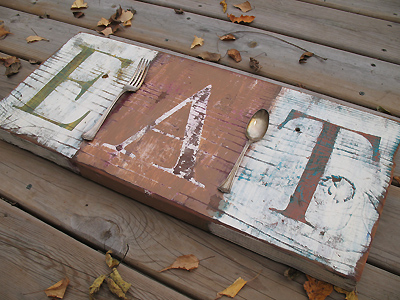
To attach the old tarnished silverware (found at a thrift store) I used model glue. Worked like a charm. :) E6000 would be another awesome choice.
I realized after adding the silverware that I should have hammered a hanger to the back first. Oh well. Bugger. I’ll have to just be careful when adding the hanger, will tackle that after the kitchen wall is painted!
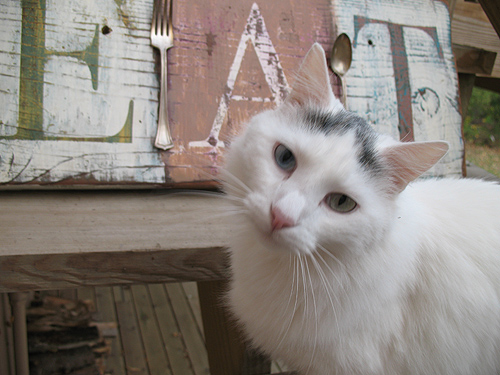
I’m very happy with my sign, I think Spike likes it too (since this post was created we lost our beloved Spike. He was struck by a car in front of our house. I really miss you buddy. RIP) :(

Distressed Eat Sign
Supplies
E =
- Turner’s Yellow
- Aspen Green
- Vintage White
A +
- True Burgundy
- Vintage White
- Coffee Bean
T =
- Aqua
- Terra Cotta
- Vintage White
Instructions
- The first step was to put on my first layer for each section. No perfection required here, just squeeze some paint out of the tube and spread it on with a paintbrush.
- Next was the second coat, which needs to be a contrasting color. Because I wanted my sign to end up as light, dark, light, I also had to start that way. Therefore, the second layer was dark, light, dark, from left to right. Just dry brush it on, leaving some parts uncovered or not covered as heavily.
- Now that there are two layers on each section, you will want to let it dry a bit so you can sand it. In case you are wondering why I used a reversed stencil technique here, it’s because I wanted to preserve the colors you see above in the actual letters, just like in the Pier 1 sign.
- Now it’s time for the final coat on each section. I decided to use a piece of folded paper towel to apply the last coat.
- After getting all the top coats on I let it dry for a bit.
- I removed the vinyl lettering and used a sander with a fine grit sandpaper to go over everything, pushing harder in some areas more than others. I also sanded all the edges and corners. I used a soft brush to get all the dust off.
- Then I gave it a couple of coats of Krylon Matte Finish sealer.To attach the old tarnished silverware (found at a thrift store) I used model glue.
- Fingerprint Daddy & Me Coffee Mug - June 12, 2026
- Patriotic Bandana Wreath - June 9, 2026
- Ladybug Painted Rocks - June 5, 2026


az mobile notary says
You are my aspiration , I have few blogs and often run out from to post .I conceive this site holds some real wonderful information for everyone. “He is able who thinks he is able.” by Buddha.
E says
Hi there-
Where did you source the vinyl lettering?
Thanks,
Elizabeth
Amanda Formaro says
I used my silhouette machine to cut the letters, and used the black vinyl that is made for that machine – http://amzn.to/2nLgzQc
Amy@theidearoom says
Love this sign! Sharing on fb today!
Amanda Formaro says
Thank you so much for the share Amy!
Amanda says
In case anyone is following the comments on this post, this sign is finally for sale. You can find it on Etsy here https://www.etsy.com/shop/amandascrafts?ref=top_trail
Amy says
Love the sign… can you please tell me the font you used for lettering? And the source for vinyl lettering. I am in the process of designing and creating signs for myself and my family for xmas…. love this idea
Amanda says
Hi Amy. I’m terribly sorry, that project was two years ago and I didn’t save the name of the font that I used :(
Erin says
Did you hammer a regular wire hanger on the back of the sign? I really would like to start crafting and I love this sign! Thank you for the step by step instructions!! I need it! Now just a little advice for the back piece please…lol. Thank you again!!
Amanda says
I ended up adding a sawtooth hanger. You can get a package of 3 from Home Depot for a couple of bucks :) Thanks!
Kim says
Love. Love. Love it! I also think you should find a way to sell because I am dying to buy it!
Amanda says
Aww thanks Kim! I’ve thought about selling it, but keep changing my mind!
Wendy says
Amanda…beautiful sign!…can you tell me what size it is or what size lettering you used?
Thanks!
Amanda says
Hi Wendy! I do have it hanging rather high up in my kitchen. So without taking it down to measure it, it’s probably easiest to just use a fork. :) The letters are about the same height as a standard dinner fork. If you still need the true measurements let me know.
Cecilia Bramhall says
I love this sign. Thanks for the tutorial. I am renovating a farmhouse and think something like this would be really cute in it. Can’t wait to try this!
Deborah Carlson says
Just gorgeous!
I have a spot that needs something like this in my kitchen.
Id love to go by your ideas and give it a try. Ill post back when its finished.
Thanks so much for sharing and the inspiration!
Deborah :)
Kate Cavanaugh says
Do you sell this? Would love to purchase on
admin says
I’m sorry I don’t, but thank you for the compliments!
Amanda says
Thank you Daily Craft for the feature!!
Thanks Bridget! I have considered it, but it did take a while to make so I would have to ask too much for it, so I decided not to.
Bridget says
Amanda…what a cute EAT sign! It would look great in our newly remodeled kitchen! Have you (or would you consider) ever made one to sell? I'm not "crafty" at all and I don't think I'd want to hang up anything I make! Let me know what you think!
Bridget
Daily Craft says
Great project! I just wanted to let you know that we featured this project on our Facebook page with over 19,000 fans. We’d love it if you’d use our Featured Blogger button, available at: http://www.dailycraft.com/thank-you-for-crafting/. Our audience loved the project and we look forward to sharing more from you. Please let us know if you have any questions or projects you’d love us to feature! Thanks!
MoneySavingEnthusiast says
You make it look so easy. This DIY is a great way to save money. Decor like this can cost a pretty penny.
@msenthusiast
Carolina R. says
Awesome! I'm going to do this sign because I love it. Thank you, I'm learning a lot!
Ashley says
Super Cute! I had my husband get a peice of old wood for me to do this project. I will go perfect in my kitchen.
What size lettering did you use though? (6in?)
Coastal.Creations says
After seening this I can see my next project! yay! Thanks! I added your button and became a follower. Here is my URL I hope you will do the same. I am a new mother and hoping to get my blog out there.
http://raedesantislove.blogspot.com/
kellypea says
Love your sign! The detailed directions make me want to go down to my garage to see if I can find some of my old craft stuff. FUN!
Amanda says
Thanks so much everyone!
Tania says
What a great sign – I would say better than the one you snapped in the store!!! Well done, I might just attempt this ;-)
Alayna Howard says
GREAT IDEA. THANK YOU FOR SHARING. I AM YOUR NEWEST FOLLOWER AND I WOULD BE HONORED IF YOU WOULD LINK YOUR SUPER CUTE BLOG UP ON MY BLOG STALKIN' PAGE.
http://alaynahoward.blogspot.com/p/blog-stalkin.html
Michelle@ A Full Cottage says
I really like this because you used the vintage silverware, to cool! Doing each letter a different color with the layered paint is also a nice touch.
Please stop by my blog for a visit I am having a big giveaway.
:) Michelle
Amanda says
Thank you all so much for your kind and encouraging comments! I really appreciate it so much! :)
Donna @ pintedfresh.blogspot.com says
LOVED this and now I am 'inspired'!! I have some awesome antique silverware I picked up at a flea – some of the pieces will now be used on something akin to this!! hope it looks as good as yours!
please come visit me!
http:/paintedfresh.blogspot.com
~Donna
Funky Junk Interiors says
Glad you entered this one Amanda. I loved it the first time I saw it too. Totally love your take on the layered paint idea. Awesome!
Donna
http://funkyjunkinteriors.blogspot.com/
LauraNell says
Love the sign. Thanks for the instructions, especially for including the things you would do differently next time.
I'm inspired to go paint something now!
Amanda says
Thank you everyone!
Armyhousehold – sorry for the confusion on that, that tutorial will be up on the 11th! :)
armyhousehold6 says
I really love your kitchen redo projects! The colors are very similiar to my new kitchen and I planning on duplicating some of the stuff, however my fav project that came through on my blog reader is not on your site! There was a post on Google reader about DIY kitchen utensils holders but when I click the link it says the page doesn't exist and I can't find it on the homepage. Pleaaaaaaaaaaaase repost, they were fantastic and your readers should see them!! Thanks for sharing all your creativity!!!
Rachel {BubblyNatureCreations.com} says
I love it! Great job!
Rachelle @ Adventures in Creating says
Love it! The colors are great, thanks for sharing this idea. Saw you over at the DIY Club
Mama Washington says
LOL I almost think mine should say "Eat Your Food" since that is what we are always telling the 3 year old. Great project though and I am trying to think of how I can do it without a cutter. Time to use my contact paper and exacto, I think!
Its So Very Cheri says
Another Great project–thanks for entering Girl.
Cheri
Amanda says
Ashlie – I used a 2×12, but you could really use whatever you wanted. If it were made on a thick piece of plywood that would be lighter. I guess I need to weigh it, but selling on etsy isn't really something I've considered. :)
Thanks so much Roeshel!
Hi Lindsey :) The sign itself is around 12" tall, so the letters are probably around 10". I would measure them for you, but we are in the middle of moving and the sign is already at the new house and I'm still in the old one. :-/ I made the letters on my Silhouette machine, so they can be resized to whatever height you want using that method :)
Lindsey says
ran across this when looking for things to make for Christmas gifts this year. How tall were your vinyl letters? Just curious….
please, would you email me. Thanks!
llwoolard [at] gmail [dot] com
The DIY Show Off says
Great job Amanda! I love the technique you used. Thanks for sharing! :)
Roeshel
Ashlie says
Oh bummer that it would be too heavy! What size is the wood? Maybe I could see if my husband could find me a piece and I could just try to do it myself. I guess I really couldn't mess it up.
Amanda says
Wow thanks Ashlie! Not sure if selling them on Etsy would be worth it since it's so heavy. I would have to make them with thinner would. Making me think about doing it though!
Ashlie says
THAT IS THE CUTEST THING EVER!!! I NEED one BADLY!! I think you should make some and sell them on ETSY!! :)
Amanda says
Thank you Wendy!
[email protected] says
I like your better than the Pier1 sign. Thanks so much for the tutorial, you have inspired me to make my own!
Amanda says
Thank you so much everyone!
Christina says
Such a great idea! And it looks awesome!
Thanks for the step by step tutorial. I think I might be able to do this! :)
naomi3 says
Absolutely love this!
Suzanne@thriftstoredecorjunky says
Awesome! I am so trying one of these! :)
Alison says
This is so brilliant! I featured your sign today:
http://oopsey-daisy.blogspot.com/2010/11/wednesdays-wowzers.html
Thanks for inspiring! Enjoy your day!
~Alison
Jen @ tatertotsandjello.com says
This was a gorgeous project Amanda. I loved it!
xox
Jen
Amanda says
Thank you all so much!! :) :)
Stefanie says
This is amazing! I love the silverware on it. It's much nicer than the Pier 1 version! Great tutorial, also. Thanks for sharing.
Jen says
Wow!
Great job! Love it! Looks just as good as the original!!!
Erin says
FANTASTIC!!!! I adore the technique you did! And thanks for sharing how you did it! :)
Amanda says
Thanks so much for all the compliments you guys! You are making me blush :) :)
thanks for the feature Steph!!
AmieAnn says
This is awesome! I LOVE the silverware attached to the sign! Hope you'll link it up to my Pink Hippo Party @ http://pinkapotamus.blogspot.com/2010/11/pink-hippo-party-2.html
Steph @ somewhatsimple says
Love love love this! Thanks for linking up to my link party so I could find it! I am featuring it on crazy domestic tomorrow (Tuesday). Come see yourself in the spotlight! Thanks again!
Marie @ Sally Lee by the Sea says
It's so cute – I just love it. I'm a new follower from Between Naps on the Porch (Met. Monday) so glad I found you!
creativejewishmom/sara says
Great job Amanda, I think I need a sign like that too, just I think mine needs to say "eat healthy", hmmm, maybe I could combine this idea with your french fruit project? Thanks so much for linking up on Craft Schooling Sunday, all the best!
Sharon says
I followed you here from Fun to Craft :). I loooooove your sign & can't wait to see more on your site. Thanks so much for sharing!
Marsha's Mpressions says
LOVE your sign and what a great tutorial you did. I'm bookmarking your post for future projects. Thanks!
Biljana says
Absolutely amazing, bravo, looks wonderful:))
Greetings from Europe, Biljana
gail myrepurposedlife.net says
I saw that sign at pier 1 and thought
"how easy" thanks for sharing a great tute!
yours turned out fabulous!
gail
Tanya says
Very cool sign!! I love how it turned out!
Amanda says
Thanks you guys! You are making me blush :) :)
Kim says
Very nice job. It looks weathered and rustic, I like the addition of the silverware.
TracyMB @ Crow's Feet Chic says
Very cool, great tutorial, and what a cute feline model! :)
Krista@thegatheringplacedesign says
Wow…great job! I love it. I like it better than the inspiration peice.:)
Holly says
Seriously awesome sign…I just LOVE it. Great tutorial and technique and well, it is just great (can I say that a few more ways). Totally a new follower on this blog!
Holly
504 Main
alyssha lynn says
I just picked up some scrap wood and can't wait to try something like this. Thanks for all the detail in your tutorial, and it truly looks amazing!! Even better than your inspiration!
Teri says
Very cool! :)
High Street Cottage says
How incredible is this sign? Well it's pretty darned awesome! My Dad was in the sign business all my life, and I've seen lots of old salvaged signs, this one looks amazing! I have my own I did myself over one of my french doors and still love it after many years. Yours is incredible, so glad you shared that and even showed us which paint and colors you used, well done! tami
Kristin @ Daydream Designs says
Your sign is absolutely brillant!! You're making me want to run out and try and duplicate this but somehow I know it wouldn't turn out nearly as beautiful as yours ; )Great job!!
Kristy says
Girl you are crafty! Love it!
Missy says
Great result~ I will be trying my hand at some signs in the near future with some old fence that I nabbed from a neighbors curb! lol. I wouldn't have thought to use tape to remove some of the paint!
Keep an eye on my blog and I will hopefully have a post on signs also!
brandy-son Zen master flash says
I totally love this good job!
Inspire Me Heather says
Your sign looks fantastic – I linked it to my "weathered wood signs" post!
Jenny says
This looks sooo great!
Jenny
http://www.simcoestreet.blogspot.com
Colleen @ MuralMaker&More says
It's fantastic. Love all the colors and how well they all work together.
Would love you to stop by and link up to Passion for Paint this weekend.
Mod Podge Amy says
It just turned out wonderfully! I'm so proud!
Elle says
Oh my gosh, I want one just like it–I love it! Wonderful work you did! Stumbling…
Amanda says
Thank you guys so much! I love it, can't wait to hang it, really appreciate all the kudos!
Beverly @ FlamingoToes.com says
I love your sign Amanda!! And what a great tutorial. I am going to have to do something similar for my dining room!
I am a new follower – don't know why I wasn't before but I've fixed that today. haha. ;)
Curtains In My Tree says
When can you make me one?? So cute you did a marvelous job
Janice
Michelle says
That is so awesome!!! I have to get one of the many machines out there so I can cut my own vinyl letters! (I was just trying to sell my husband on the idea…yes his eyes did glaze over :( )
TidyMom says
I LOVE this Amanda!!
Kara'sKreations says
Love love love it! You have inspired me to go for it!
Tammy says
This is a fabulous project, I will be making my own. I love your blog and follow. Thanks for sharing.
Amanda says
Thanks so much everyone!!
Anon – You can cut the letter from a sturdy card stock if you don't have a Silhouette or other cutting machine. I used Vinyl because it sticks, so you could do that too, but cardstock is definitely less expensive :)
Tammy@ Not Just Paper and Glue says
This is absolutely adorable! I LOVE the added touches of the spoon and fork. It really finishes it off. Best wishes in the contest!
Amy Kinser says
Your sign is great! Love all the colors and the distressing!
[email protected] says
I love it! What a great look! Thanks for the how-to, I'll be linking.
Orange it Lovely says
oh that is so very cool!
Great job!
Beth @ Free Stylin' says
Wow! What a beautiful sign! I love it. I've had a project rolling around in my head for awhile, and this might just be the way to go about it. Thank you for the really great tutorial!
Katie @ This Chick Cooks says
I love this! Its great :) I am thinking I might put this in my kitchen to compliment my repurposed window menu board. Thanks for the idea.
Stacie says
That turned out VERY CUTE! Love the colors! Thanks so much for the how-to!
BTW…I featured it here:
http://thecreativecrate.blogspot.com/2010/11/distressed-kitchen-sign.html
Thanks again! :)
**Amy** says
I love your sign! I am going to make one for my new dining room…ahem…the one I am designing in my head. Haven't told the hubs yet, but I have plans! Your sign is just brilliant! Congratulations!
Anonymous says
This is a brilliant idea! I'd love to duplicate it for Christmas gifts but what is a Silhouette machine? Can you think of something else or somewhere else I can get cool letters to use. : )
Jen B says
That's a great looking project! Love the detailed tutorial, thanks so much for sharing!
Amanda says
Thank you all soooo much!!
Southerngirl says
Wow, absolutly brilliant! I love your sign!
Courtney {a thoughtful place} says
What a great result. The distressed finish on it is perfect!
Sharon @ Elizabeth & Co. says
I love your sign and the nicely detailed tutorial!
HoneyScrap says
Yay! I voted for this! I have had a picture the "home" version in my crafts folder on my computer for about 6 months…now its time to try it:)
Funky Junk Interiors says
Wonderful!! I love your take on how you did up the lettering in reverse! Very cool! And your distressing turned out fabulous!
I'm linking this project up to my sign one pronto! :)
Donna
Kristen Duke Photography says
wow, looking through your tutorial, I am even more impressed! I love the step by step, especially the masking tape tip! I've wanted to trying distressing, but other tutorials haven't helped….thanks and congrats!
Angie says
this won my vote! Love it!
April says
I keep voting for you, so I figure I should just follow your blog now because I evidently love your stuff!
Sue says
This looks fantastic! I LOVE it! I would have voted for you if I had known! I'll vote next round:)
Bethie says
I love this and perfect timing! I just told my husband I wanted to make a Fresh Eggs sign for my chicken coop!! Thanks for the info.
Amanda says
Renee – thank you! I'm loving making things for my kitchen A foodie in the craft room :)
Thanks so much Michele!
Nikki – Yes! I would love that!
Sassy – that would be awesome! Would LOVE to see it!
Mare, Heidi, Jennifer, Emily – Thanks so much ladies!
Emily says
This is such a great project! Congrats on moving on!
Jennifer says
I love this and I actually voted for it (and the painted pillows). I love the way it looks. I think you did a great job.
Heidi@TheCraftMonkey says
Yay! I voted for your EAT sign! I LOVE it!! So rustic & vintagey…LOVE it!
Mare says
I voted for this. It was my favorite. I love it because it is rustic.
Sassy Sites! says
You made it! xoxo!! I LOVE this sign and I'm going to attempt to make one today! :)
Nikki says
I LOVE this! I want to try it for my kitchen, if that's okay, and I'll link back to here! Thanks for a great tutorial!
Michele {The Scrap Shoppe} says
Absolutely love it, Amanda! It was so hard to narrow the votes down, but this was one of my 3. I love your interpretation of the sign for your kitchen. Fantastic job!
Kudos Kitchen says
This sign is brilliant!!! Love the rustic look. The application is perfect for this and like you said, it kind of takes a little of the pressure off. The combination of your passions (crafting and cooking) makes this a real winner Amanda. You did a fantastic job and I'm sure you must be bursting with pride! Great picture with Spike too. Priceless!