

This paint stick scarecrow is one of my favorite fall crafts. I actually made it several years ago and had it up until last year. I left this poor little guy outside in the elements and Mother Nature did him in. So I’ll need to grab a paint stick and some scrap fabric to make another! Isn’t he cute??
So if you would like to make one, the instructions and the pattern are below. I’m sorry there’s no step by step photos on this one. If I make him again, I’ll update the post :) This is a fun Thanksgiving hostess gift too!
More Scarecrow Crafts
- Paper Bag Scarecrow
- Reversible Scarecrow Snowman Sign
- Cardboard Tube Scarecrow
- Craft Stick Scarecrows
- Coffee Can Scarecrow
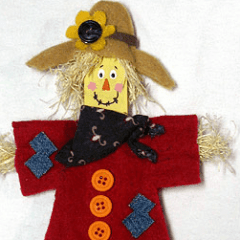
Paint Stick Scarecrow
Supplies
- paint stir stick
- acrylic paint: tan or sunflower pink, orange, white and black
- paint brush
- toothpick
- fine tip black marker
- felt: red tan, brown, gold
- scrap of old blue jeans approx 8″ x 10″
- bandana or other patterned material we used boxer shorts!
- buttons: 3 orange 1 each green, purple, navy blue
- American moss or raffia
- 12 ″ piece of green raffia
- hot glue gun
- pattern
Instructions
Prep
- Paint the top 5 inches of the paint stick with tan or sunflower acrylic paint. Set aside to dry.
- Lay sheet of red felt on work surface and fold in half (greeting card style). Lay the shirt pattern on top of the felt so that the shoulders and neck area line up with the fold. Trace the pattern then cut out, keeping the felt folded. Be sure to cut the neck hole out as well.
- Repeat the above process with the tan felt, laying the hat pattern so that the top of the hat lies along the fold, cut out.
- Cut out a thin strip of brown felt, about 4 inches long, long enough to wrap around the hat (band).
- Cut out a flower from the gold felt.
- Place denim jean material on work surface and fold in half. Trace the pants pattern onto the denim and cut out. It is not necessary to line this up along the fold as with the shirt.
- Cut out two long strips from the denim, about 1 inch wide and 6 inches long each. These will be the cuffs of the pants. Lay the strips right (dark) side facing up, and run hot glue along the top edge. Fold over to adhere and repeat with the other side, making a folded cuff strip. Set aside.
- Cut 7 small squares out of the denim jeans for patches and set aside.
- Cut out a scrap of bandana, boxer shorts, or other patterned material about 5″ square. Set aside.
Assemble
- With shirt still folded; insert the stir stick, painted end at the top, into the neck hole of the shirt. The neck hole of the shirt should cover about an inch or so of the paint. Use hot glue to tack the shirt to the stick just at the neck hole, front and back. DO NOT glue the rest of the shirt yet, you still need to insert moss in the arm holes.
- Take one of the pieces of denim pants and place it over the top of the stir stick, positioned just underneath the bottom of the shirt. When you have it where you want it, tack it in place with hot glue. Take the other piece of denim pants and place it on the other side of the paint stick, lining it up with the one in front. Tack in place with glue. As with the shirt, DO NOT glue the bottom of the pants together or add the cuffs, you still need to insert moss.
- Gather some American moss in your fingers like a bouquet, trim the ends. Hot glue some moss into the arms of the shirt and into the opening of the pant legs. You also need to glue some moss to the top of the paint stick for the hair. Trim if needed.
- Glue the shirt together now that the moss is inserted. Glue the pants together as well. Glue “cuff” in place on the bottom of the pants, glue seams into the back and trim where needed.
- Place folded top of hat at the top of the stir stick and fold into place. Position over the moss, there should be enough room for the scarecrow’s face, about 2″. Glue hat together.
Embellishments
- Glue thin strip of brown fat onto hat as the band, glue seams at the back and trim if needed. Glue flower to the left side of the hat, covering the band and part of the brim. Hot glue a navy blue button to the center of the flower.
- Fold bandana square in half and roll the long end a few times. Tie around scarecrow’s neck to cover up neck hole. Hot glue in place.
- Glue 3 orange buttons down the center of the shirt. Glue four denim patches on the shirt as noted in photo or anywhere you please.
- Tie green raffia around the belt area of the pants, trim the ends and tack with hot glue.
- Glue denim patches, wrong side up, to the pants as noted in photo. Glue a purple and a green button on top of two of the patches.
- Use the handle end of a paint brush dipped in white paint to dot on whites of eyes. Use a toothpick dipped into black paint to dot on eyes. Use toothpick dipped in orange paint to draw on a triangle nose. Dip a paintbrush into pink paint, dab off excess and carefully dot on cheeks. Use black fine tip marker to add eyebrows and a moth, adding a few stitches to the mouth.
Expert Tips & FAQs
You can use any color buttons, or fabrics for that matter, that you like. We have listed the colors we used. Feel free to personalize this project any way you like.

Latest posts by Amanda Davis (see all)
- Swirling Twirling Ladybugs - July 21, 2026
- Drip Tie Dye Backpack - July 17, 2026
- Mini Coastal Clay Houses - July 14, 2026


Louise says
Hi there.. the scarecrow is so cute… want to try to make it – but the shirt and pants pattern will not open…
Can you help me out???
Thanks
Louise
Amanda says
Thanks for letting me know :) I have updated the post and you should be able to click on the pattern link and open it now.
Rena says
CUTE!
nicole says
how cute
Erika says
This is absolutely adorable! I can’t wait to make these.
✿Erika