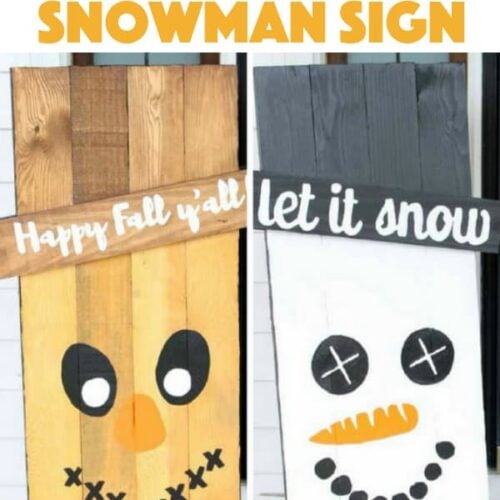
You can make your own DIY reversible scarecrow snowman sign, and it’s actually much easier than it looks! Grab your supplies and get professional results with our tips and tricks. We even have the templates for you so that all you have to do is trace!
Before Thanksgiving gets here, be sure to check out our Reversible Wood Slice Chalkboard!

This reversible pallet scarecrow snowman is one of many adorable fall crafts on the blog for the upcoming fall and winter seasons. Another favorite project are these reversible scrap wood pumpkins, you’ll have the cutest house decor on the block whether you choose to make either one of these crafts!
Reversible Scarecrow Snowman Sign
This woodworking project is made with straight cuts only. Even a novice at DIY projects can tackle this one. Just follow the simple step by step instructions below and you will have your own reversible scarecrow snowman sign in no time at all.
Rather buy one than make one? You can find several different styles of this very project right here on Etsy!
Related: Love scarecrows? You might also like this scarecrow mason jar.

Supplies needed to make a reversible scarecrow snowman sign:
- 1×4 boards (I used two that were 1o foot long)
- Saw
- Screws
- Nails
- Wood glue
- Drill or screwdriver
- Hammer
- Brown and gold wood stain
- Outdoor paint in white, black, and orange
- Paintbrushes
- Printable template
- Scissors
- Tape
- Transfer paper (helps to have both black and white)
- Spray sealer

How to make a reversible scarecrow snowman sign:
- Start by cutting your 1×4 boards to size. You want four pieces that are 3 foot long and two pieces that are 18 inches long.
- Lay out your 3-foot boards as shown below with one 18 inch board below it. NOTE: You want the 18-inch board to be at a slight angle. I placed mine approximately 6 inches from the top on one side and 9 inches on the other.

- Add wood glue between the angled board and your 3-foot boards. NOTE: Use scrap pieces to prop up your 3-foot boards and make them flat.
- Add wood screws as shown below (I used two screws per board). The screws should be long enough to go through the first board and about halfway through the second.
- Wipe away any excess glue with a damp rag.

- Add the second 18-inch board directly over the first but on the opposite side.
- Again add wood glue in between this board and the three-foot boards.
- This time use finishing nails to secure the board into place. Again these should be long enough to go through the first board and about halfway into the second. I used two nails per board.
- Wipe away any excess glue with a wet rag.

- Leave the sign laying flat until the glue has completely dried. NOTE: I used a few scrap pieces to prop it up and make sure it was completely flat.

- Once dry, you can start finishing your project. I started with the scarecrow side and a few coats of wood stain. Allow this to dry before adding your painted elements.

- To add the painted elements, cut around each one on the printed template.
- Lay into place on the sign.
- Add transfer paper (shiny side down) between the printed paper and the sign.
- Tape into place.

- Use a pen to go around all lines.
- Lift the template and transfer paper away and you are left with lines on your surface.

- Use those as guidelines to paint your sign.
- Repeat with all elements. NOTE: I used anywhere from 2 to 4 coats of paint on each of the elements depending on the paint color. Be sure to dry in between coats and add as many as it takes to cover your surface.

- Repeat all of the elements on the fall side before continuing to the opposite side. Allow to dry completely before flipping.
- Repeat all of the same steps for the snowman side of your reversible sign.

- Paint the edges of your sign as well (I used black paint). This will be outside so you want to be sure that all surfaces are well covered with at least two coats of a high-quality coating that is rated for outdoor use.
- Allow your finished project to dry completely then finish off with a few coats of spray sealer for additional protection.
- Allow to dry then add this reversible sign to your outdoor decor for fall and winter.
You will love this project leaned up beside your front door. Any project that can be left out for two full seasons is a winner in my book!

Will you be making your own reversible scarecrow snowman sign for fall and winter? Follow our super simple instructions and you will have your own version in an afternoon.
For another fun fall craft idea, try these craft stick scarecrows made with wine corks, or for a winter craft, check out these adorable snowman ornaments. Check out all of my adult-friendly craft ideas! Happy crafting!

Reversible Fall and Winter Sign
Supplies
- 1x4 boards I used two that were 10 foot long
- Saw
- Screws
- Nails
- Wood glue
- Drill or screwdriver
- Hammer
- Brown and gold wood stain
- Outdoor paint in white black, and orange
- Paint brushes
- Printable template
- Scissors
- Tape
- Transfer paper helps to have both black and white
- Spray sealer
Instructions
- Start by cutting your 1x4 boards to size. You want four pieces that are 3 foot long and two pieces that are 18 inches long.
- Lay out your 3 foot boards as shown below with one 18 inch board below it. NOTE: You want the 18 inch board to be at a slight angle. I placed mine approximately 6 inches from the top on one side and 9 inches on the other.
- Add wood glue between the angled board and your 3 foot boards.
- Add wood screws as shown below (I used two screws per board). The screws should be long enough to go through the first board and about half way through the second.
- Add the second 18 inch board directly over the first but on the opposite side.
- Again add wood glue in between this board and the three foot boards.
- This time use finishing nails to secure the board into place. Again these should be long enough to go through the first board and about half way into the second. I used two nails per board.
- Leave the sign laying flat until the glue has completely dried. NOTE: I used a few scrap pieces to prop it up and make sure it was completely flat.
- Once dry, you can start finishing your project. I started with the scarecrow side and a few coats of wood stain. Allow this to dry before adding your painted elements.
- To add the painted elements, cut around each one on the printed template.
- Lay into place on the sign.
- Add transfer paper (shiny side down) between the printed paper and the sign.
- Tape into place.
- Use a pen to go around all lines.
- Lift the template and transfer paper away and you are left with lines on your surface.
- Use those as guidelines to paint your sign.
- Repeat with all elements. NOTE: I used anywhere from 2 to 4 coats of paint on each of the elements depending on the paint color. Be sure to dry in between coats and add as many as it takes to cover your surface.
- Repeat all of the element on the fall side before continuing to the opposite side. Allow to dry completely before flipping.
- Repeat all of the same steps for the snowman side of your reversible sign.
- Paint the edges of your sign as well (I used black paint). This will be outside so you want to be sure that all surfaces are well covered with at least two coats of a high quality coating that is rated for outdoor use.
- Allow your finished project to dry completely then finish off with a few coats of spray sealer for additional protection.
- Allow to dry then add this reversible sign to your outdoor decor for fall and winter.
This post originally appeared here on Aug 16, 2017.
- Mason Jar Bird Feeder - January 9, 2026
- Fall Mason Jars - September 16, 2025
- Burlap Stenciled Pillow Covers - May 16, 2025


Scarlet says
I love this super cute holiday season diy sign and it is even better that you can use it as both scarecrow and snowman. It was smart to make it reversible. Very clever indeed.
Marie says
This is beautiful! I love that you went with a natural wood stain on the scarecrow side. It adds that rustic touch that is perfect for autumn. Thanks for the tutorial!
Amanda Formaro says
So glad you like it Marie! Thanks!
Michelle Leslie says
Ingenious Amanda and just look at those cute little faces. I’d love to try figure out what to paint for Spring and Summer so they can stay out all year long. Maybe a cute scarecrow? I really. really like this idea. Thanks so much
Amanda Formaro says
What a great idea and you’ve really got me wracking my brain on what would be good for spring and summer. Maybe a yellow chick and a …. ?
Susan says
So charming and I love that you get two holidays in one decoration (less storage space needed!). Thanks for sharing at the This Is How We Roll Link Party.
Jess says
HA! What a neat idea!!
I would love for you to share this with my Facebook Group for recipes, crafts, tips, and tricks: https://www.facebook.com/groups/pluckyrecipescraftstips/
Thanks for joining Cooking and Crafting with J & J!
Courtney @ Pop It Up Girl says
So clever! You could totally do this for other holidays too! Love it!
Roseann Hampton says
What a great idea! I love when I find things that I can use more than once a year!
Jodie says
LOVE this – GREAT use of time & space & supplies + it makes decorating easier, just flip it over!
come share at Reader Tip Tuesday: http://www.jodiefitz.com/2017/08/22/reader-tip-tuesday-party-crafts-recipes/
Have a GREAT day