• Home
  • About
    • About Crafts by Amanda
    • Visit Our Recipe Site
  • Work With Us
  • Join
    • Free Newsletters
    • Join our Facebook craft group
↑
  • Tutorials
    • Tutorial Index
    • Adult Crafts
    • Crafts for Kids
    • Crafts for Seniors
    • Recycled Crafts
    • Seasonal Crafts
    • Holiday Crafts
    • Free Printables
    • Craft Collections
  • Adult Crafts
    • Bath & Body
    • Beach Crafts
    • Clay Pot Crafts
    • Crafts for Seniors
    • Decoupage Crafts for Adults
    • DIY Gift ideas
    • Garden Crafts
    • Home Decor Projects
    • Kitchen Crafts
    • Light Bulb Crafts
    • Luminary Crafts
    • Mason Jar Crafts
    • Needlework
    • Photo Display Ideas
    • Recycled Crafts for Adults
    • Wearable Crafts for Adults
  • Crafts for Kids
    • Animal Crafts for Kids
    • Back to School Crafts
    • Beach Crafts for Kids
    • Camp Crafts
    • Cardboard Tube Crafts for Kids
    • Decoupage Crafts for Kids
    • Easy Crafts for Kids
    • Nature Crafts for Kids
    • Other Kid’s Crafts
    • Paper Plate Crafts for Kids
    • Recycled Crafts for Kids
    • Slimes, Doughs, & Clay
    • Wearable Crafts for Kids
  • Holiday Crafts
    • 4th of July Crafts
    • Christmas Crafts
    • DIY Gift ideas
    • Earth Day Crafts
    • Easter Crafts
    • Father’s Day Crafts
    • Halloween Crafts
    • Memorial Day Crafts
    • Mother’s Day Crafts
    • New Year’s
    • Other Holidays
    • Patriot Day Crafts
    • St. Patrick’s Day Crafts
    • Thanksgiving Crafts
    • Valentine’s Day Crafts
  • Seasonal Crafts
    • Winter Crafts
    • Spring Crafts
    • Summer Crafts
    • Fall Crafts
  • Skip to primary navigation
  • Skip to main content
  • Skip to primary sidebar
  • Skip to footer

Crafts by Amanda

crafts for adults and kid's crafts

  • Tutorials
    • Tutorial Index
    • Adult Crafts
    • Crafts for Kids
    • Crafts for Seniors
    • Recycled Crafts
    • Seasonal Crafts
    • Holiday Crafts
    • Free Printables
    • Craft Collections
  • Adult Crafts
    • Bath & Body
    • Beach Crafts
    • Clay Pot Crafts
    • Crafts for Seniors
    • Decoupage Crafts for Adults
    • DIY Gift ideas
    • Garden Crafts
    • Home Decor Projects
    • Kitchen Crafts
    • Light Bulb Crafts
    • Luminary Crafts
    • Mason Jar Crafts
    • Needlework
    • Photo Display Ideas
    • Recycled Crafts for Adults
    • Wearable Crafts for Adults
  • Crafts for Kids
    • Animal Crafts for Kids
    • Back to School Crafts
    • Beach Crafts for Kids
    • Camp Crafts
    • Cardboard Tube Crafts for Kids
    • Decoupage Crafts for Kids
    • Easy Crafts for Kids
    • Nature Crafts for Kids
    • Other Kid’s Crafts
    • Paper Plate Crafts for Kids
    • Recycled Crafts for Kids
    • Slimes, Doughs, & Clay
    • Wearable Crafts for Kids
  • Holiday Crafts
    • 4th of July Crafts
    • Christmas Crafts
    • DIY Gift ideas
    • Earth Day Crafts
    • Easter Crafts
    • Father’s Day Crafts
    • Halloween Crafts
    • Memorial Day Crafts
    • Mother’s Day Crafts
    • New Year’s
    • Other Holidays
    • Patriot Day Crafts
    • St. Patrick’s Day Crafts
    • Thanksgiving Crafts
    • Valentine’s Day Crafts
  • Seasonal Crafts
    • Winter Crafts
    • Spring Crafts
    • Summer Crafts
    • Fall Crafts
Craft Tutorials | Seasonal Crafts | Fall Crafts | Craft Stick Scarecrows
Fall Crafts

Craft Stick Scarecrows

Author by Amanda Davis on October 7, 2011 Updated on August 21, 2022

4.60 from 5 votes
Jump to Project
656 shares
  • Share
  • Tweet
  • Flipboard
  • Email

craft stick scarecrows


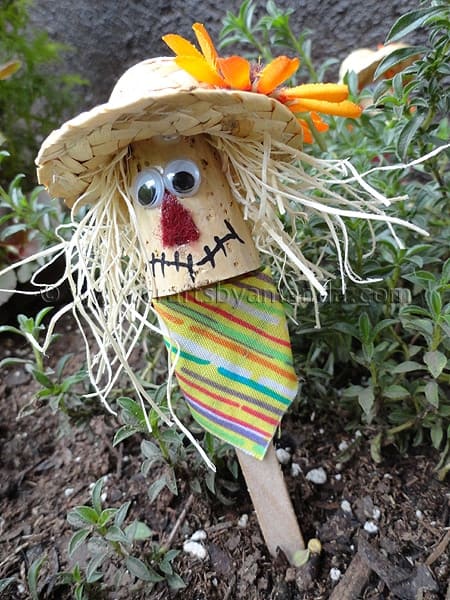
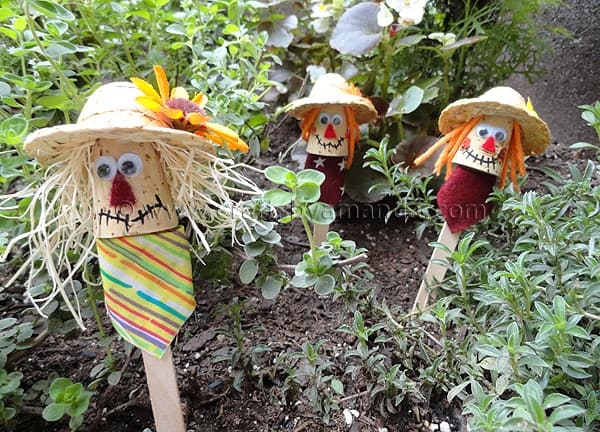
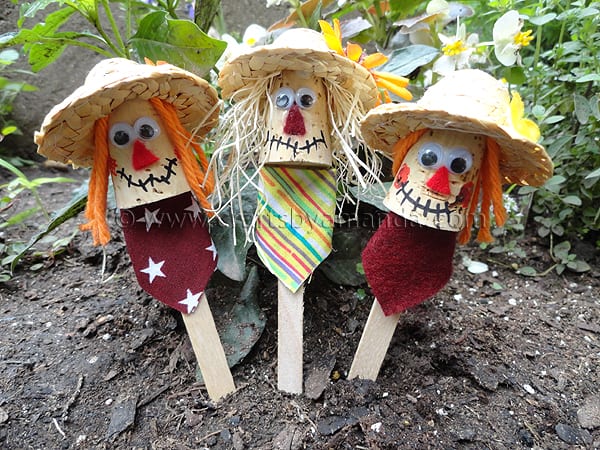
Scarecrows are synonymous with autumn. Making fall crafts with your kids needs to include some of these cuties! Using some craft sticks, corks and mini straw hats, you can make these cute little craft stick scarecrows. Use them as plant pokes, puppets or stick them in some Styrofoam to hold them up.
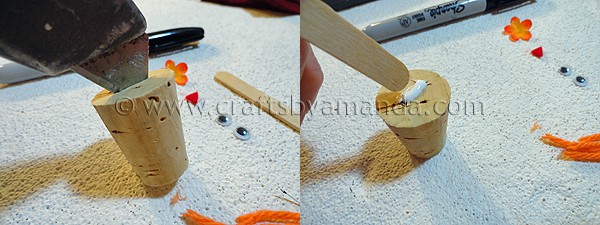
The first thing you need to do is cut a slit in the wide end of the cork. Grown ups should handle a craft knife or box cutter, but kids can do this by poking the cork with a toothpick several times. Line that slit with some white craft glue and insert the craft stick.

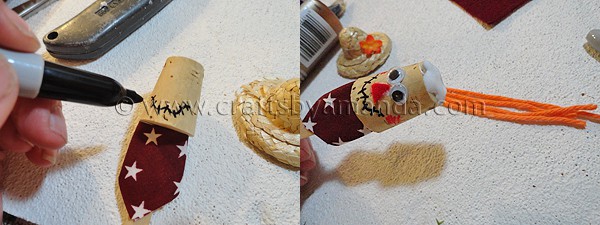
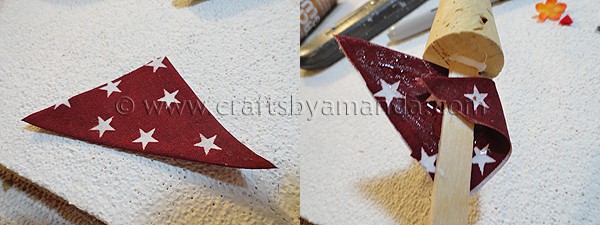
To make the scarecrow’s scarf you’ll need a piece of fabric, about 2 inches square. Fold it in half to make a triangle and glue it together. Then wrap it around the craft stick neck and glue in the back.

You can use a Sharpie marker to draw on a stitched smile, then glue on googly eyes and a triangle scrap of orange felt.

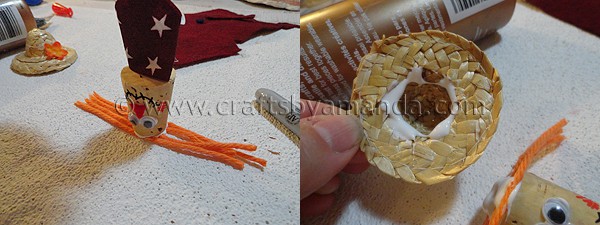
Take cut pieces of yarn and line them up next to each other, put white glue on top of the cork head, then turn upside down to stick the head to the yarn. Put some glue inside the rim of the hat and add it to the head.
Here’s a printable version for you. Have fun!

Psst! Here’s something fun for the kids.. a paper bag scarecrow! And another cool project is this reversible scarecrow snowman sign!

More Scarecrow Crafts

  • Paint Stick Scarecrow
  • Cardboard Tube Scarecrow
  • Coffee Can Scarecrow
Print Project
4.60 from 5 votes

Craft Stick Scarecrows

Author: Amanda Formaro

Supplies

For each scarecrow:

  • 1 craft stick
  • 1 cork available at craft stores
  • 1 miniature straw hat
  • 2 wiggle eyes
  • Scraps of felt and/or material
  • Yarn raffia or American Moss
  • Small silk flowers
  • White craft glue
  • Instant grab glue
  • Scissors
  • Sharpie markers
  • Craft knife or toothpick

Instructions

  • Holding cork with the widest end facing upward, use the craft knife to make a slit that the craft stick will fit into. You can also do this with a toothpick if you are concerned about the sharp aspect of a craft knife. Pipe a bit of white craft glue into the slit and insert the craft stick. Set aside.
  • Cut a scrap of fabric or felt to about 2-inches square. Fold in half to form a triangle and glue together with instant grab glue. Cover one side of triangle with instant grab glue and attach to the front of the craft stick just below the cork (head). Fold the ends of the triangle around to the back and press together to adhere glue.
  • Use a Sharpie marker to add a mouth, glue a small triangle of felt on as the nose, and add the wiggle eyes. Optionally, you can use a pink or red marker to add rosy cheeks as well.
  • Cut yarn (or raffia, etc) into four pieces, each 3-inches long. Line them up side by side. Cover the top of the head with white craft glue and turn upside down, pressing the top of the head (cork) onto the pieces of yarn. This will pick up all four pieces a the same time. Turn right side up and add more craft glue on top of the yarn and inside the straw hat. Press the hat onto the head. Glue a silk flower to the hat.

Expert Tips & FAQs

You can use yarn, raffia, or straw for the scarecrow's hair. In a pinch, strips of construction paper or felt will work great too!


');

  • Author
  • Recent Posts
Amanda Davis
Amanda Davis is the crafty, entrepreneurial mother of four children. She loves to bake, cook, make kid's crafts and create decorative items for her home. She is a crafting expert and guru in the kitchen and has appeared online and in print publications many times over the years.
Latest posts by Amanda Davis (see all)
  • Mason Jar Aquarium - May 23, 2025
  • Make Bracelets from Recycled T-shirts - May 20, 2025
  • Spring Scavenger Hunt - May 9, 2025
656 shares
  • Share
  • Tweet
  • Flipboard
  • Email

Filed Under: Easy Crafts for Kids, Fall Crafts, Other Kid's Crafts Tagged With: autumn, Craft Stick Crafts, fall, kid's crafts, puppet, puppets, scarecrow

Reader Interactions

Free CraftsBy email every week

Latest crafts straight to your inbox!

Comments

  1. Karen Howard says

    July 31, 2012 at 3:05 am

    These Scarecrows are adorable-I’ll be making some to put into my houseplants for Fall. Thanks.

    Reply
  2. Sara @ Mom Endeavors says

    October 16, 2011 at 4:26 pm

    SO cute! We do themed playdates each month and I think this one might be PERFECT for our November one! :)

    Reply
  3. mindie says

    October 15, 2011 at 3:05 pm

    I love these little scarecrows. I would love for you to share them at my ongoing Fall linky. I also have an anything goes linky, I would love for you to add to your list. Come strut your stuff, fri-monday.

    Reply
  4. Alison says

    October 15, 2011 at 2:25 am

    Darling, as always, Amanda!!

    Reply
    • Amanda Formaro says

      October 18, 2011 at 9:20 pm

      Thank you Alison!

      Reply
  5. pam says

    October 14, 2011 at 1:57 am

    It sure pays to get caught up once and awile! OMG these are so cute i can’t stand it! This is definitely one i will be making! And I pinned! Soo clever and cute! Well done you!

    Reply
    • Amanda Formaro says

      October 15, 2011 at 1:07 am

      Thanks so much Pam!

      Reply
  6. maggy, red ted art says

    October 12, 2011 at 7:36 pm

    Adorable as ever! Very sweet indeed!

    Thanks for linking on Kids Get Crafty!

    Maggy

    Reply
  7. Carissa says

    October 11, 2011 at 8:12 pm

    These are adorable! This would be a great project to make with kids for a container garden.

    I found you through crafterminds and I’m your newest facebook friend and google follower. :-)

    Reply
    • Amanda Formaro says

      October 11, 2011 at 8:58 pm

      Thanks so much Carissa!

      Reply
  8. Ruth says

    October 11, 2011 at 7:58 pm

    I love this idea!!! I can imagine them in all my flower pots!

    Reply
    • Amanda Formaro says

      October 11, 2011 at 8:58 pm

      Thank you Ruth! They are gracing my herb garden now :)

      Reply
  9. breanna says

    October 11, 2011 at 6:45 pm

    i love love LOVE this!!

    Reply
    • Amanda Formaro says

      October 11, 2011 at 8:58 pm

      Thanks so much Breanna!

      Reply
  10. Brittany says

    October 11, 2011 at 3:34 pm

    You always have the cutest ideas! My kids will love this!

    Reply
    • Amanda Formaro says

      October 11, 2011 at 8:59 pm

      Thanks Brittany, so nice of you to say!

      Reply
  11. Wiola says

    October 9, 2011 at 6:42 pm

    Oh sooo cute! :) They make me smile.

    Reply
  12. Linda says

    October 9, 2011 at 4:47 am

    Too cute…thanks for sharing the instructions.. can’t wait to make some..

    Reply
  13. Lana Bisson says

    October 8, 2011 at 9:19 pm

    Oh Amanda… These are precious..I dont drink wine much so how do you go about aquireing wine corks..

    You should link these up to paperissues.com

    Reply
    • Jen says

      November 13, 2011 at 1:10 pm

      Hi!
      We have this awesome store (Trash to Treasure ?) near us where you can collect any and all different kinds of recyclables: corks, tins, glassware, etc. See if you have one in your area. They have awesome finds. For a yearly fee you can return once a month to collect as many little craft items that you like. They greatly appreciate your recyclables too!

      Reply
  14. Katrina says

    October 8, 2011 at 5:41 pm

    So cute!

    Reply
  15. Becky @creatively content says

    October 7, 2011 at 5:30 pm

    These are perfectly clever! Great way to use those corks. Love your ideas
    Amanda.

    Reply
4.60 from 5 votes (1 rating without comment)

Leave a Reply Cancel reply

Your email address will not be published. Required fields are marked *

Rate This Project


The maximum upload file size: 640 MB. You can upload: image, video. Links to YouTube, Facebook, Twitter and other services inserted in the comment text will be automatically embedded. Drop files here

Primary Sidebar

Hi! I’m Amanda and I’m the founder and head designer of Crafts by Amanda. I have spent over 25 years creating projects to share, but it’s not just me anymore! It’s turned into a complete family affair. Come and meet the Creative Team!

Free CraftsBy email every week

Latest crafts straight to your inbox!

All Time Favorites

snowy pinecone candle jar luminaries

Winter Luminaries: Snowy Pinecone…

Make pretty winter luminaries that appear to be covered ... Go To project

Make this wonderful deco mesh pumpkin wreath to hang on your door this fall!

Deco Mesh Pumpkin Wreath…

Adorn your door this fall with a pretty deco mesh ... Go To project

Learn to make these adorable ladybug painted rocks. use special outdoor paint for this adorable garden craft so you can keep garden ladybugs all summer!

Ladybug Painted Rocks…

I'm going to show you how to make these adorable ... Go To project

Reuse those empty prescription pill bottles in all sorts of ways. From organizing to making cookies. Yes, cookies! See how to use your empty pill bottles!

20 Uses for Prescription Pill…

You've been collecting prescription pill bottles for ... Go To project

Meet the Family

Amanda

Founder and Designer

Kristen

Editorial Manager

Lindsay

Social Media Manager

As seen on:

Footer

Favorites

  • Jar Photo Frames
  • No-Sew Roman Shade
  • Paper Flowers
  • How to Make a Scrunchie
  • Mermaid Slime

About

  • Home
  • Meet the Creative Team
  • Work with Us
  • Privacy Policy
  • Accessibility
  • Contact Us

Images/text copyright Amanda Formaro 2020. To feature a post from Crafts by Amanda, you may use one photo credited and linked back directly to the project post.

Free CraftsBy email every week

Latest crafts straight to your inbox!

Copyright ©2025, Crafts by Amanda. All Rights Reserved.
Design by Pixel Me Designs

Rate This Tutorial

Your vote:


To share a photo with your comment click here!

A rating is required
A name is required
An email is required

Recipe Ratings without Comment

Something went wrong. Please try again.